How to Remove the Chat Icon using Group Policy (GPO)
In this guide, I will show you how to remove the chat icon using Group Policy from the Windows 11 taskbar. A GPO can be used to remove the chat icon from domain-joined computers with Active Directory setup.
On a Windows 11 PC, by default, the chat icon is pinned to the taskbar. Along with it, you will find Windows Search, Task View, and Widgets. When you install Windows 11 or upgrade Windows 10 to Windows 11, most users prefer to hide this chat icon.
Although users can hide chat icon from taskbar manually, on Active Directory-joined computers, you can deploy a group policy to remove the chat icon from the taskbar in Windows 11. There are many methods to remove the team chat icon from the taskbar. For example, you can remove Microsoft Teams Chat Icon From Taskbar Using Intune.
Before we proceed further, here are some really useful articles related to GPO:
- How to Block Disable USB devices using Group Policy
- Enable Remote Desktop Using Group Policy (GPO)
- Disable Check for Updates using Group Policy (GPO)
- Configure PUA Protection using Group Policy
- How to Disable Internet Explorer 11 using Group Policy
Methods to disable the Chat icon in Windows 11
There are multiple methods that you can use to hide or disable chat icon from Windows 11 taskbar:
- Manually turn off Chat Icon using Windows 11 Taskbar settings.
- Hide/Disable Chat icon using Windows Registry.
- Deploy a Group Policy to disable Teams chat icon.
- Use a PowerShell script to hide/remove/disable the Chat icon.
- For computers enrolled in Microsoft Endpoint Manager, deploy a profile and remove Teams Chat icon using Intune.
From the above-listed methods, we will use group policy to disable the chat icon on Windows 11 computers.
Download ADMX Templates for Windows 11 21H2
There is a new Group Policy setting to disable the chat icon, and this setting was added with Windows 11 21H2 administrative templates. You must download the ADMX Templates for Windows 11 October 2021 Update [21H2] from the Official Microsoft Download Center.
Copy the files from C:\Windows\PolicyDefinitions on a Windows 11 computer to your central policy store. The Configure Chat Icon GPO setting is part of TaskBar.admx and TaskBar.adml. If you want, you can only update those two files.
Note: If you don’t import the taskbar.admx and taskbar.adml into your central policy store, you will not find the GPO setting to remove the chat icon in GPMC.
Remove the Chat Icon using Group Policy
Let’s look at the steps to remove the chat icon using Group Policy. First, launch the Group Policy Management console on the server. If you are a domain administrator, you can log in to either the domain controller or a member server with GPMC installed.
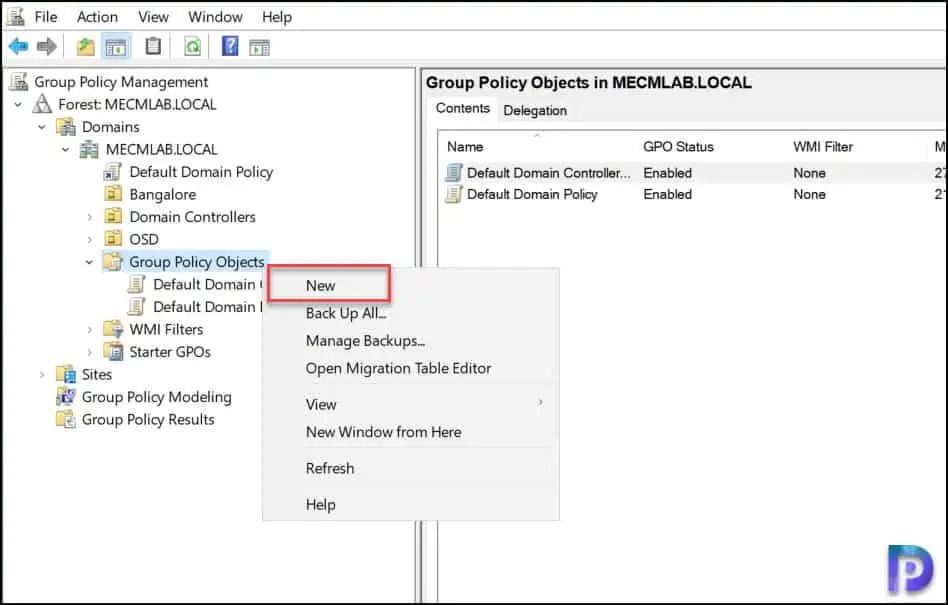
In the Group Policy Management console, expand your domain and navigate to Group Policy Objects. We will first create a new GPO to remove the chat icon and then link this GPO to an OU.
Note: You should not edit the default domain policy in this case, as the settings will apply to the entire domain. The best practice is to create a new GPO and then apply it to a selected OU.
Right click Group policy objects and select New.
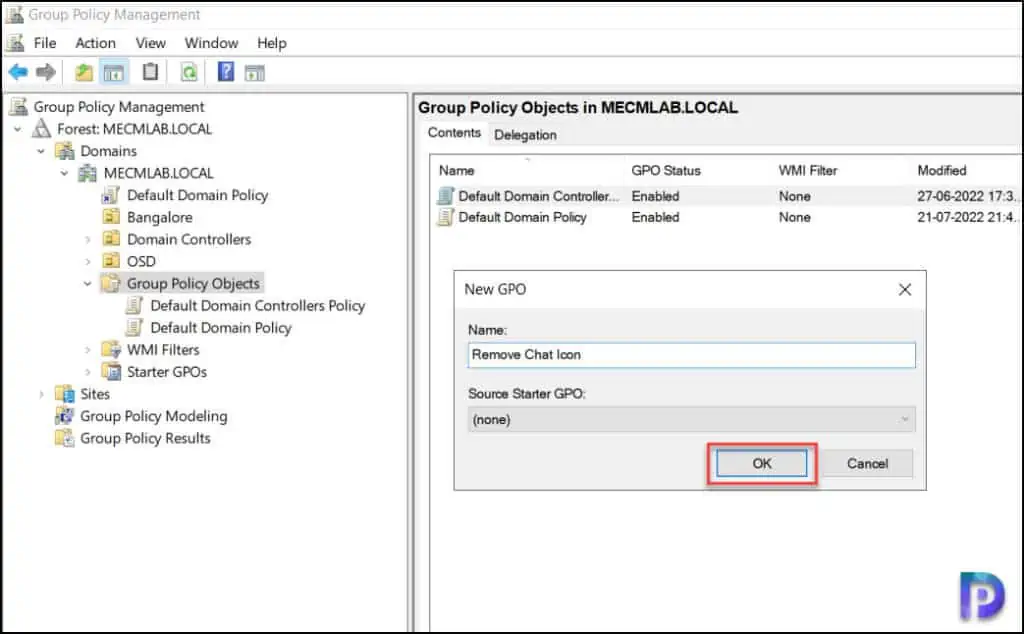
On the New GPO window, enter the GPO name as ‘Remove Chat icon‘ or something similar and click OK.
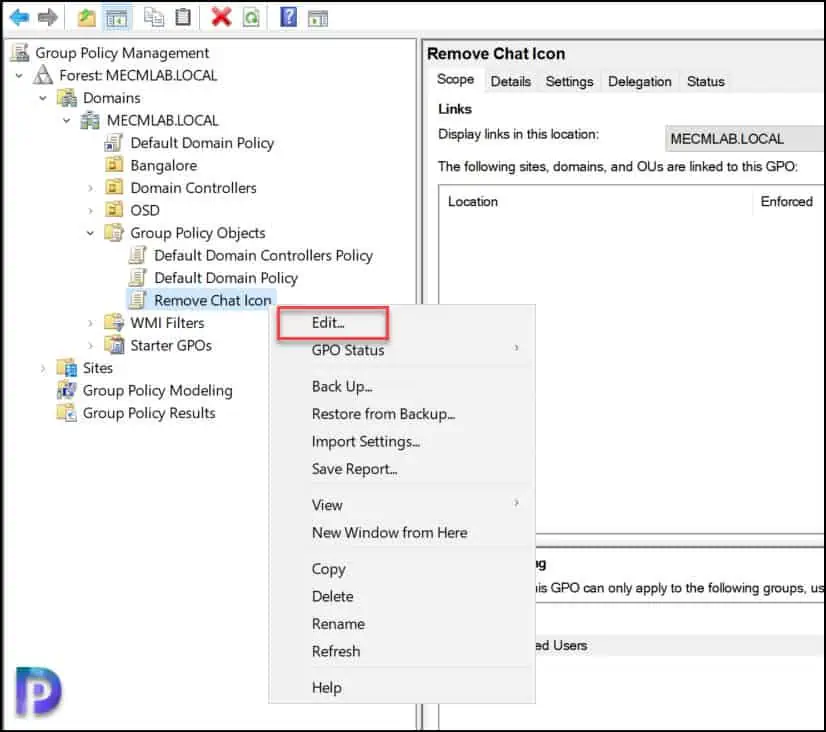
You should find the newly created GPO under Group Policy Objects. Right-click Remove Chat Icon GPO and select Edit.
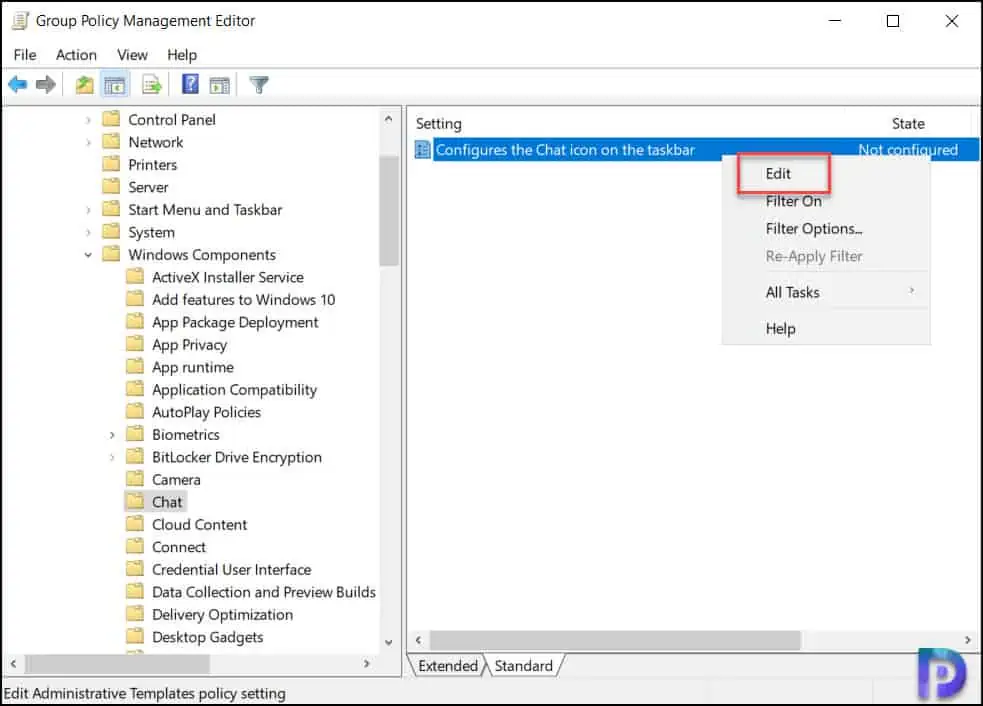
In the Group Policy Management Editor, navigate to Computer Configuration\Administrative Templates\Windows Component\Chat. Here you will find only one policy setting, which is “Configures the Chat icon on the taskbar“. Right-click this policy setting and select Edit.
Configures the Chat icon on the taskbar
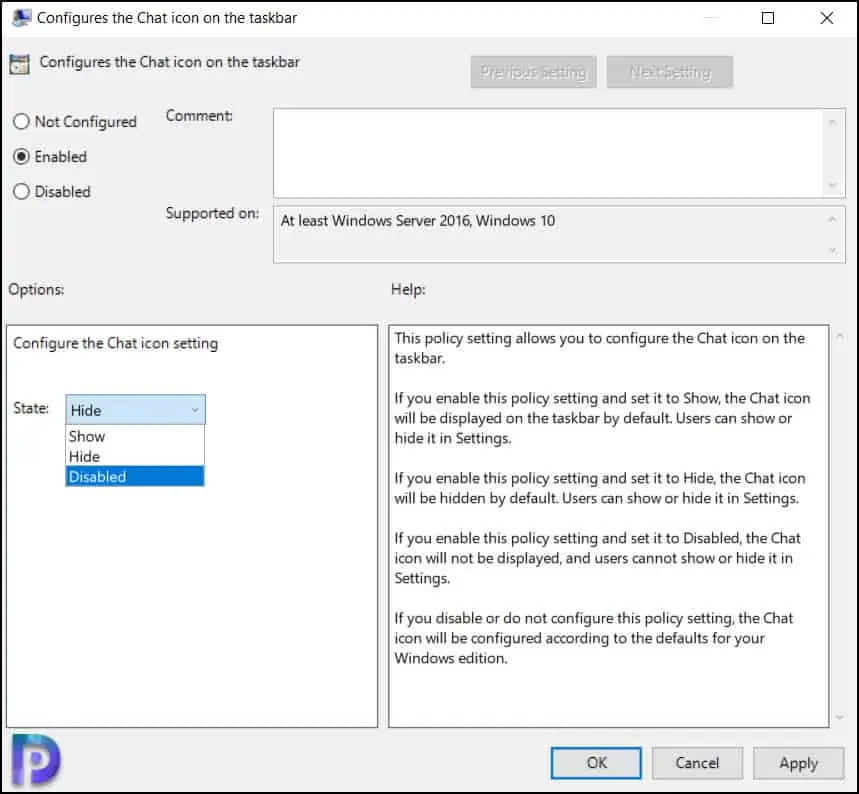
This policy setting allows you to configure the Chat icon on the taskbar. There are three options to choose from when you enable this policy setting.
- Show: If you enable this policy setting and set it to Show, the Chat icon will be displayed on the taskbar by default. Users can show or hide it in Settings.
- Hide: If you enable this policy setting and set it to Hide, the Chat icon will be hidden by default. Users can show or hide it in Settings.
- Disabled: If you enable this policy setting and set it to Disabled, the Chat icon will not be displayed, and users cannot show or hide it in Settings.
For the policy “Configures the chat icon on the taskbar GPO,” select Enabled to enable this setting, and then decide the chat icon state setting. In this example, I am going to select the state as “Disabled.” Click “Apply” and “OK.”
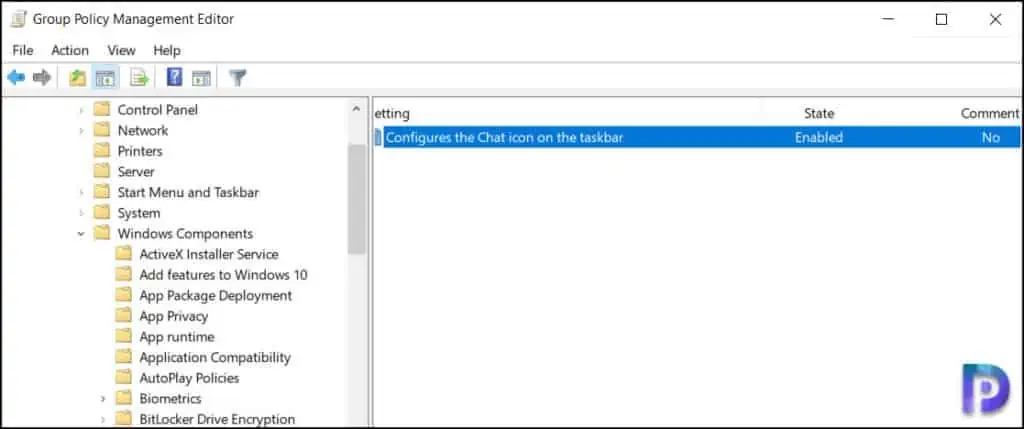
The GPO setting Configures the chat icon on the taskbar is now enabled. Close the Group policy management editor.
Link the GPO to OU
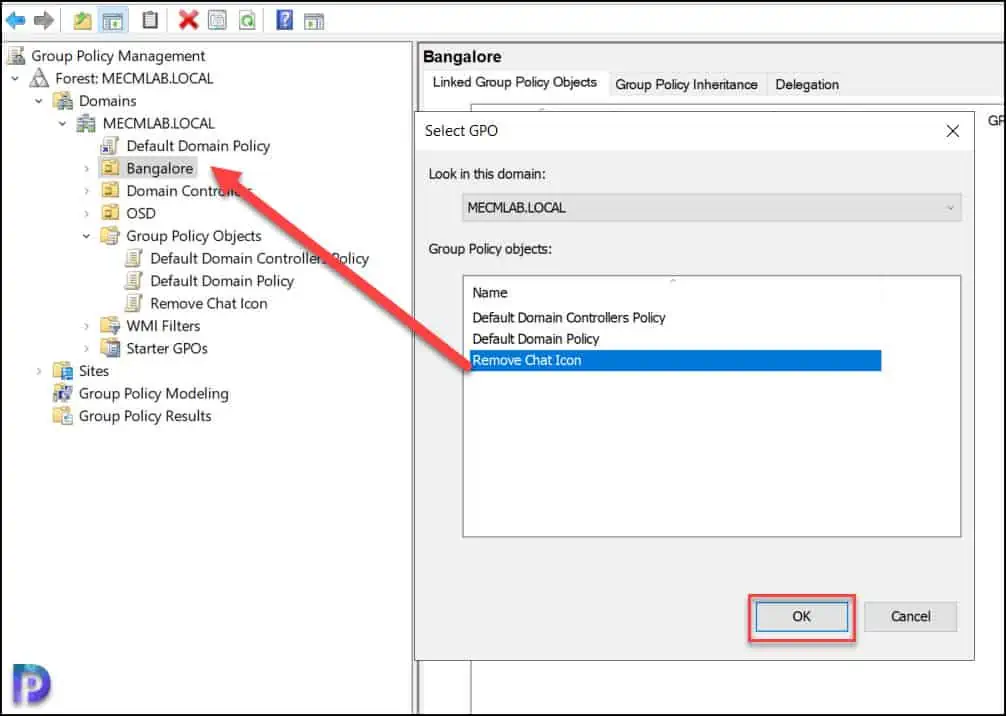
It is necessary to apply or link the GPO that we created in the previous step to an OU. It’s best to test the policy on a small group of computers before expanding it to a larger group, though you can link it to the entire domain if necessary. Right-click an OU in the Group Policy Management console and choose “Link an Existing GPO.”
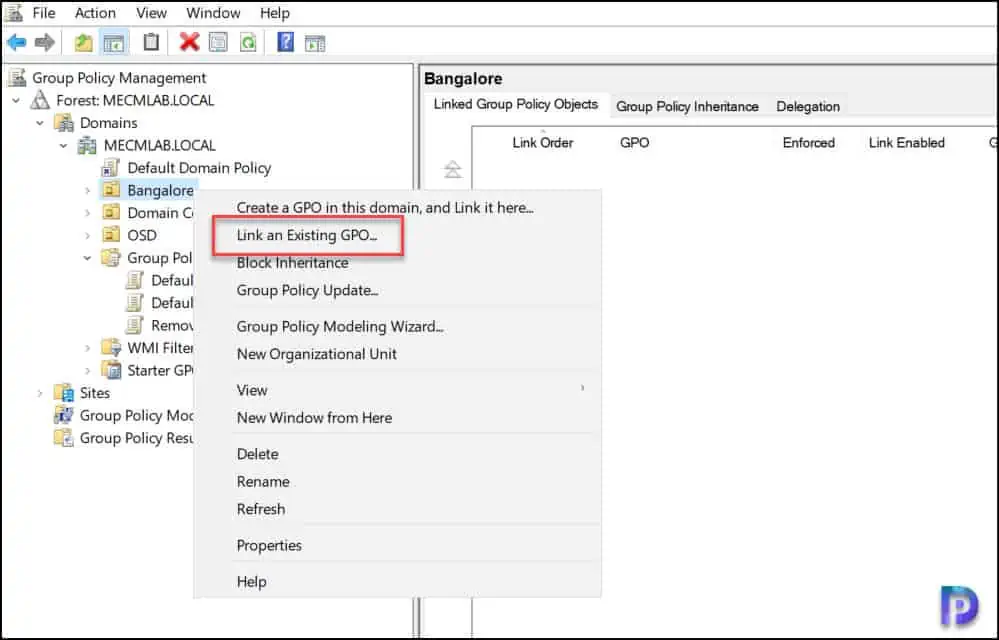
You must select a GPO to link it to the OU. In this case, select Remove Chat Icon GPO and link it to the OU. Click OK.
Verify the GPO on Client Computers
In this step, we will verify if the Remove Chat Icon GPO works on the client computers. By default, the Group Policy refresh interval is 90 minutes, and you may change Group Policy Refresh Interval if required.
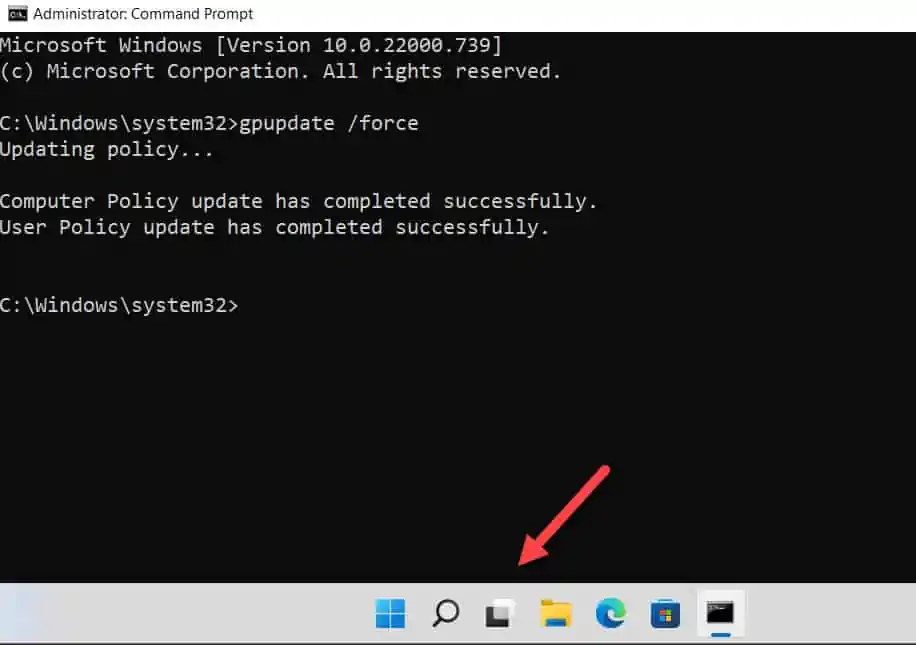
Run the command gpupdate /force on the client computer to force a group policy update. I wrote an article on different methods to update group policy on remote computers, which can be helpful here. On the Windows 11 computer, launch the command prompt as administrator and run the command “gpupdate /force.” This will force an update of all the policies applicable to the computer.
From the below screenshot, we can see that the chat icon is removed from the taskbar after the GPO is applied. This proves that you can use group policy to get remove the chat icon on more than one computer.
