Create Quiet Time Policies in Intune for iOS/iPadOS & Android Apps
In this article, we will show you how to create quiet time policies in Intune for iOS/iPadOS and Android Apps. You can now mute work-related notifications for end users by creating and assigning a quiet time policy in Intune.
The quiet time policy settings in Intune automatically mute Microsoft Outlook email and Teams notifications on iOS/iPadOS and Android platforms. You can use these policies to limit end-user notifications received after work hours.
Although users can disable notifications on their apps manually, Intune can assist you in doing so. If your organization’s users do not want to receive notifications from Outlook and Team apps after work hours, administrators can enable global quiet time settings, which allow you to create policies to schedule quiet time for your end users.
Currently, the quiet policies in Intune are applicable only to Microsoft 365 apps such as Outlook and Teams on iOS/iPadOS and Android. You cannot create a quiet time policy for Windows and macOS devices managed by Intune.
Quiet time policy types in Intune
Before you create quiet time policies in Intune, let’s understand the types of policies available. There are two types of quiet time policies available, and you must choose one when creating the policy. Each policy is listed in the table below, along with a description.
| Quiet Time Policy Type | Description |
|---|---|
| Date Range | This policy type will automatically mute the notifications on iOS/iPadOS and Android apps for Microsoft Outlook email and Teams. |
| Days of the week | This policy type will automatically mute Microsoft Outlook email and Teams notifications on iOS/iPadOS and Android platforms during certain hours or all day on selected days of the week. |
Create Quiet Time Policies in Intune for iOS/iPadOS & Android Apps
Use the following steps to create an iOS/iPadOS and Android quiet time policy in Intune:
- Sign in to the Microsoft Intune Admin center.
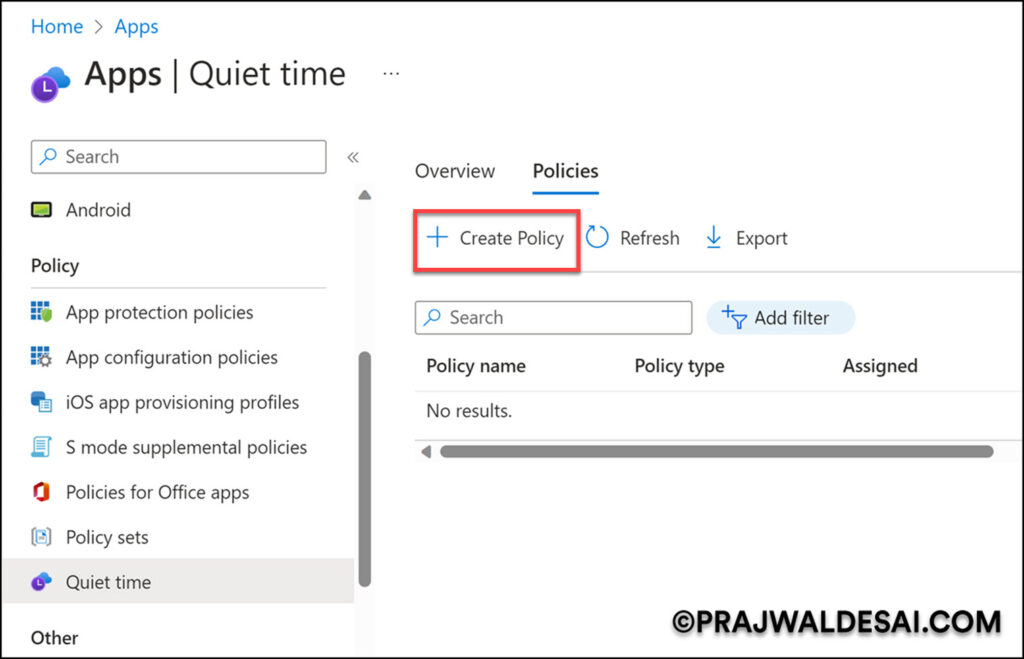
- Select Apps > Quiet Time > Policies.
- Select Create policy to add a new quiet time policy.
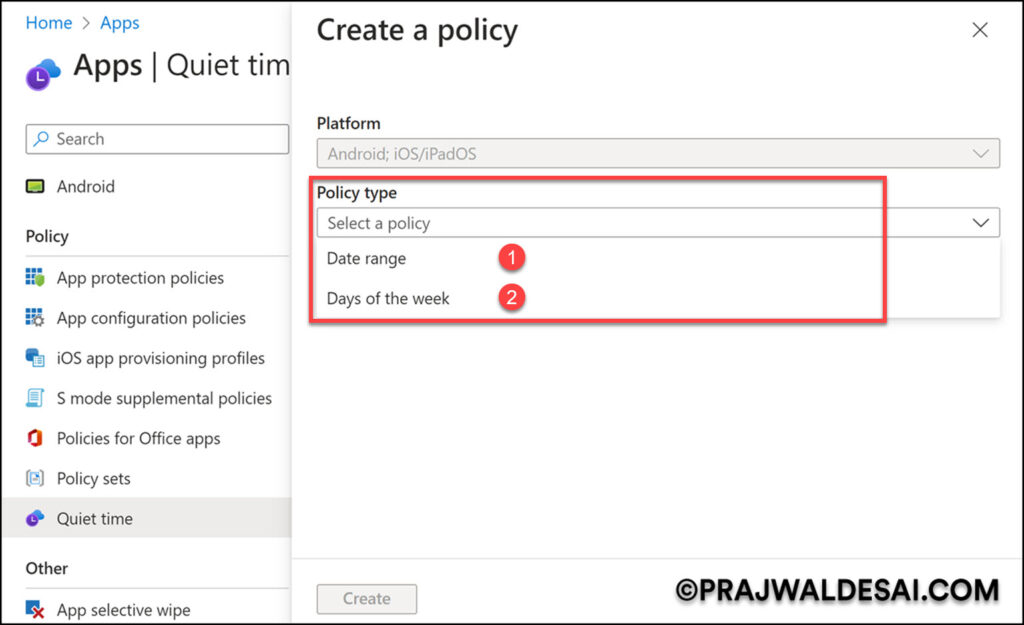
On the Create a Policy window, the platform is set to Android, iOS/iPadOS. For the policy type, click the drop-down, and you’ll see two options. Select one of the policy types based on your requirements.
- Date Range
- Days of the week
In this article, we will explain the quiet time policy configuration settings provided by each policy type. This will assist you in determining the best policy type for deploying the quiet time policies with Intune.
Date Range Policy Configuration Settings
By configuring this policy type, you can automatically mute Microsoft Outlook email and Teams notifications during the specified range.
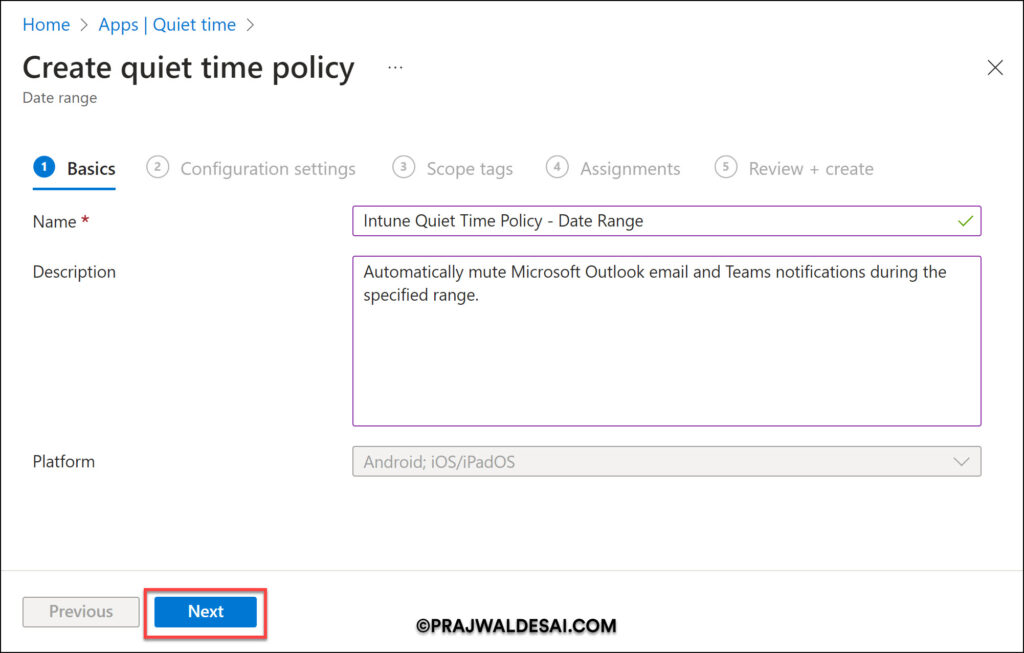
On the Create a Policy window, select the policy type as “Date Range“. On the Basics tab of the Create Quiet Time Policy, specify the profile name as Intune Quiet Time Policy – Date Range. Add a brief description of this policy. Click Next.
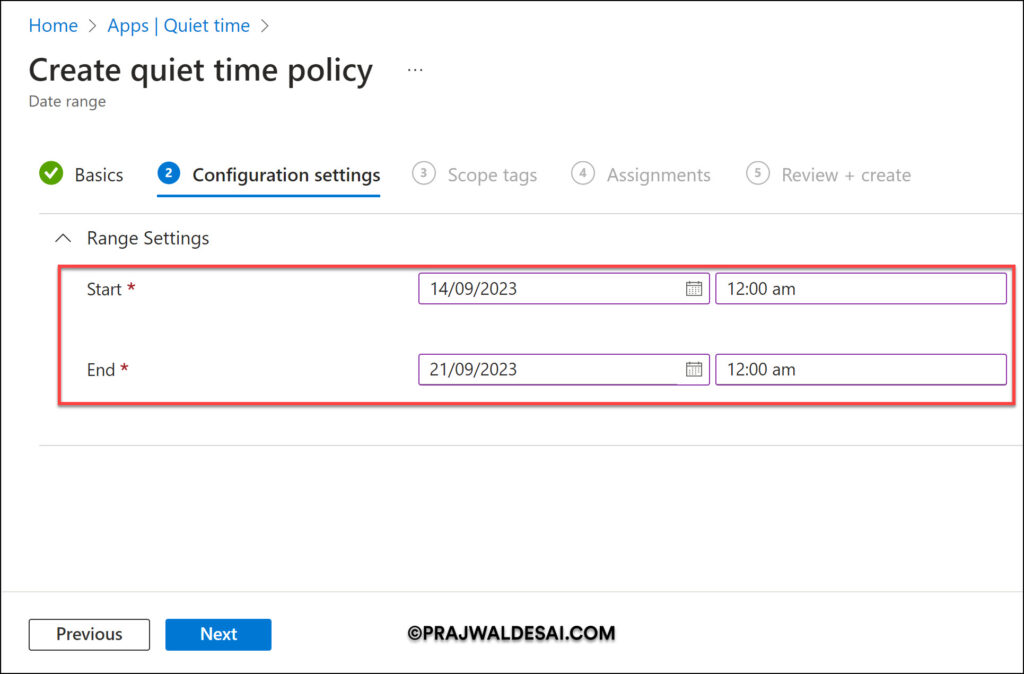
If you select the Date Range policy, it offers the following configuration settings (Range Settings).
- Start Date and Time: Specify the start date and time to mute the notifications.
- End Date and Time: Specify the end date and time to mute the notifications.
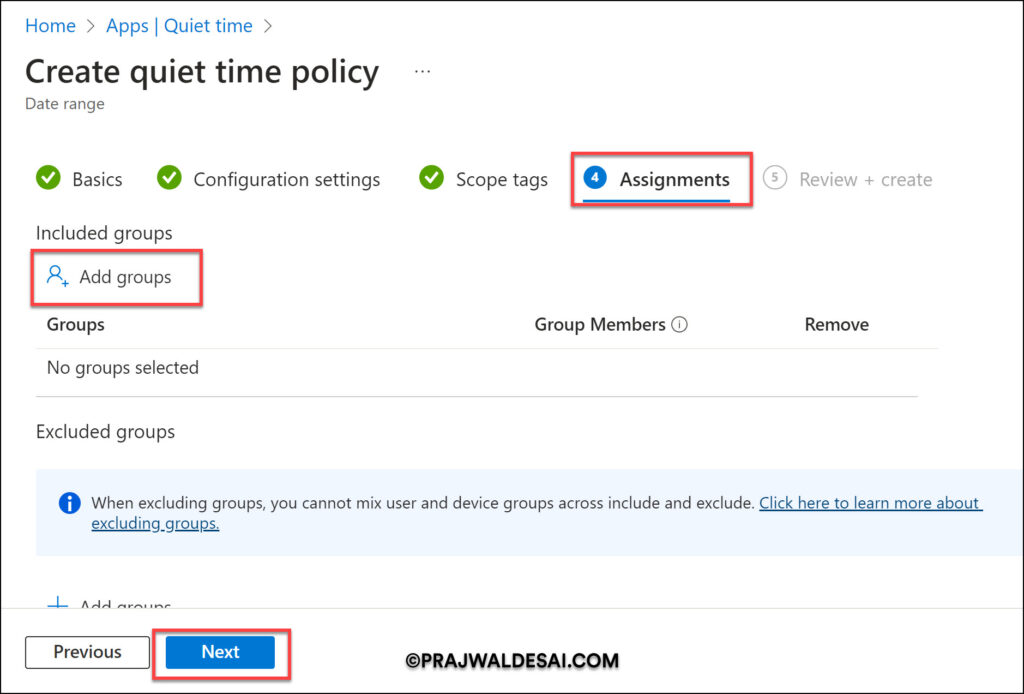
Add the Scope Tags for the quiet time policy and click Next. The Assignments page allows you to assign the app protection policy to groups of users. You must apply the policy to a group of users to have the policy take effect. After adding the Entra ID groups, click Next.
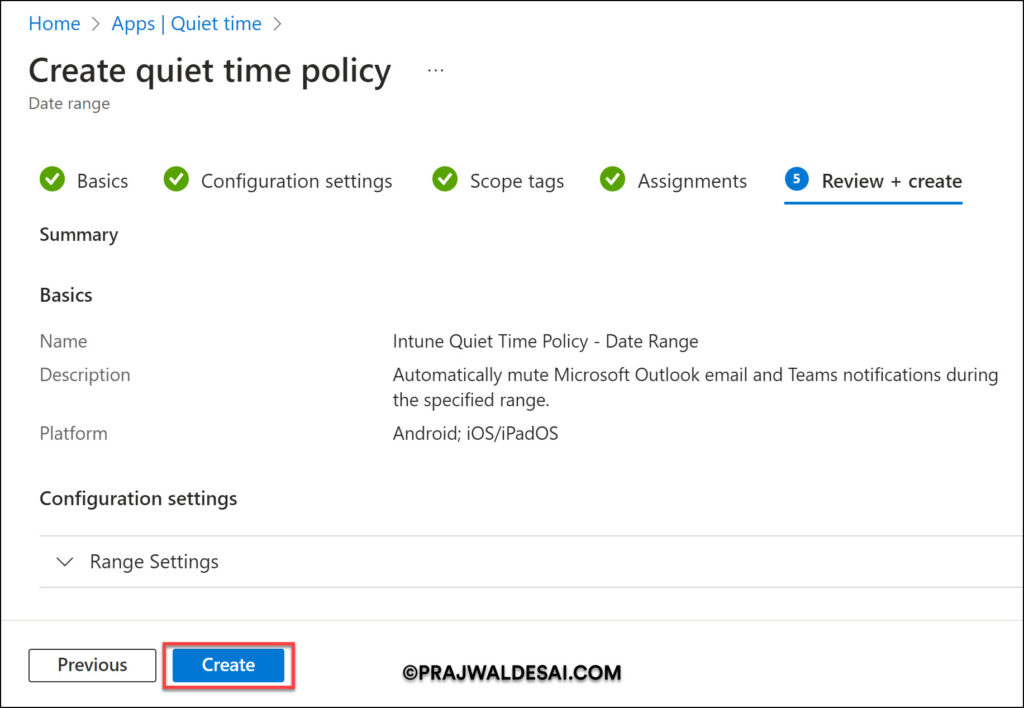
On the Review + Create page, review the values and settings you entered for this quiet time policy.
When you’re ready, click Create to create the quiet time policy in Intune.
Days of the Week Policy Configuration Settings
By configuring this policy type, you can automatically mute Microsoft Outlook email and Teams notifications on iOS/iPadOS and Android platforms during certain hours or all day on selected days of the week.
The Days of the Week policy type offers more configuration settings as compared to the Date Range policy type. Let’s see what configuration settings you get when you select the Days of Week policy type for the Intune quiet time policy.
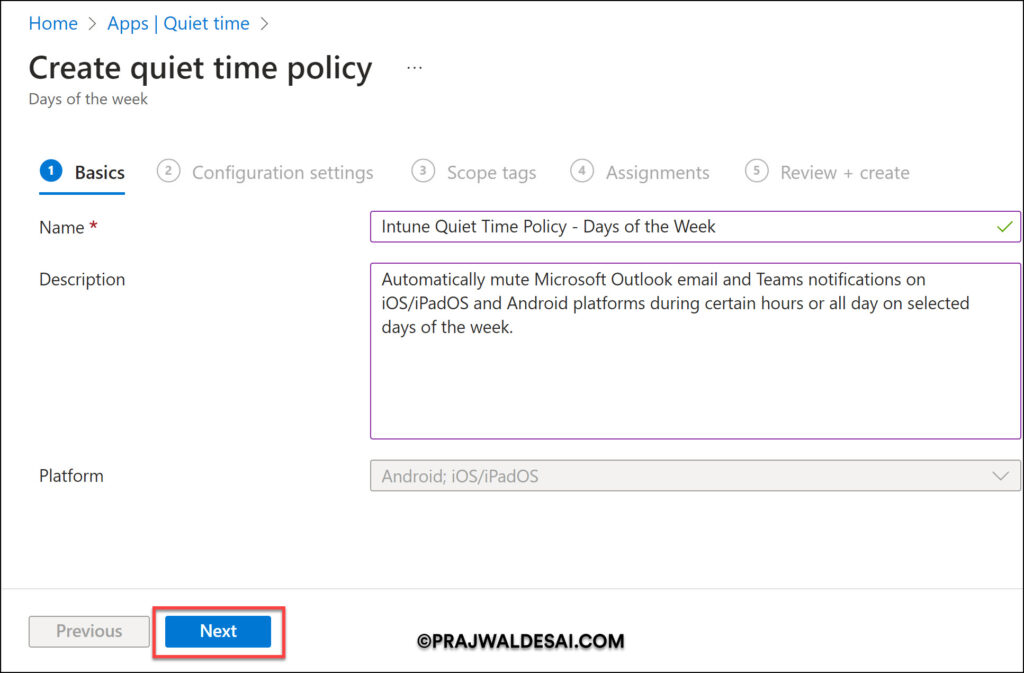
On the Create a Policy window, select the policy type as “Days of the Week.“. On the Basics tab of the Create Quiet Time Policy, specify the profile name as Intune Quiet Time Policy – Days of the Week. Add a brief description of this policy. Click Next.
The Days of Week policy has the following configuration settings sections.
- AllDay
- Certain Hours
- End User Overrides
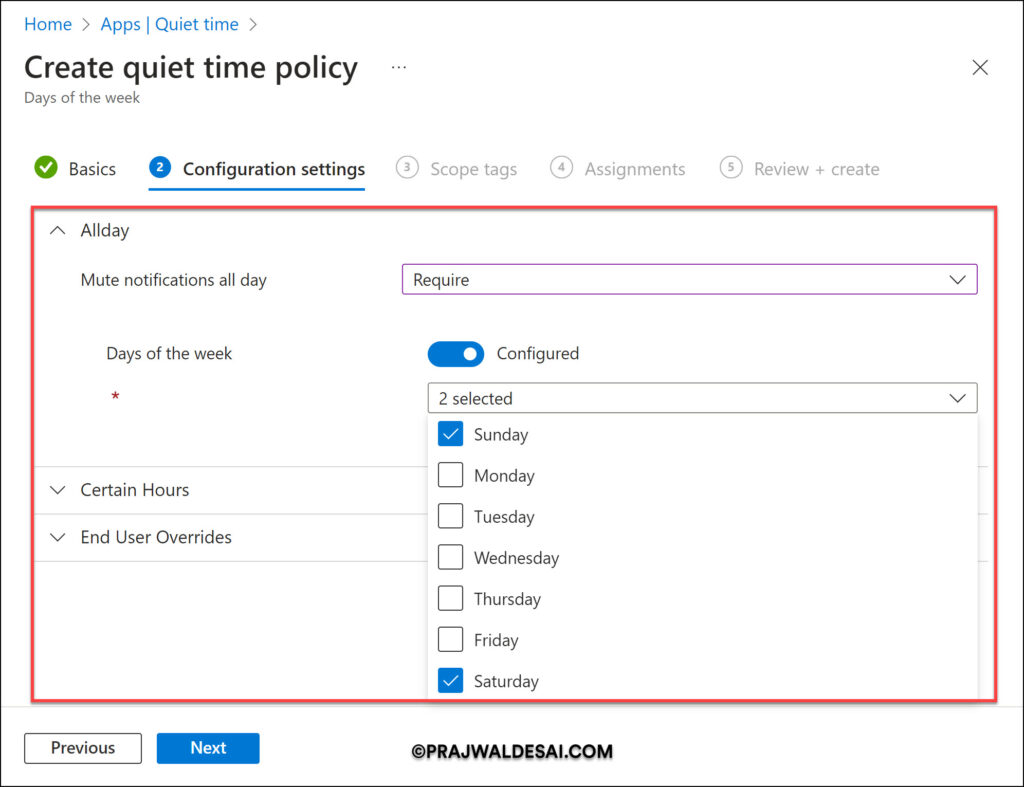
The AllDay configuration setting allows you to mute notifications all day and lets you choose the days of the week as well. This setting is optional, but let’s see what it offers.
- Mute notifications all day: Set this option to Require to mute notifications for a complete 24 hours on specific days of the week.
- Days of the week: Set this option to Configured and then select one or more days of the week that notifications must be muted for a complete 24 hours.
Select the drop-down next to Mute notifications all day and set it to Require. You will now be presented with the Days of the Week setting. Click the drop-down next to it, and you can select the days of the week to mute the app notifications.
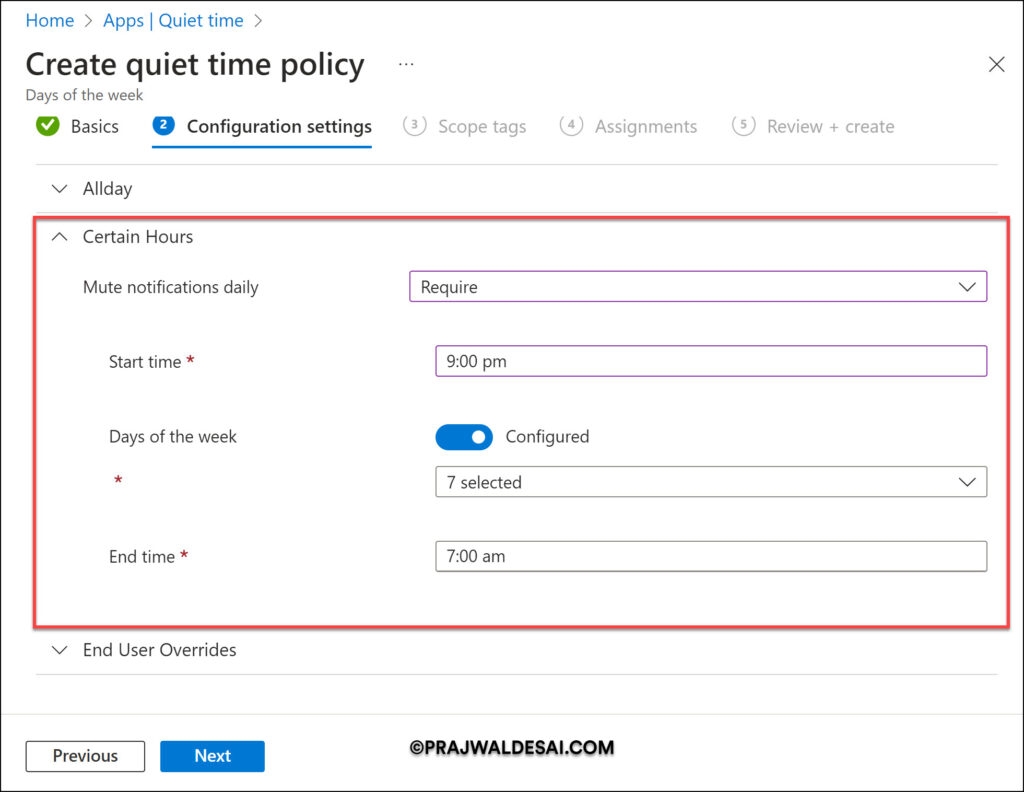
The Certain Hours section offers the following settings when you create an Intune quiet time policy for apps:
- Mute notifications daily: Set this option to “Require” to mute notifications for certain hours on specific days of the week.
- Start time: Choose the start time for muting notifications for certain hours on specific days of the week.
- End time: Select the end time for muting the notifications for certain hours on specific days of the week.
- Days of the week: Set to Configured and then select the days of the week that notifications must be muted for certain hours. You can select all 7 days and mute the notifications for the entire week.
Configure the options based on your organization’s requirements.
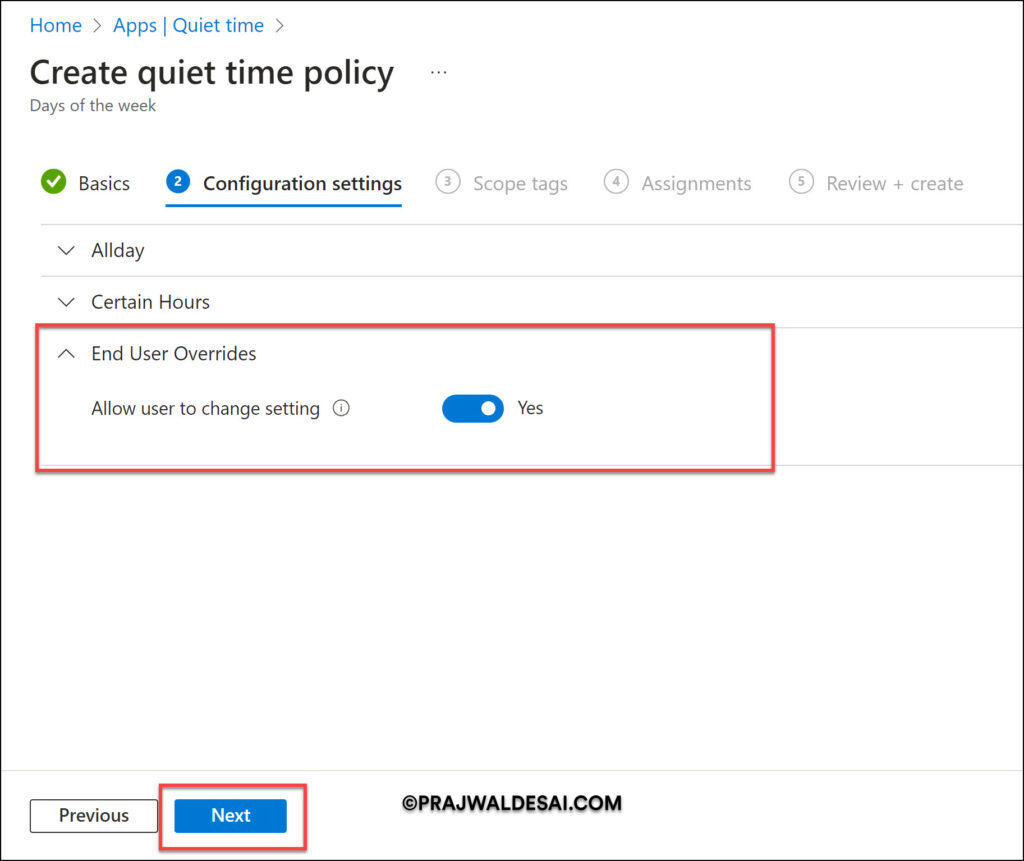
“Allow user to change setting” is the only configuration option in the End User Overrides section. When you select Allow user to change setting to Yes, you allow end users to introduce changes to this setting by editing their global quiet time settings. If you set it to No, you are restricting end users from changing this setting by editing their global quiet time settings.
Once you have configured the quiet time policy settings for your organization, click Next.
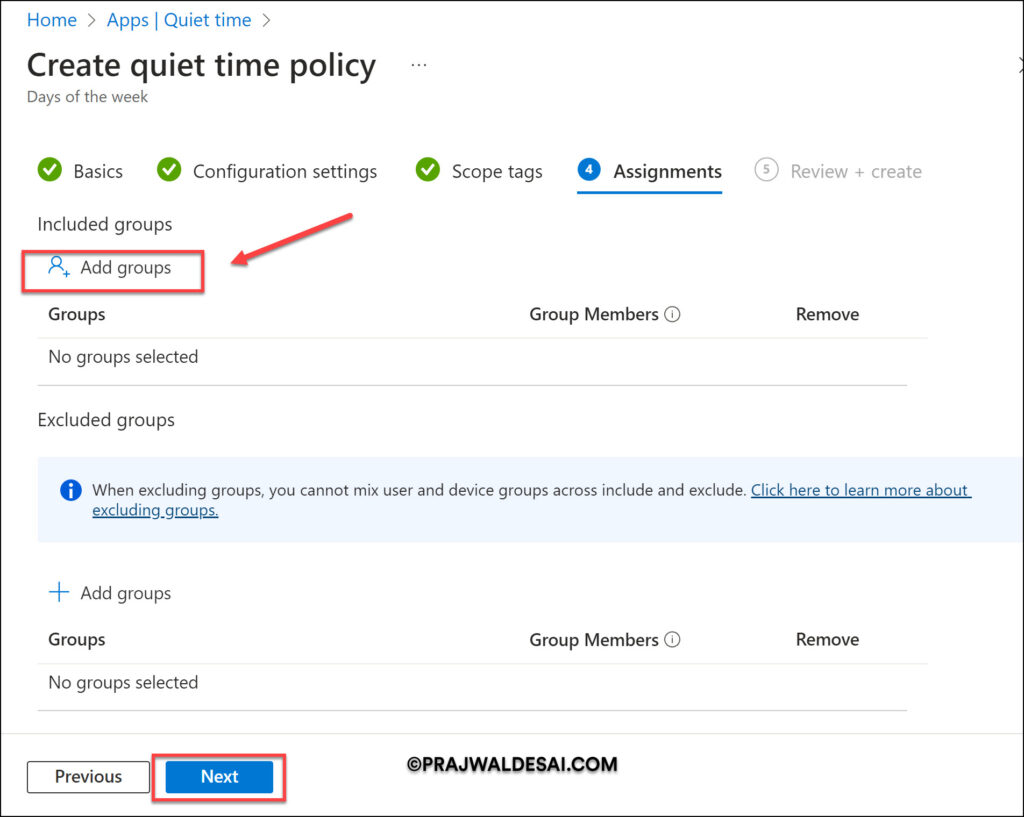
Scope tags are optional, and you may use them if you wish to. Click Next. On the Assignments section, click on +Add groups to include your Entra ID groups to target the quiet time policy. Click Next.
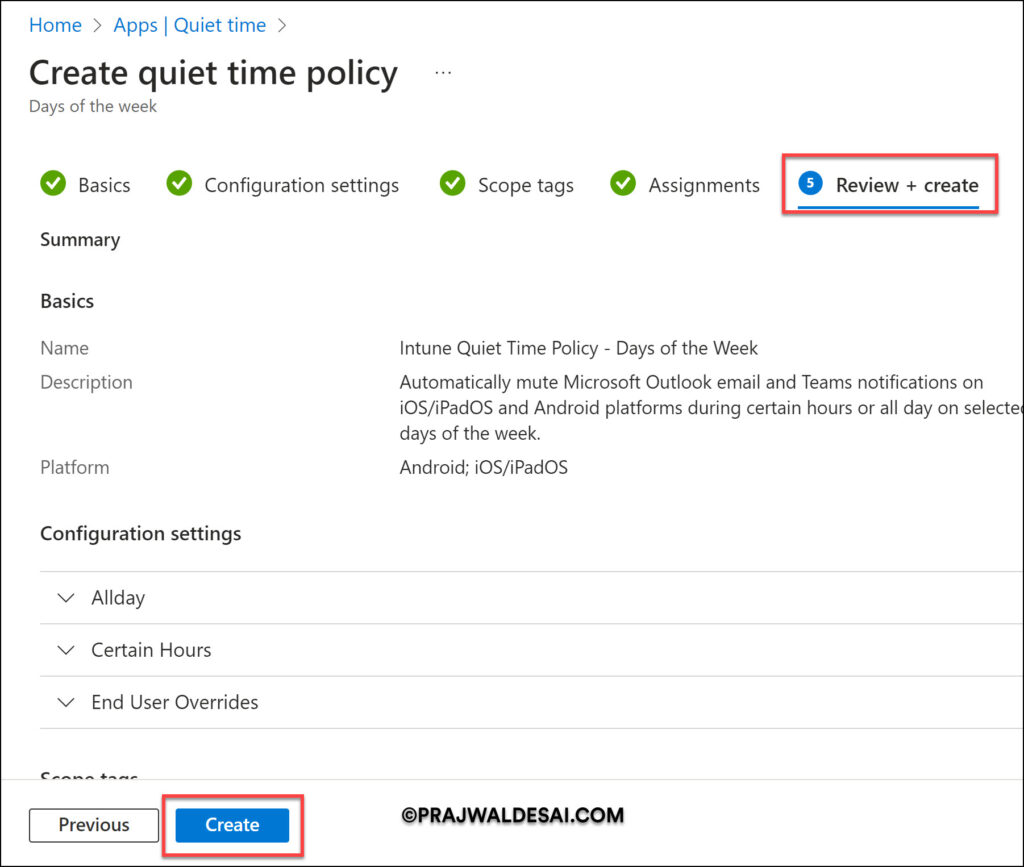
Review the quiet time policy settings for the final time on the Review + Create tab and select Create. This is how you create a quiet time policy in Intune for your iOS/iPadOS and Android Apps.
View Quiet Time Policies in Intune
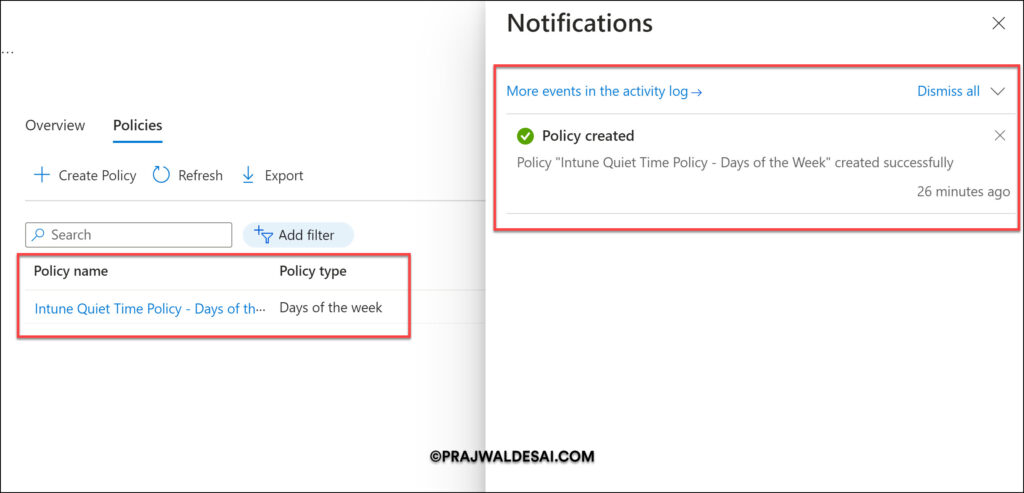
After you create a quiet time policy, you’ll see a notification in the top-right corner of the screen: “Policy Intune Quiet Time Policy created successfully“.
Administrators can create multiple quiet time policies in Intune, and you can view all of them by going to Apps > Quiet Time > Policies.
Edit an existing Quiet Time Policy in Intune
In some cases, you may need to adjust the quiet time policy settings to make significant changes. You can change existing quiet time policies by editing the policy in Intune. However, when you change existing policies, users won’t see the changes for a 24-hour period.
Use these steps to edit existing quiet time policies in Intune:
- Sign in to the Microsoft Intune Admin center.
- Go to Apps > Quiet Time > Policies.
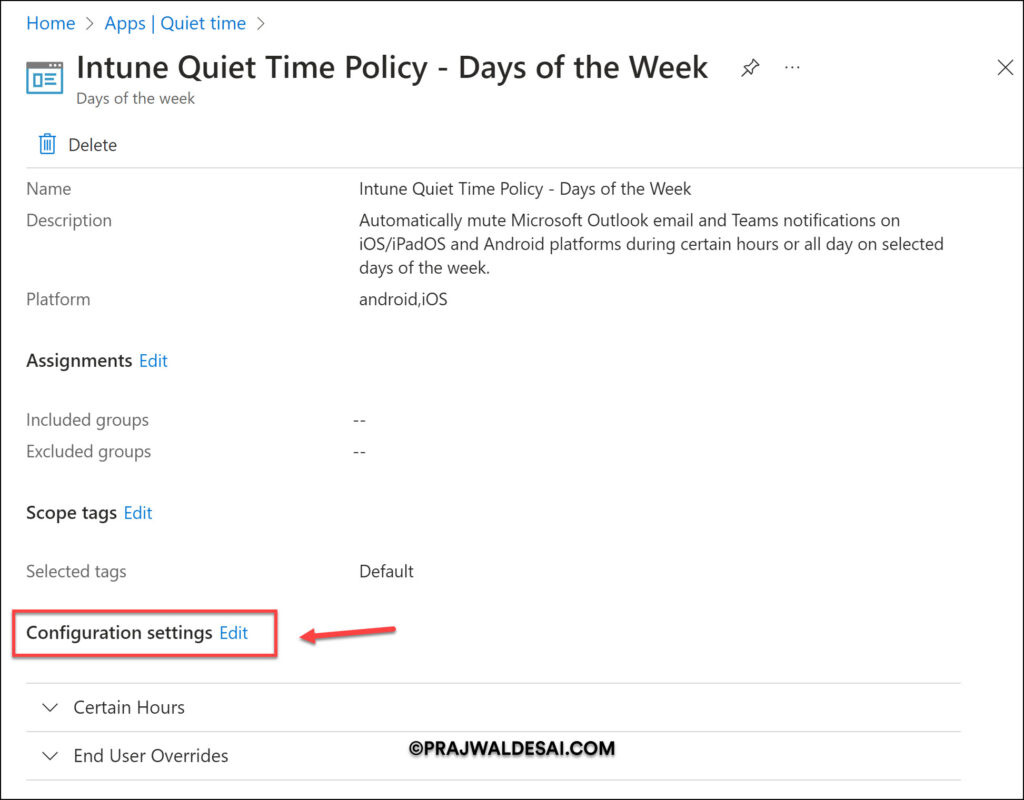
- From the list of policies, select the Quiet Time Policy you want to change, and under Configuration Settings, select Edit.
- After making the changes to the policy, click Save to save your changes.
How to delete Intune Quiet Time Policy
If you have problems with a quiet time policy you created or if you no longer require it, you can safely delete it.
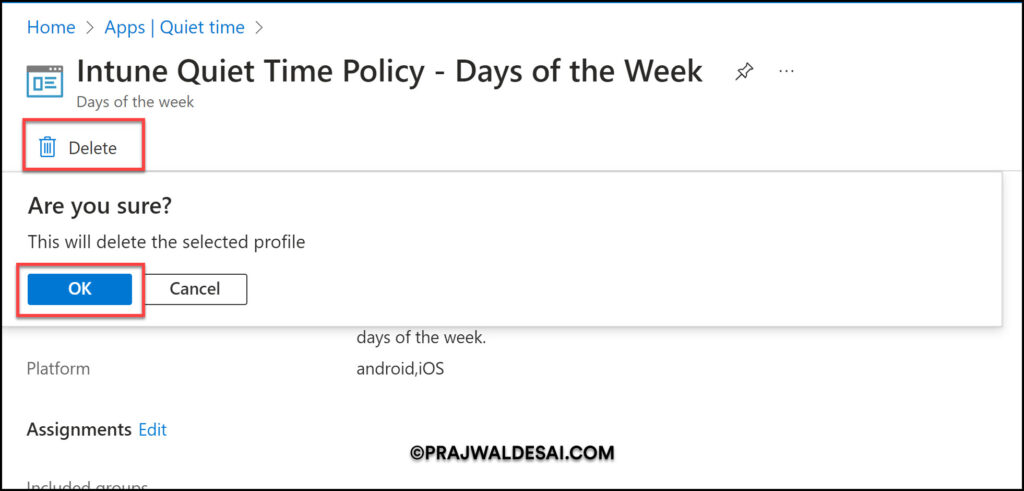
Here’s how you can delete a quiet time policy in Intune: In the Intune admin center, go to Apps > Quiet Time > Policies. Select the policy that you wish to delete and click the Delete button. On the profile deletion confirmation box, click OK to delete the policy.
