How to Rename Administrator Account using GPO (Group Policy)
In this article, I will show you how to rename administrator account using GPO (Group Policy). We will create a GPO and link it to an OU that will rename the local administrator account on domain joined computers.
When you install any Windows operating system, the default administrator account is disabled. You should never log on with the built-in administrator account. You must use your own administrative account instead. Furthermore, you can enable the administrator account using multiple methods. However, it’s not recommended unless you really need to access this account.
Renaming the administrator account will reduce the chance of brute force assaults, enhancing security in your Active Directory network. Group Policy makes it simple to rename the administrator account on all PCs in your AD domain.
Before we proceed further, here are some really useful articles related to GPO:
- How to Block Disable USB devices using Group Policy
- Enable Remote Desktop Using Group Policy (GPO)
- Disable Check for Updates using Group Policy (GPO)
- Configure PUA Protection using Group Policy
- How to Disable Internet Explorer 11 using Group Policy
Why should you rename the Local Administrator Account?
The administrator account exists on all Windows 10 and Windows 11 desktop editions (Home, Pro, Enterprise, and Education). Administrator accounts have privileged access to systems. As a recommended security practice, renaming the account makes it slightly more difficult for attackers to guess this username and password combination.
Steps to Rename Administrator Account using GPO
Let’s look at the steps to rename administrator account using Group Policy. First, launch the Group Policy Management console on the server. If you are a domain administrator, you can log in to either the domain controller or to a member server with GPMC installed.
There are two important points that I would like to highlight here:
- You should not edit the default domain policy in this case, as the settings will apply to the entire AD domain.
- The best practice that is followed in many organizations is creating a new GPO and then applying it to a selected OU.
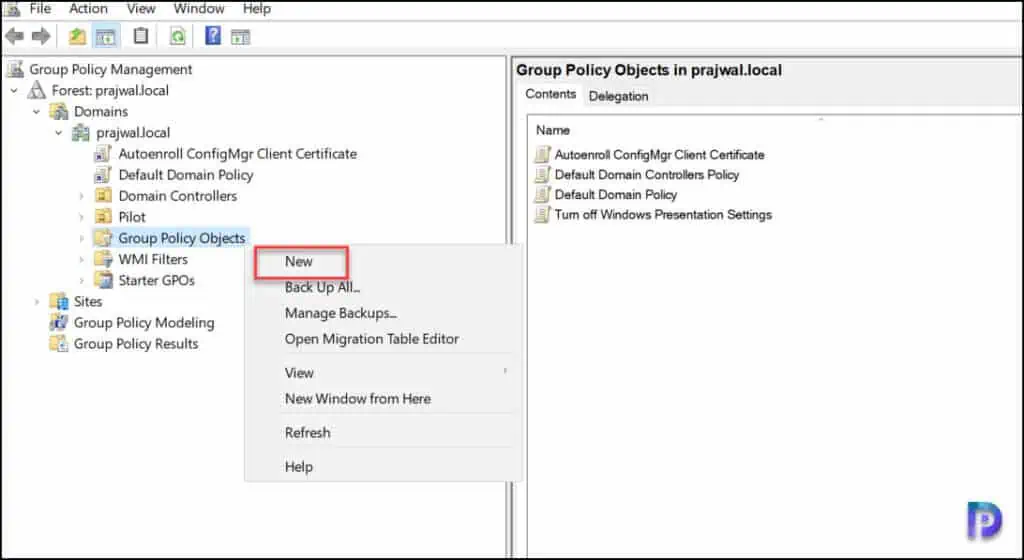
In the Group Policy Management console, expand your domain and navigate to Group Policy Objects. We will first create a new GPO that will rename the built-in administrator account, and then link this GPO to an OU. Right click Group Policy Objects and select New.
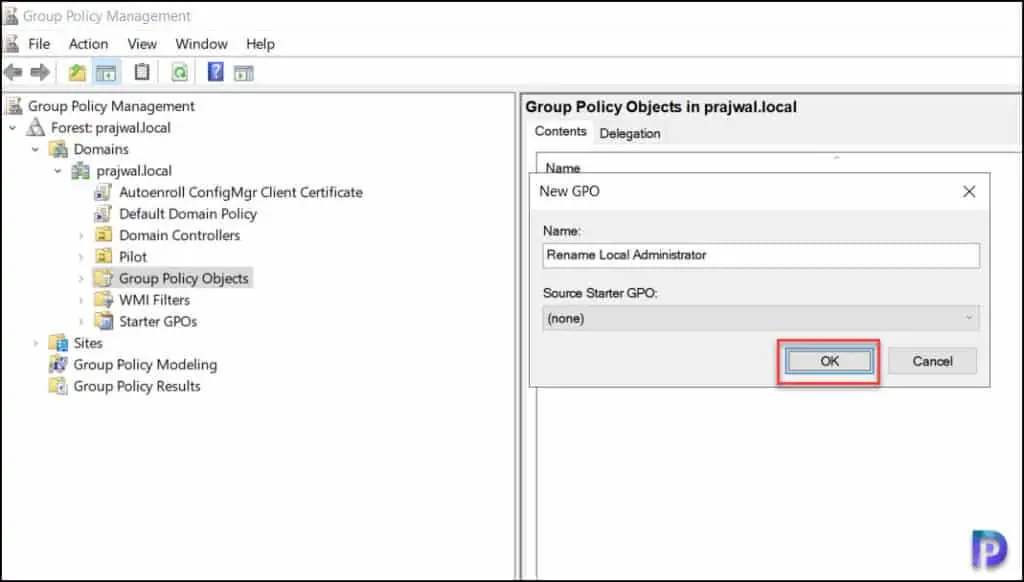
Enter the GPO name as “Rename Local Administrator” and click OK.
You should find the newly created GPO under Group Policy Objects. Right-click Rename Local Administrator GPO and select Edit.
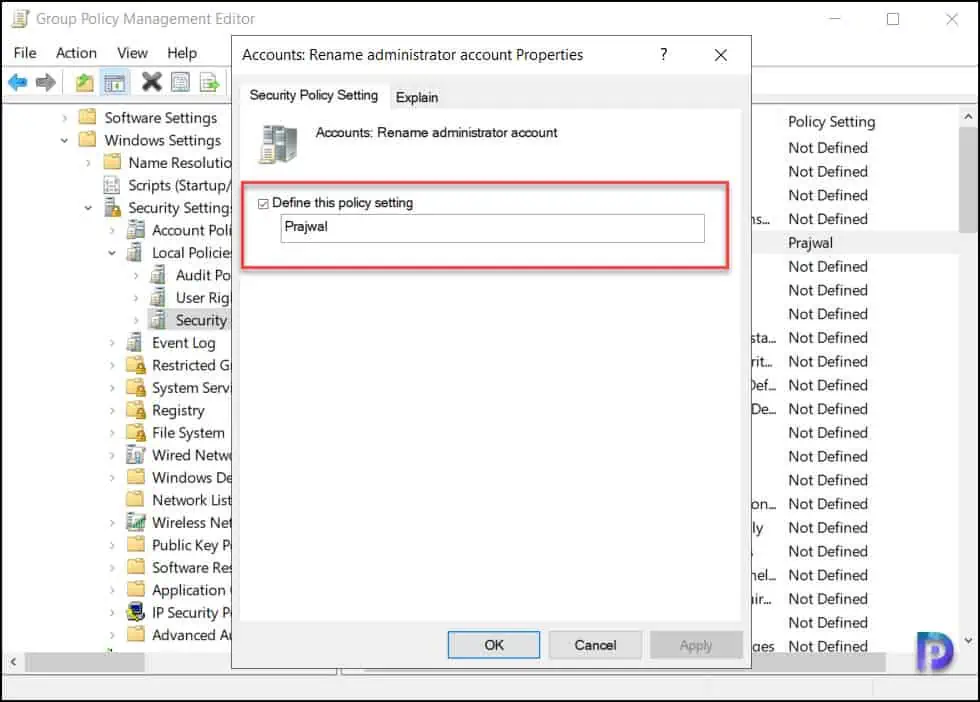
In the Group Policy Management Editor, navigate to Computer Configuration\Policies\Windows Settings\Security Settings\Local Policies\Security Options. In the right pane, look for the policy Accounts: Rename administrator account. Right-click this policy setting and select Properties.
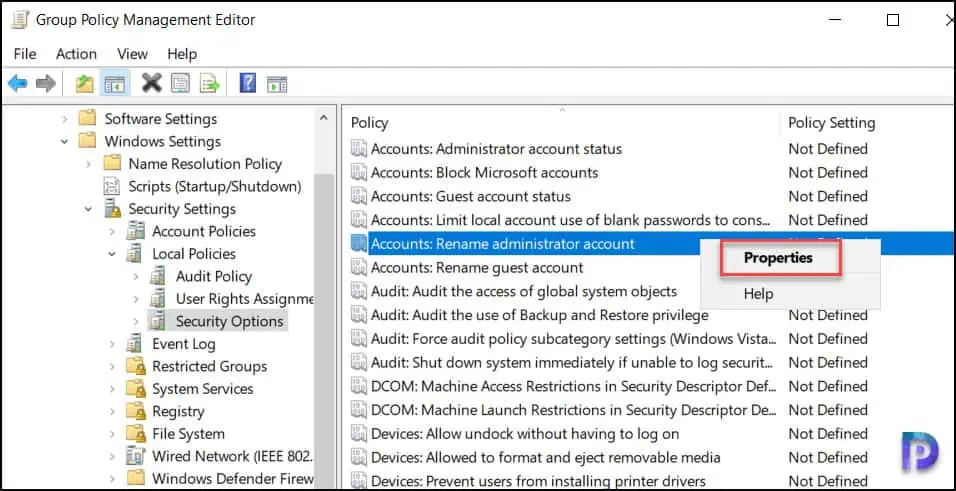
Accounts: Rename administrator account: This security setting determines whether a different account name is associated with the security identifier (SID) for the account Administrator. The BUILTIN\Administrator account always has a relative identifier (RID) of 500. Renaming the well-known Administrator account makes it slightly more difficult for unauthorized persons to guess this privileged username and password combination.
On the rename administrator account properties window, check the option “Define this policy setting” and enter the local administrator name. Ensure the administrator name doesn’t include any symbols or special characters. Click Apply and OK. Close the group policy management editor.
Link the Group Policy Object to OU
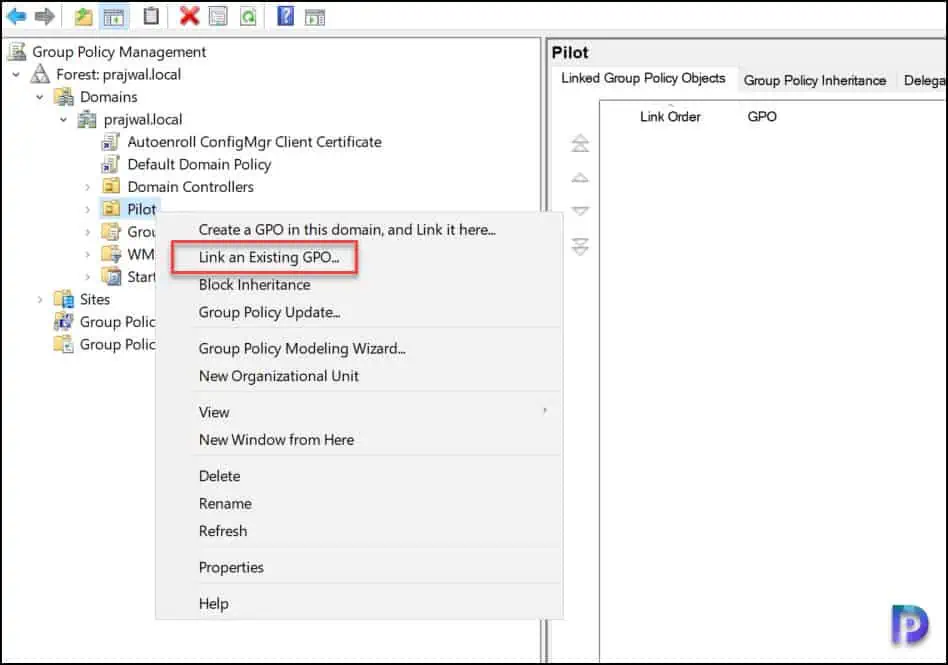
It is necessary to apply or link the GPO that we created in the previous step to an OU. It’s best to test the policy on a small group of computers before expanding it to a larger group, though you can link it to the entire domain if necessary. Right-click an OU in the Group Policy Management console and select “Link an Existing GPO.”
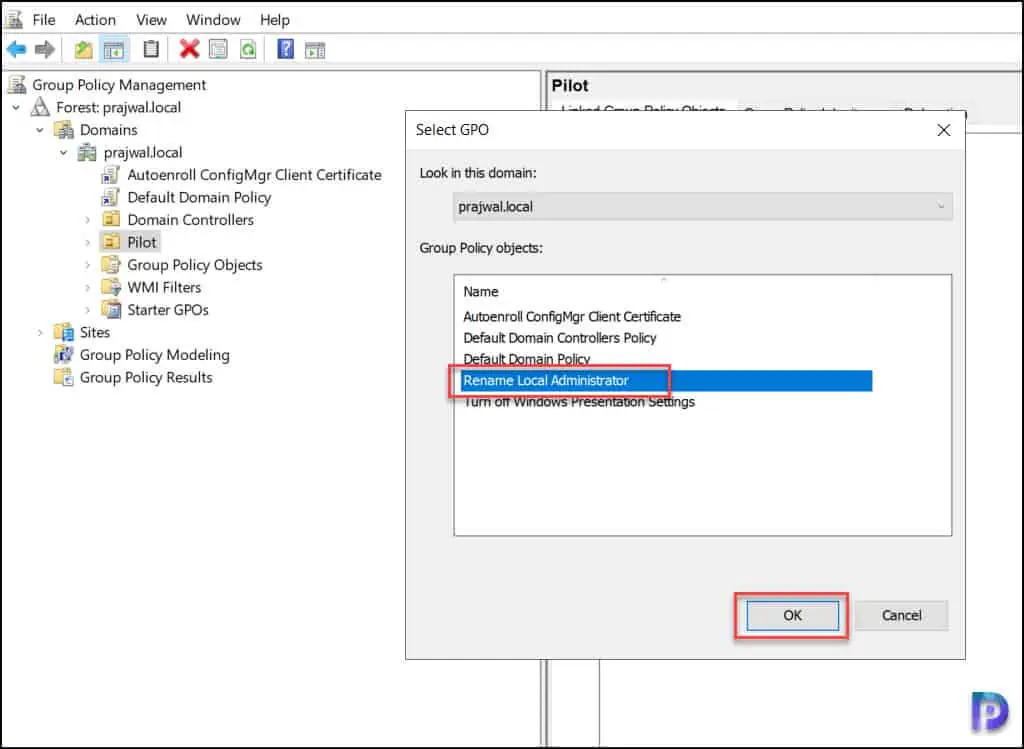
You must select a GPO to link it to the OU. In this case, select Rename Local Administrator and link it to the OU. Click OK.
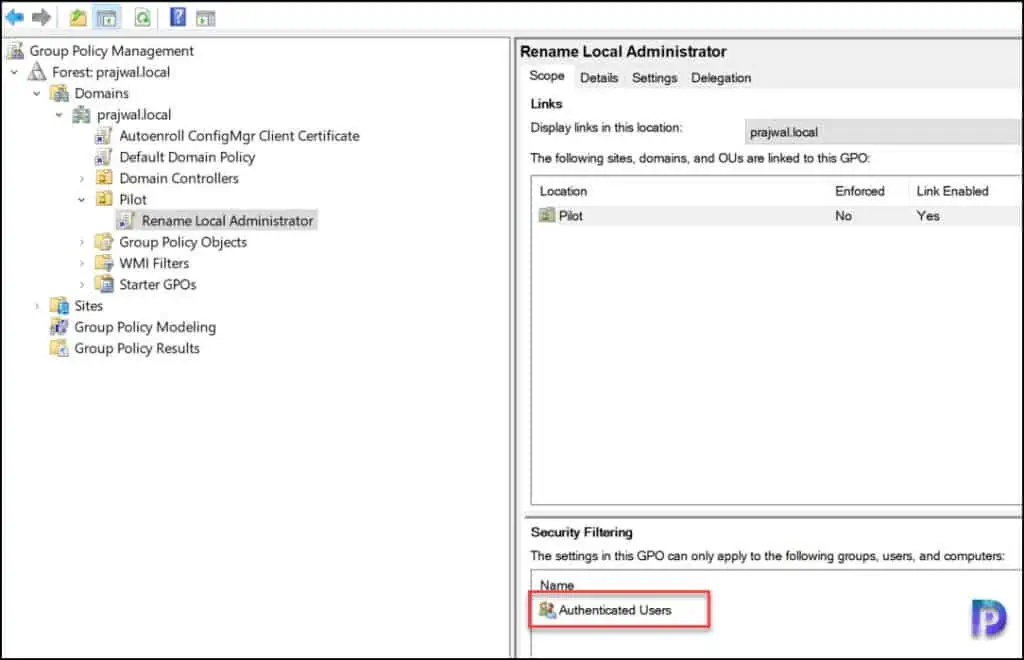
We see the scope of the GPO is applied to authenticated users.
Update Group Policy and Verify the GPO on Client Computers
In this step, we will refresh the group policy on computers and verify if GPO has renamed the administrator account. By default, the Group Policy update interval is 90 minutes for AD domain joined computers, and you may modify the Group Policy Refresh Interval if required.
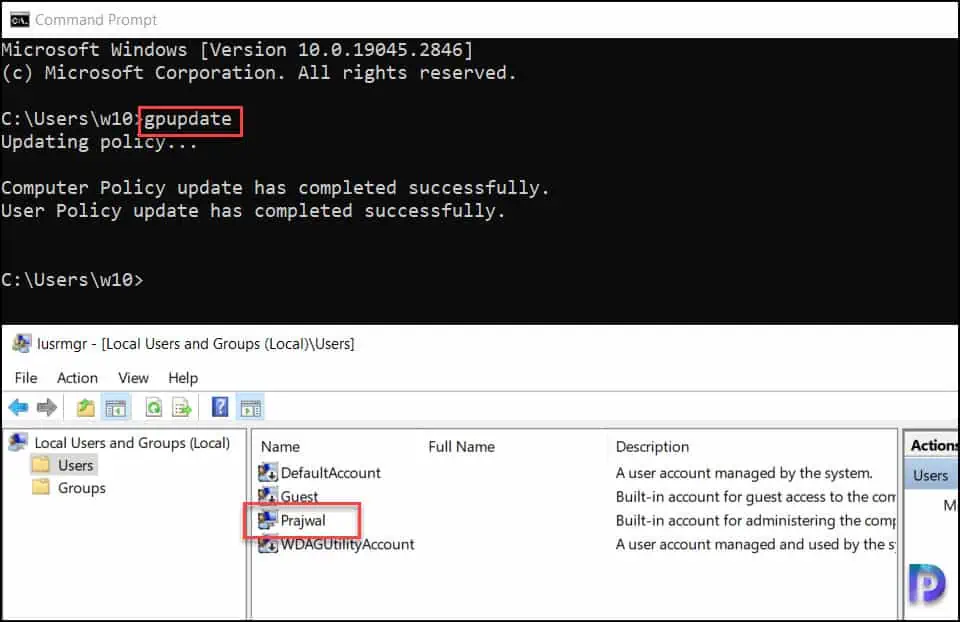
Run the command gpupdate /force on the client computer to force a group policy update. I wrote an article on different methods to update group policy on remote computers, which can be helpful here. On the Windows computer, launch the command prompt as administrator and run the command “gpupdate /force.” This will force an update of all the policies applicable to the computer.
From the below screenshot, we can see that the administrator account has been renamed to ‘Prajwal‘ after the GPO is applied. To find the administrator account, you can open the Local Users and Groups console or simply run the command lusrmgr.msc. Select the Users folder, and here you will find all the accounts created on the computer, including the renamed administrator account. The guide on how to rename administrator account using GPO is now complete.
