How to Enable Content Validation in SCCM on DP
If you are planning to enable content validation in SCCM, this post is for you. I will explain what content validation feature is and explore DP Content Validation Options in SCCM
Content Validation feature was first introduced in Configuration Manager 2012. This feature still exists on Configuration Manage current branch.
I always feel that there is a lot to explore in Configuration Manager. Every feature is very interesting and is designed to make the life of admins easy. Let’s explore the content validation feature.
Table of Contents
What is Content Validation in SCCM ?.
Content validation is a feature that validates the content on a SCCM distribution point. So what exactly does it validate ?. Suppose you have got some content on a distribution point. The validation process will check to see if the content on the distribution point is the same as the content in the source of the application or package.
If the file hash is unexpected for the files on the distribution point, Configuration Manager creates a status message that you can review in the Monitoring workspace.
You can either enable content validation in SCCM on a SCCM distribution point and schedule it or validate the packages manually. If the content is invalid, it will then be reported in the Content Status node in the Monitoring workspace of the Configuration Manager console.
You can also enable Content Validation in SCCM while installing the distribution point server role. However most of us enable the feature once we have DP working correctly.
Content validation is an optional feature and you enable it only if you wish to validate all the content on distribution point. For more info on Content validation in configuration manager, read monitor content in ConfigMgr.
Enable Content Validation in SCCM
The steps to enable content validation in SCCM are :-
- Launch the SCCM console.
- Navigate to Administration\Overview\Distribution Points.
- Right click distribution point server and click Properties.
- Under the Distribution Point server properties, click Content Validation tab.
- Enable validate content on schedule and click Apply and OK.
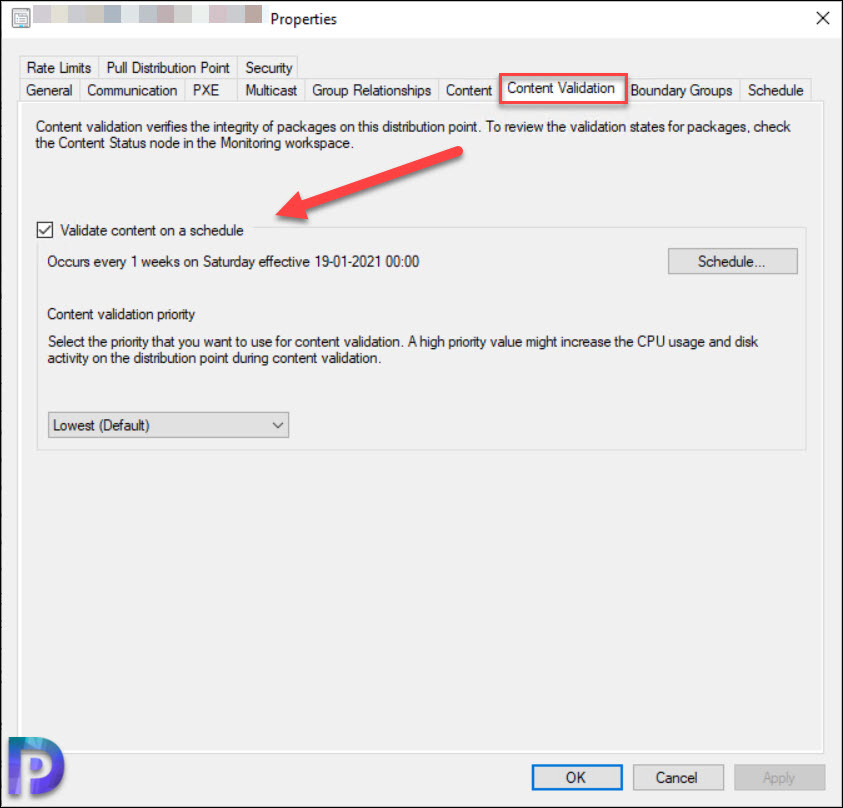
To view the results of the content validation process, go to the Monitoring workspace. Expand Distribution Status, and select the Content Status node. This node displays the content for each type.
When you activate the content validation, you can monitor the smsdpmon.log. The smsdpmon.log records details about the distribution point health monitoring scheduled task that is configured on a distribution point.
Define DP Content Validation Schedule
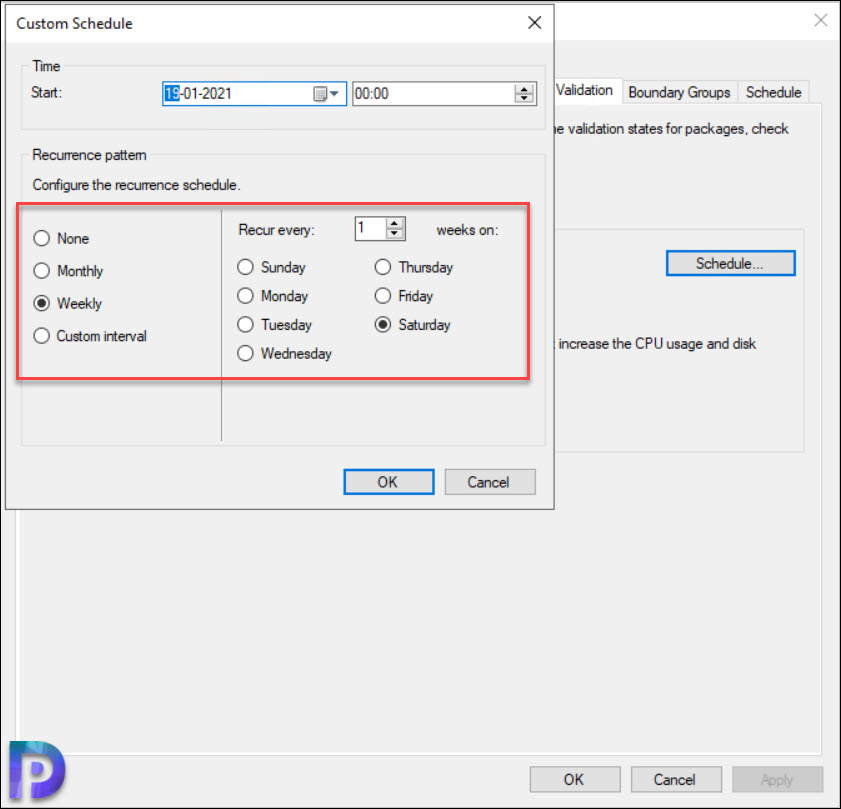
When you enable content validation in SCCM on a distribution point server, the validation runs based on a schedule. By default the validation occurs once a week on Saturday.
However, if you wish to modify the content validation schedule, you can do that with schedule option. Click the Schedule button and in the custom schedule window, specify the new schedule.
You may choose to run the validation every month or set a custom interval. After you make the changes, click OK button.
Set Content Validation Priority
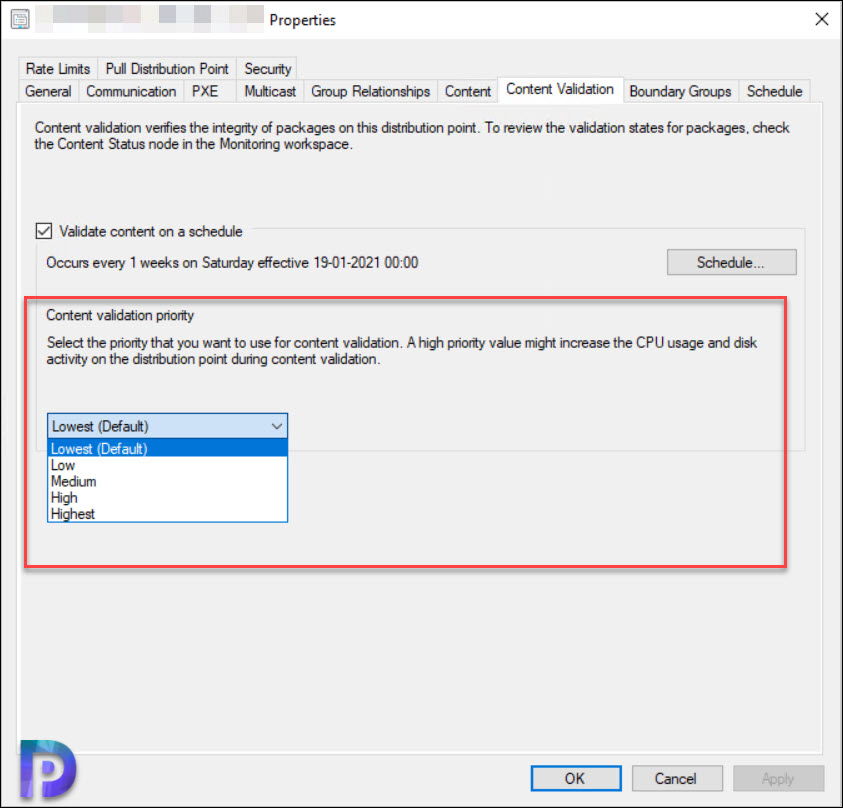
The last bit about content validation is setting the priority. With this option, you can select the priority that you want to use for content validation.
By default the content validation priority is set to Lowest (default). However you can change this to Low, Medium, High or Highest.
Note that a high priority might increase the CPU usage and disk activity on the distribution point server during the content validation.
If you have set the content validation priority as High and if you notice high CPU usage or disk activity, change it to medium or low.
How to Manually Validate Content on Distribution Point
So if you don’t want to enable content validation in SCCM and manually validate the packages, you can do that. There are many ways to validate the content manually.
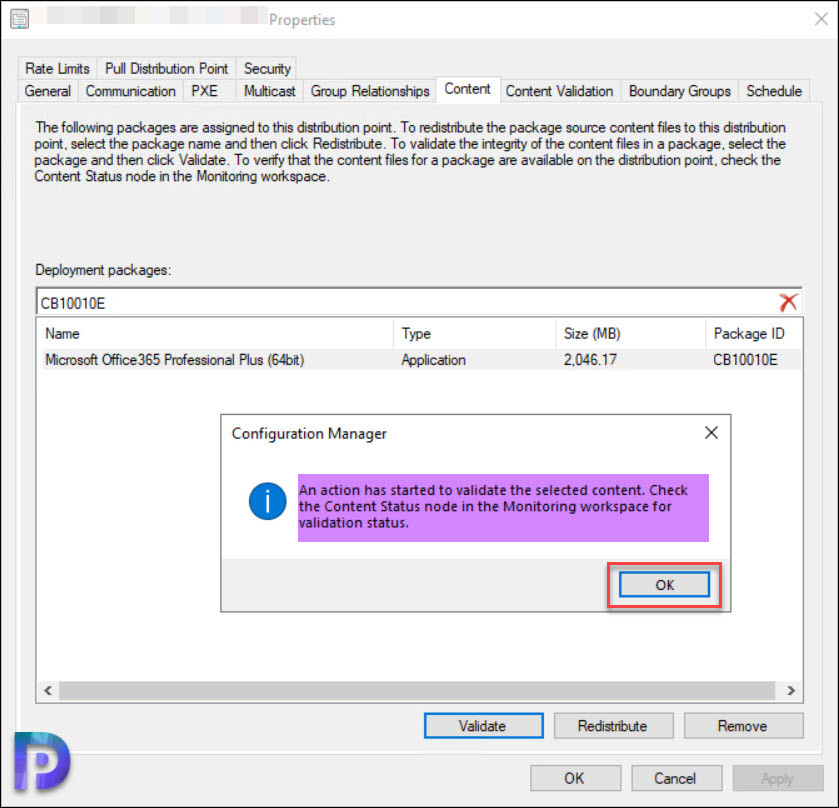
Under the Distribution Point properties, click the Content tab. Enter the package name or the Package ID. Select the package and click Validate.
You see a message box Are you sure that you want to validate content on selected distribution point ?. Click OK.
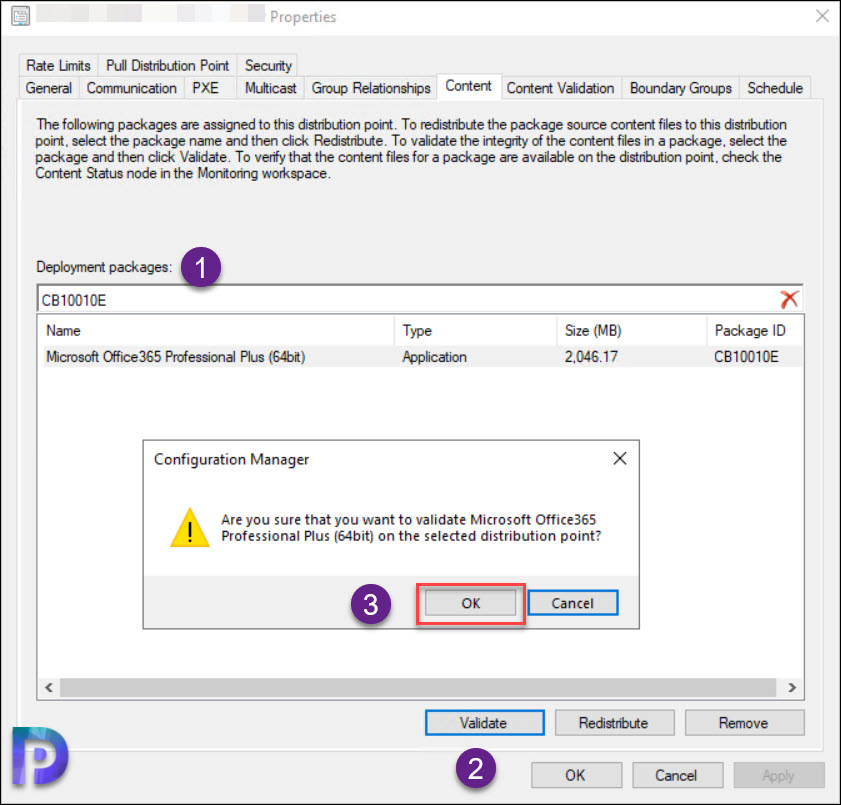
A confirmation box appears with a message. An action has started to validate the selected content. check the Content Status node in the Monitoring workspace for validation status.
This is how you can manually validate the content on a distribution point.
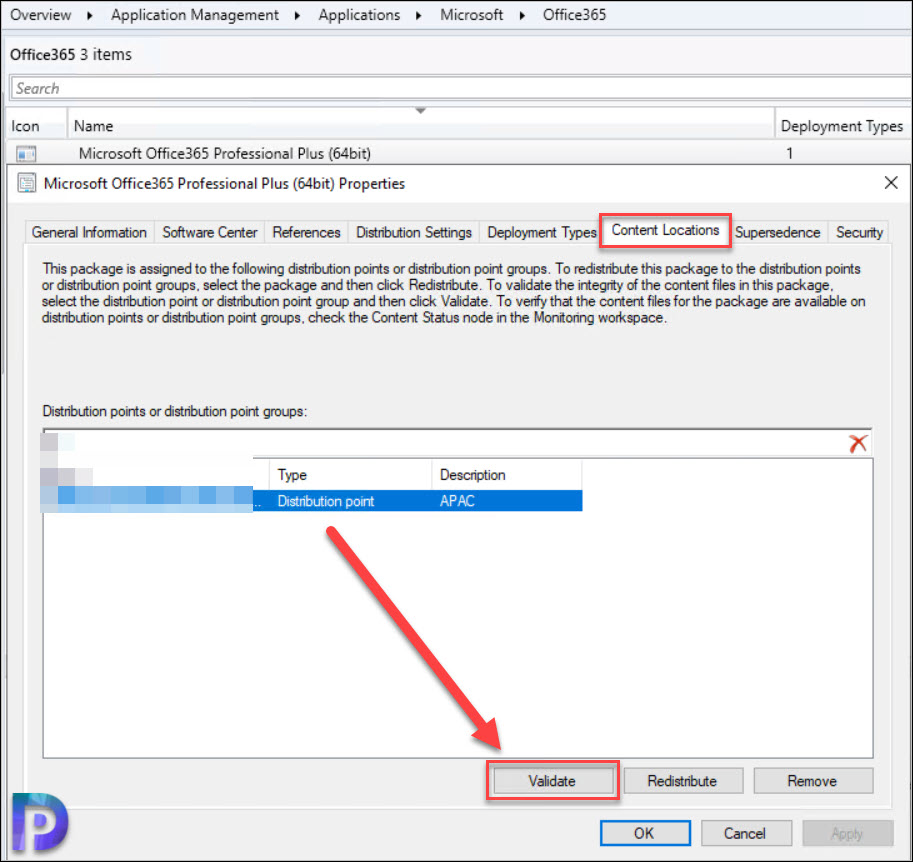
There is another way to manually validate the content on a distribution point. In the Configuration Manager console, select the Software Library workspace. Select the content type that you want to validate. On the Home tab of the ribbon, in the Properties group, select Properties.
Switch to the Content Locations tab. Select the distribution point or distribution point group on which to validate the content. Select Validate, and then select OK.
The content validation process starts for the content on the selected distribution point or distribution point group.
Invoke Content Validation on DP Using PowerShell
If you like to validate the content (application or a package) on a distribution point using PowerShell, you can do that using Invoke-CMContentValidation cmdlet.
Following are the options that you can use with Invoke-CMContentValidation. More information about the command usage Invoke-CMContentValidation.
- [-CollectionName]
- [-DistributionPointGroupName]
- [-DistributionPointName]
- -TaskSequenceId
- [-DisableWildcardHandling]
- [-ForceWildcardHandling]
- [-WhatIf]
- [-Confirm]
You can validate the content such as application, package, task sequence, operating system etc. Check out the below information.
-ApplicationId
-ApplicationName
-BootImageId
-DeploymentPackageId
-DeploymentPackageName
-DriverPackageId
-DriverPackageName
-OperatingSystemImageId
-OperatingSystemImage
-OperatingSystemImageName
-OperatingSystemInstallerId
-OperatingSystemInstallerId
-PackageId
-PackageName
-TaskSequenceId
-TaskSequenceName
Let me show you an example of Invoke-CMcontentvalidation usage. The below command validates the content for the application named 7-zip on the distribution point named DPServer.
Invoke-CMContentValidation -ApplicationName "7-zip" -DistributionPointName "DPServer"
Common FAQ’s – Content Validation
Some FAQ’s about Content validation.
What is Content Validation Feature in SCCM?
The content validation process verifies the integrity of content files on distribution points. The validation process will check to see if the content on the SCCM distribution point is the same as the content in the source of the application or package.
How do I enable Content Validation in SCCM?
Under the SCCM Distribution Point properties, click Content Validation tab. Enable validate content on schedule and click Apply and OK.
Can I validate the content on DP manually?
Yes, under the Distribution Point properties, click the Content tab. Enter the package name or the Package ID. Select the package and click Validate.
How to validate the DP content using PowerShell?
Use the Invoke-CMContentValidation to validate content on a distribution point using PowerShell.
What is default Content Validation Schedule?
By default the content validation process runs every 1 weeks on Saturday at 00:00.

The Content Validation job failed on one DP over the weekend. Is there a way (I am sure there is) to re-run it manually on all packages? It will be painful to run it one at a time on 250+ packages.
You can let it run on the upcoming weekend otherwise you have to either manually validate the packages for this week or use powershell script to do that.