Windows 11 23H2 Upgrade using SCCM | ConfigMgr
In this article, we will demonstrate the steps to perform a Windows 11 23H2 upgrade using SCCM. We will use Windows Servicing in ConfigMgr to upgrade Windows 11 devices to version 23H2 via the enablement package.
Microsoft released Windows 11, version 23H2, which is also known as the Windows 11 2023 update. As per the Microsoft article, Windows 11, version 23H2, is a scoped, cumulative release, meaning that it contains all the recently announced features as well as some new enhancements.
Windows 11 23H2 is an enablement package, and this makes it easier to deploy it with ConfigMgr. If you remember, Windows 10 22H2 was also released as an enablement package. The enablement package is a great option for installing a scoped feature update, as it enables an update from version 22H2 to version 23H2 with a single restart, reducing update downtime.
In this article, we will use the Configuration Manager feature update option to deploy the Windows 11 23H2 enablement package. We believe this is the easiest and quickest way to update Windows 11 to version 23H2. Servicing plans are another option to update the devices to version 23H2. Refer to the guide on how to use servicing plans to update to Windows 11 version 23H2.
Ways to upgrade to Windows 11 23H2
Version 23H2 is available through Windows Server Update Services, Configuration Manager, Windows Update for Business, and the Volume Licensing Service Center (VLSC). There are several methods for upgrading to Windows 11 version 23H2.
- Get the Windows 11 23H2 update via Windows Update.
- Use Servicing Plans to upgrade eligible Windows 11 devices to version 23H2.
- Upgrade Windows 11 22H2 to Windows 11 23H2 using the ConfigMgr Windows Servicing feature.
- Deploy the Windows 11 23H2 update using the SCCM task sequence.
- Using the Intune feature update policy, upgrade WUfB-managed devices to Windows 11 23H2.
Take a look at the guide on upgrading Windows 10 to Windows 11 using multiple methods.
Prerequisites
Configuration Manager requires only a few settings before deploying feature updates to computers. If you have deployed the feature updates before, it means most of the prerequisites are already taken care of. Before deploying the updates, you might need to configure your SCCM setup if it is new.
Listed below are all the prerequisites required for the Windows 11 23H2 upgrade using SCCM.
- Configure Software Update Point by enabling the upgrades for Windows 10 and Windows 11.
- Ensure the service connection point is online before you sync the updates.
- Enable dynamic updates for feature updates in Configuration Manager Client Settings.
- The product category “Windows 11” must be enabled under Software Update Point > Products.
Download Windows 11 23H2 Enablement Package
First, let’s download the Windows 11 23H2 enablement package update using SCCM. We recommend running a software update synchronization to get the latest updates from Microsoft.
You have two options to get started: install the feature update straight away or download the feature first and then deploy it. We recommend first downloading the enablement package, then distributing the content to distribution points, and finally deploying it.
Use the following steps to get the Windows 11, version 23H2 update in SCCM:
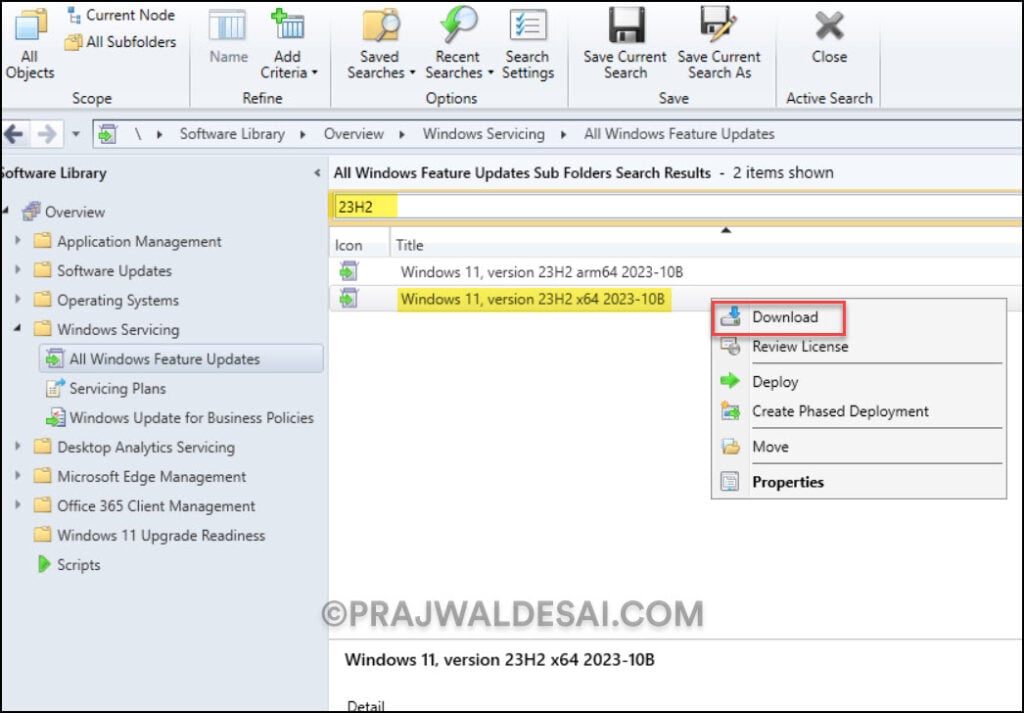
- In the SCCM console, go to Software Library > Windows Servicing > All Windows Feature Updates.
- In the search box, type “23H2” and click on Search. This will filter the updates and display only 23H2 updates.
- Right-click on the Windows 11, version 23H2 x64 2023-10B update and select Download.
Create a deployment package for Windows 11 23H2 Update
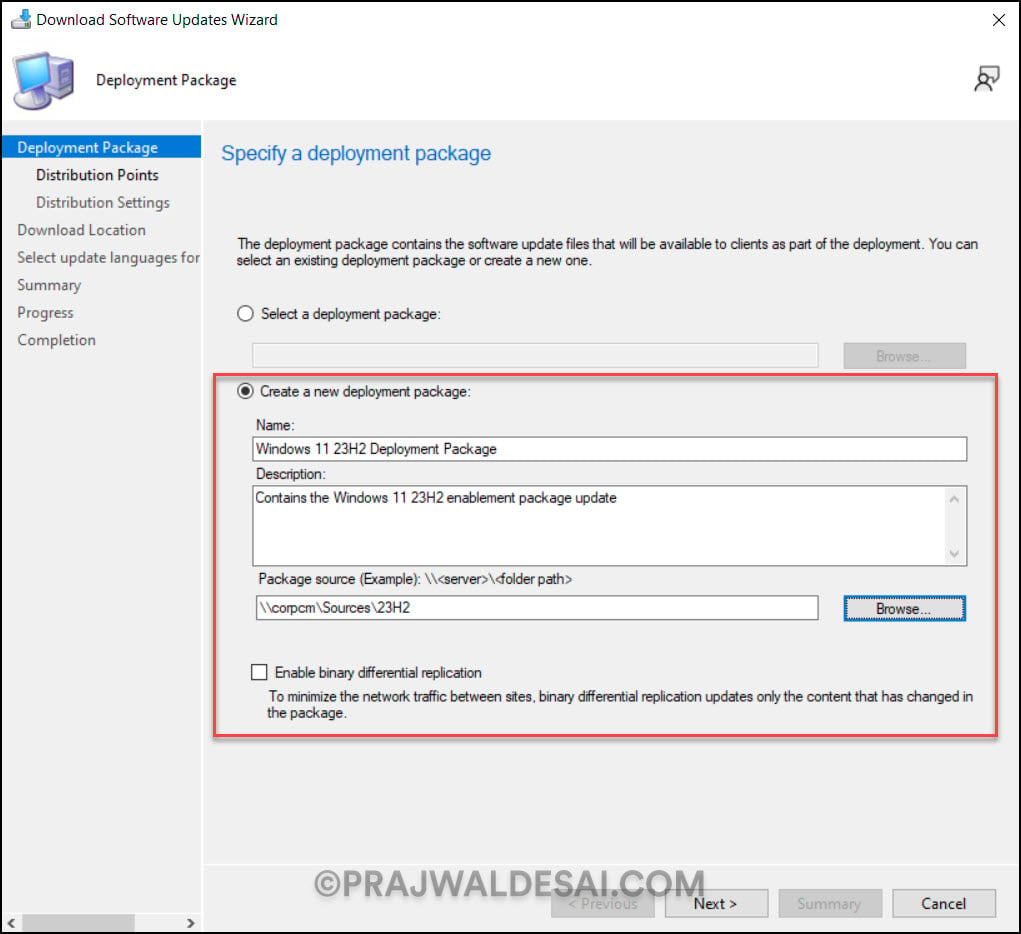
We recommend creating a new deployment package for the Windows 23H2 update. On the Deployment Package window, you must specify the deployment package for Windows 11 23H2 upgrade files. This deployment package that you create will contain the software update files that will be deployed to the clients.
Select Create a new deployment package and specify the package name as “Windows 11 23H2 Deployment Package.” Add a brief description of this package.
Specify the package source, which is a shared folder where you want to download the updates. Enabling the binary differential replication is optional. Click Next.
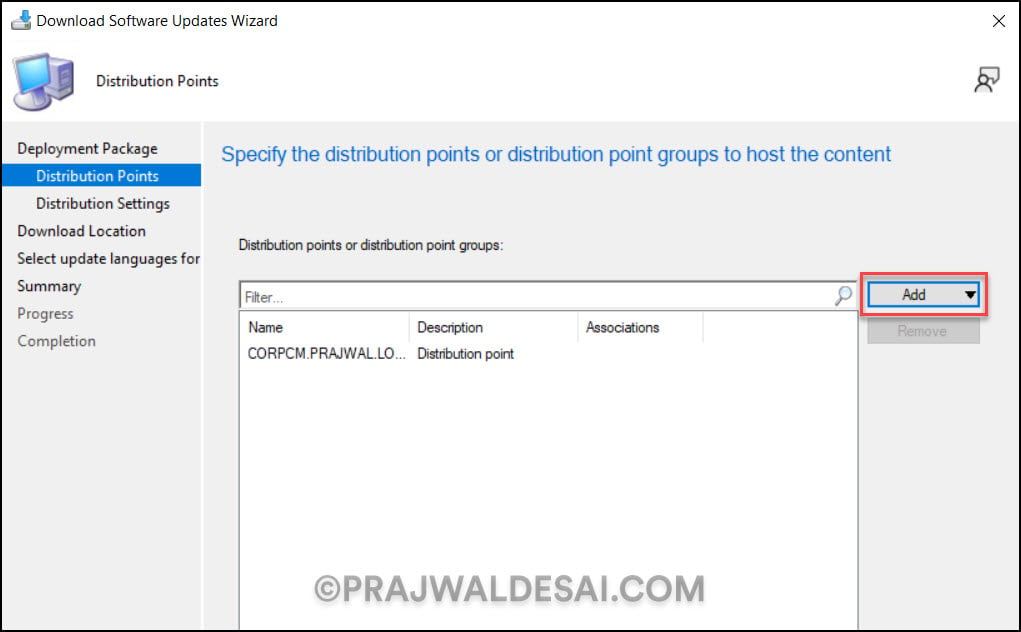
Click on the Add button and choose the distribution point servers to which you would like to distribute the Windows 11 23H2 upgrade files. Click Next.
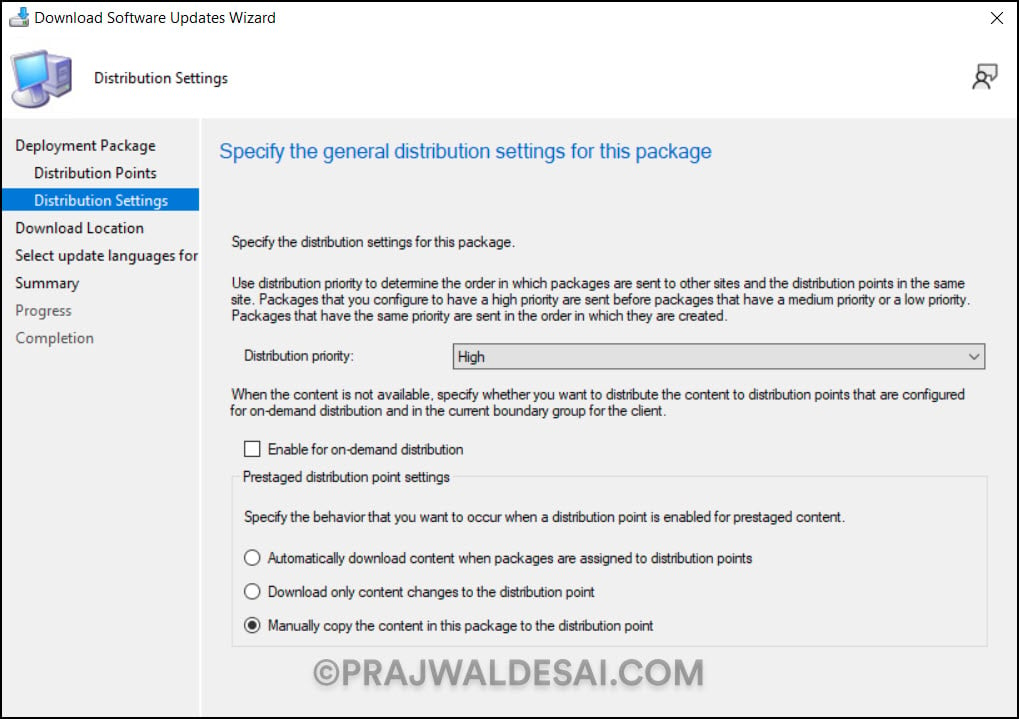
On the Distribution Settings page, configure the general distribution settings for the deployment package. Click Next.
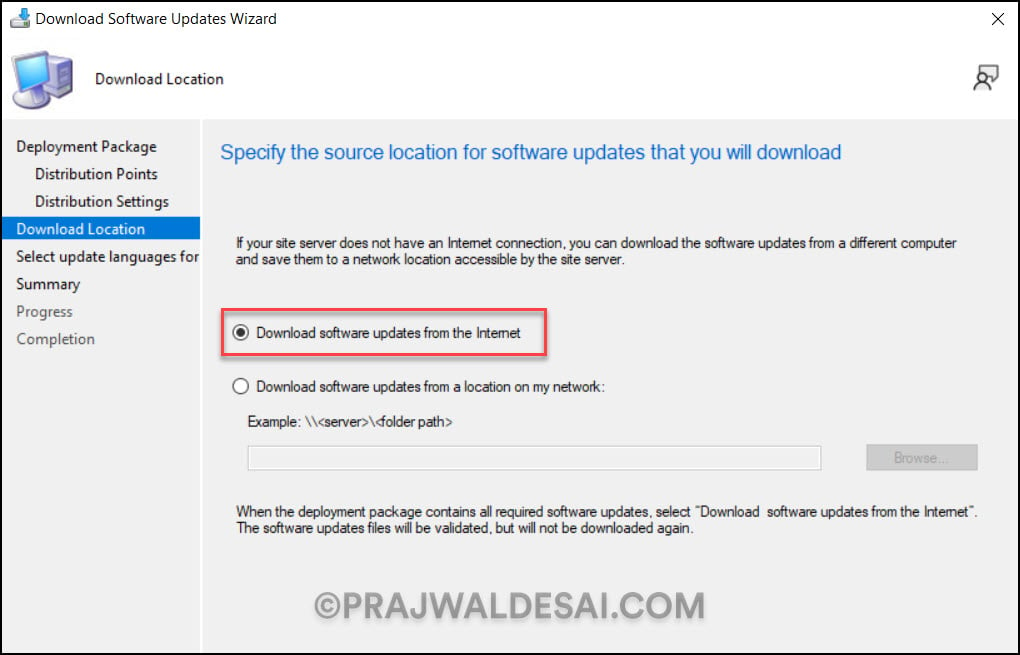
Select an option to specify from where you want to download the updates. In the below example, we have selected the option Download software updates from the internet. Click Next.
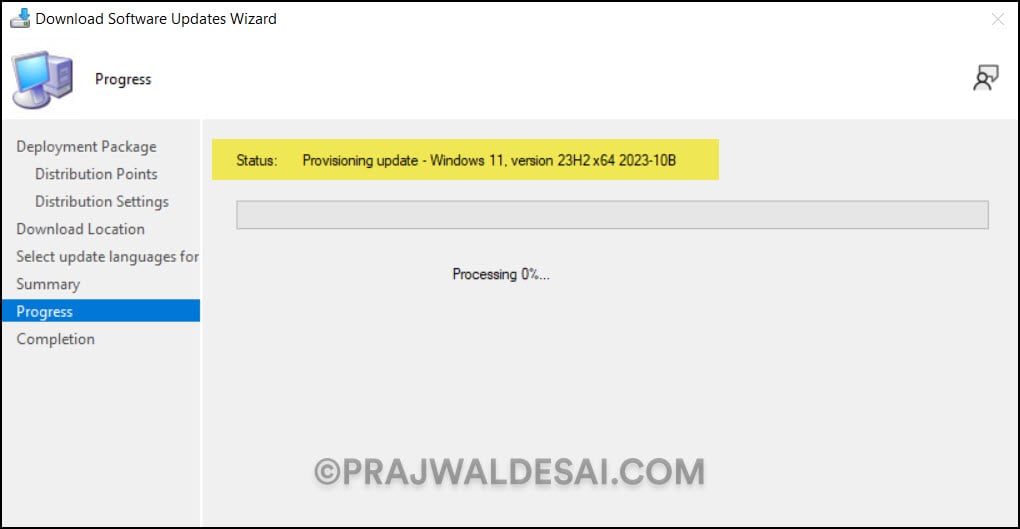
On the Summary window, review the settings for the deployment package and click Next. Now on the Progress tab, we see the Windows 11 23H2 Enablement Package updates being downloaded.
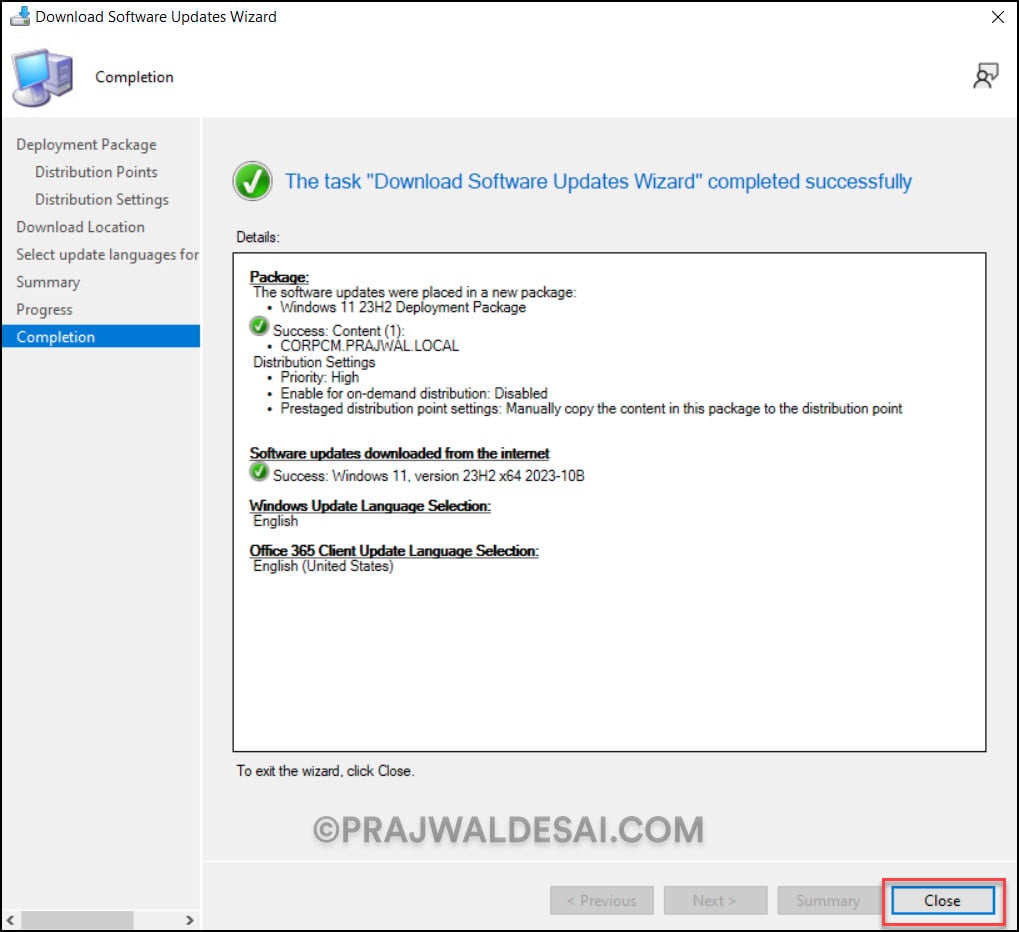
We see that Windows 11 23H2 updates are downloaded to the specified location. Close the download software updates wizard.
Note: In case you encounter issues while downloading the Windows 11 23H2 enablement package update, review the PatchDownloader.log located in the %temp% folder. This file records all the errors that occur during the download of Windows 11 feature updates.
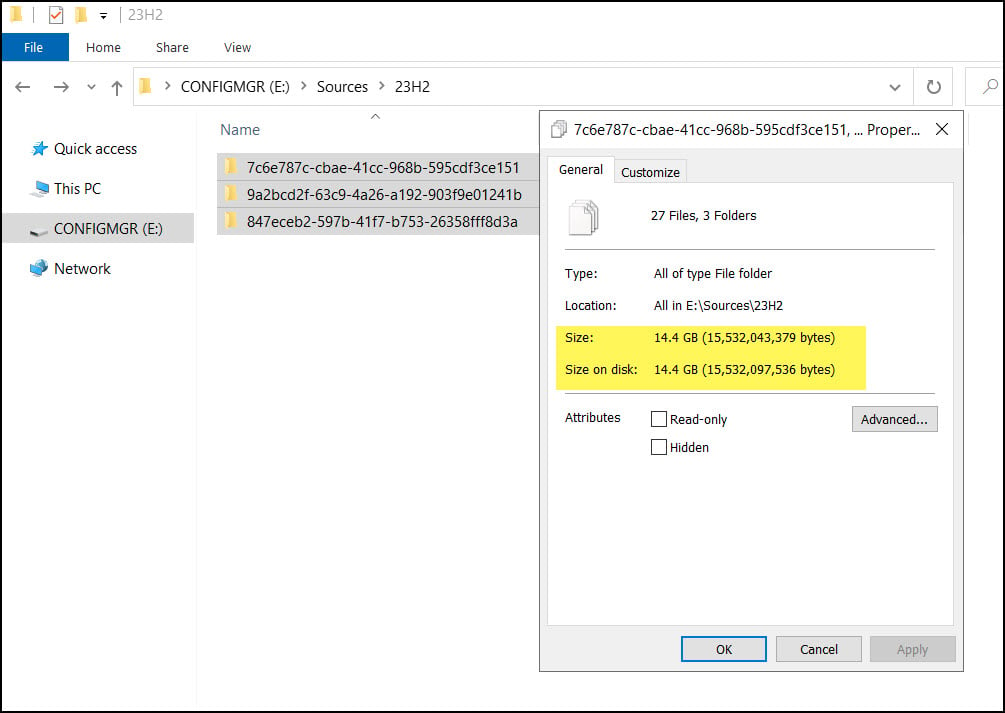
In the above step, we downloaded the Windows 11 23H2 updates to the specified location. When you navigate to the downloaded location, you will notice that the 23H2 enablement package contains three folders, each of which contains several updates. When we checked the size of all the folders, the total size of the enablement package updates was 14.4 GB.
Perform Windows 11 23H2 upgrade using SCCM
In this step, using Windows Servicing, we will deploy the Windows 11 23H2 feature update using Configuration Manager. You can deploy this feature update to a single Windows 11 client or to a device collection consisting of multiple Windows 11 devices.
If you are deploying the Windows 11 23H2 update for the first time in your organization, we suggest testing the upgrade on a pilot device collection. A few devices that are intended to test the upgrade to 23H2 should be included in this device collection. Use the following guide to create Windows 11 device collections in SCCM.
Use the following steps to deploy the Windows 11 23H2 feature update using SCCM:
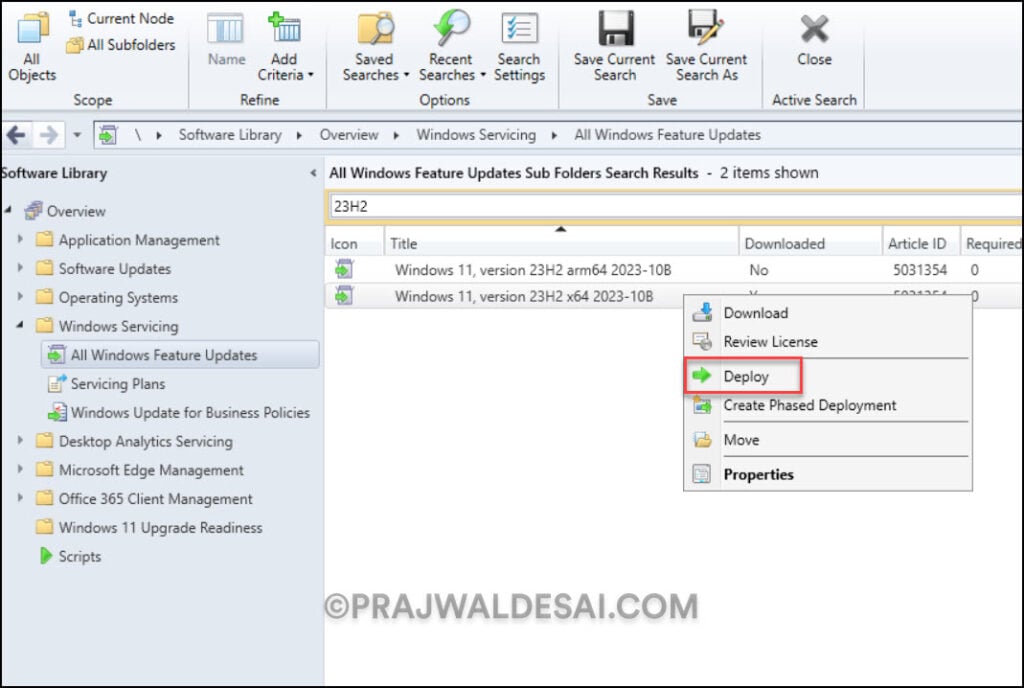
- In the ConfigMgr console, navigate to Software Library\Overview\Windows Servicing\All Windows Feature Updates.
- Right-click Windows 11, version 23H2 x64 2023-10B update, and select Deploy.
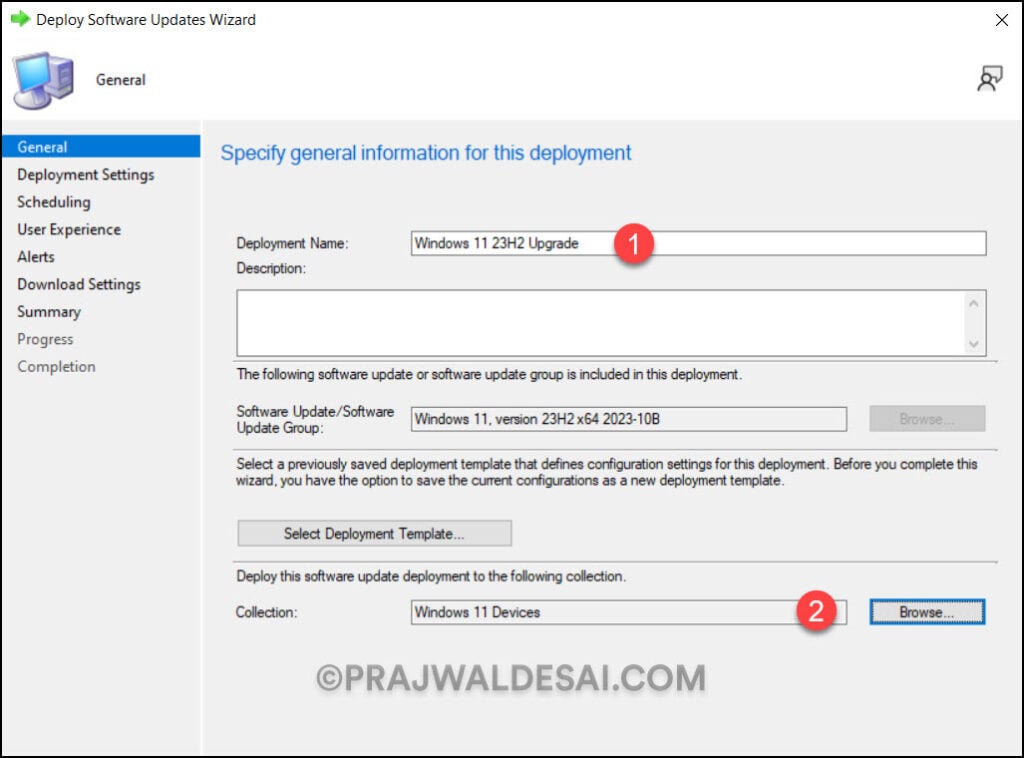
On the General page, enter the details for the Windows 11 23H2 feature update deployment.
- Deployment Name: Enter the deployment name, for example, Windows 11 23H2 upgrade.
- Description: Add a brief description about the deployment.
- Software Update Group: This is created automatically and is visible under Software Update Groups in the Configuration Manager console.
- Collection: Click Browse and select a device collection consisting of a few pilot devices selected for testing the Windows 11 2023 upgrade.
Click the Next button to continue.
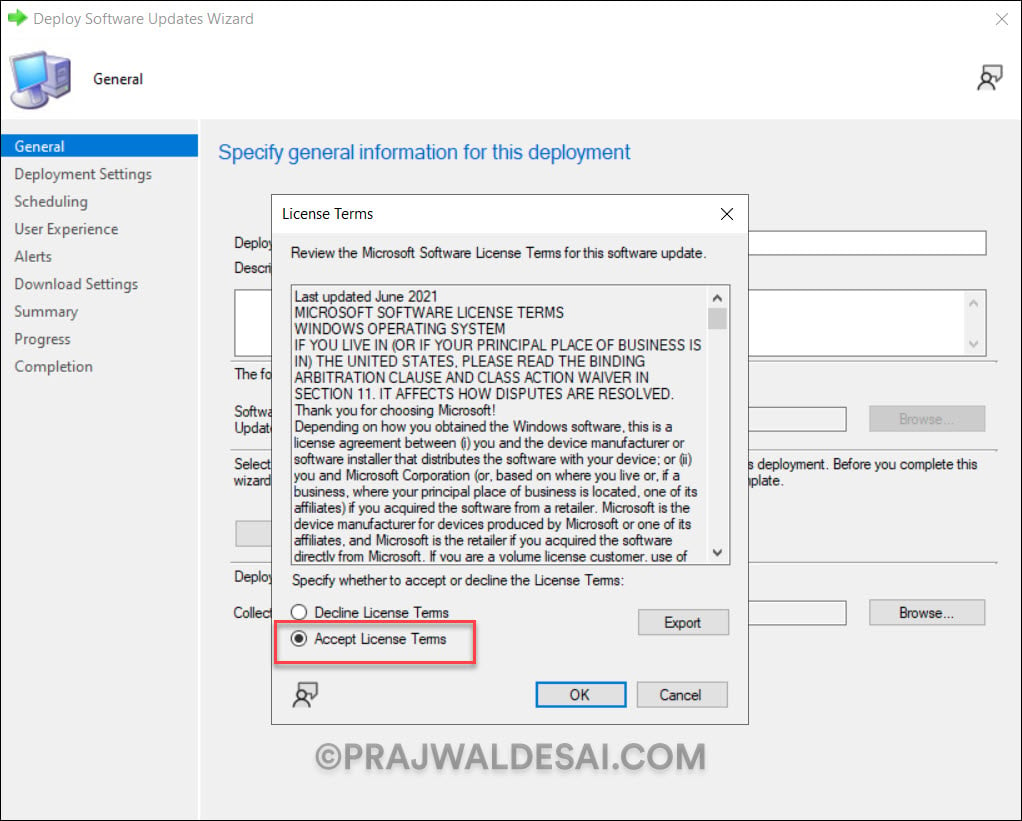
Accept the license terms for the Windows 11 23H2 update. Click Next.
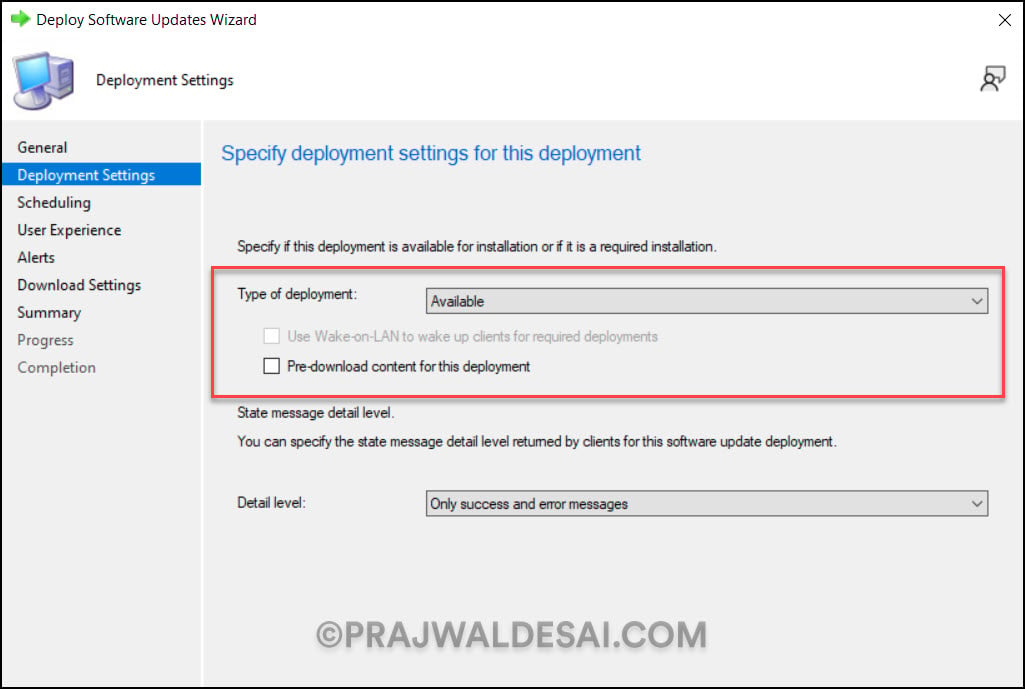
On the Deployment Settings page, specify the type of deployment. Choose whether you want to make the Windows 11 23H2 upgrade available for users in the Software Center or deploy it as required. Read more about SCCM Available vs. Required to know the differences. Click Next.
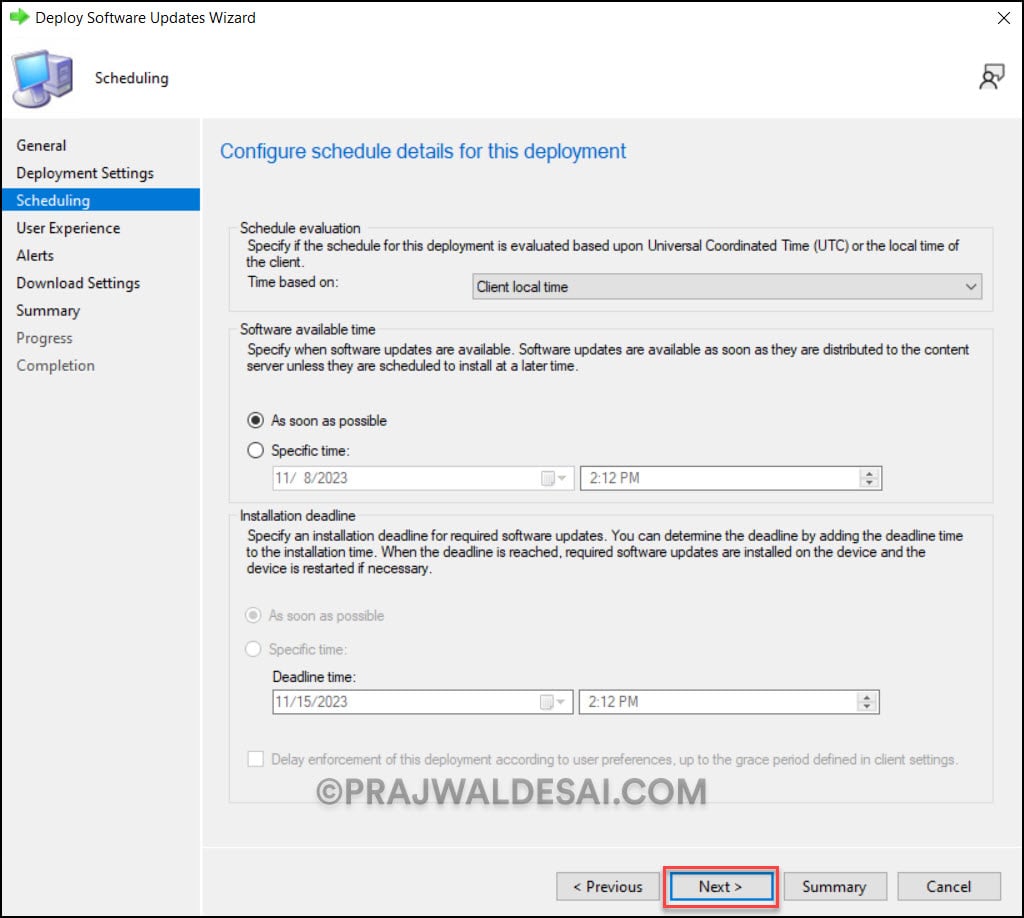
The Scheduling page lets you configure schedule details for the deployment. Configure the following settings:
- Schedule Evaluation | Time Based on: Select Client Local Time.
- Software Available Time: As soon as possible.
If you want to make the Windows 11 23H2 upgrade available at a specific date and time, select Specific Time and define it. Define the deadline for installation to ensure the upgrade happens within the defined period.
Click next to continue.
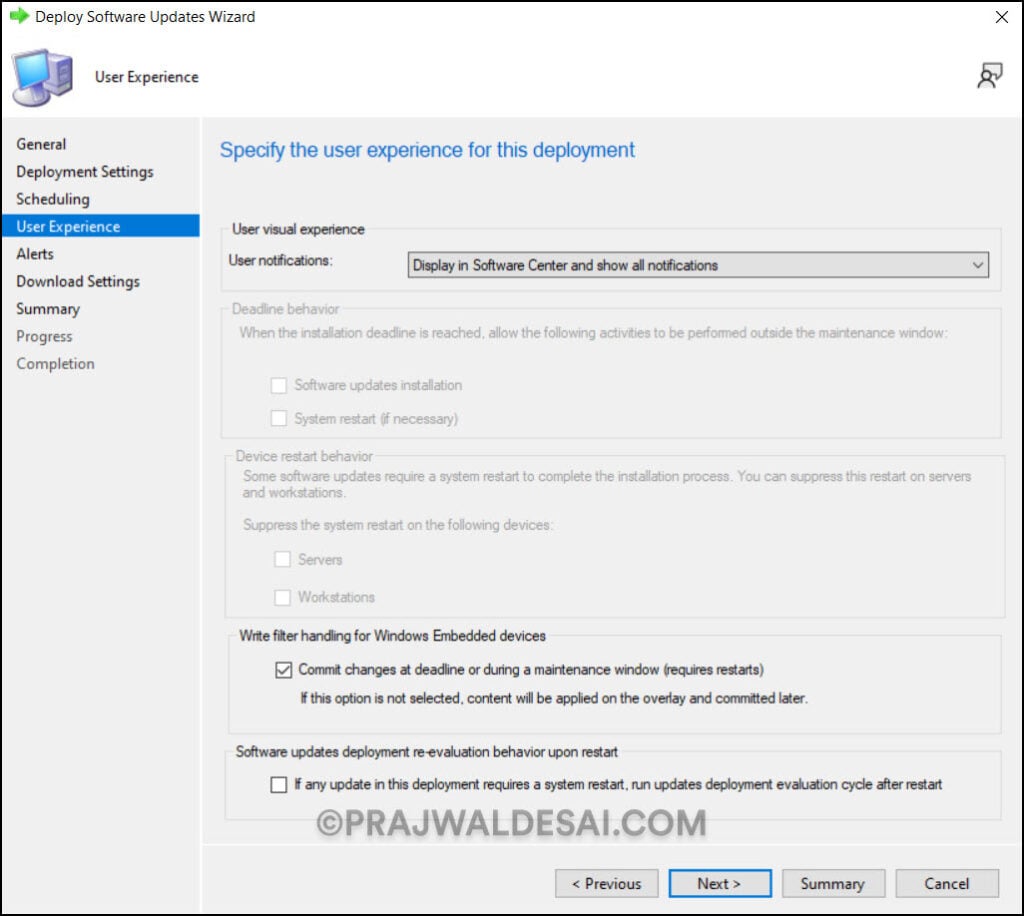
Specify the following user experience settings for the 23H2 update deployment:
- User Notifications: Display in Software Center and show all notifications
- Commit changes at the deadline or during a maintenance window (requires restarts): Yes
- If any update in this deployment requires a system restart, run updates deployment evaluation cycle after restart: No.
Click Next.
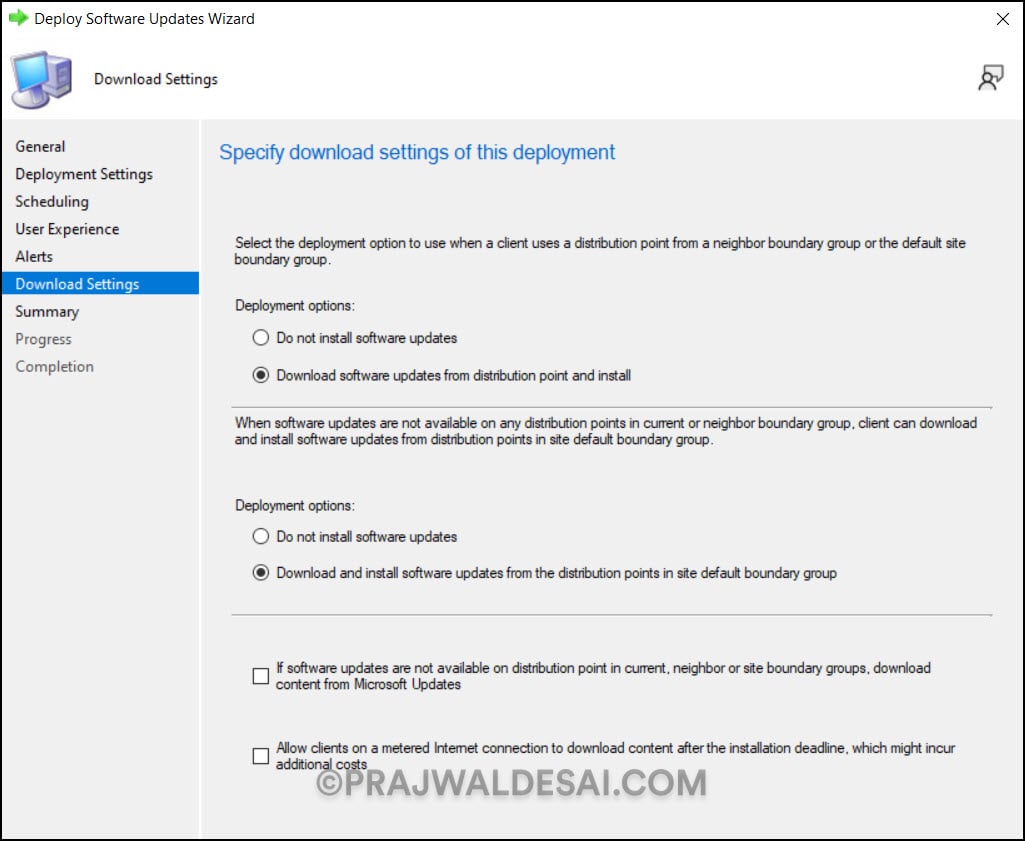
On the Download Settings tab, specify the download settings for the current deployment:
- Client Computers can use distribution points from neighbor boundary: Yes
- Download and install software updates from the fallback content source location: Yes
Click Next to continue.
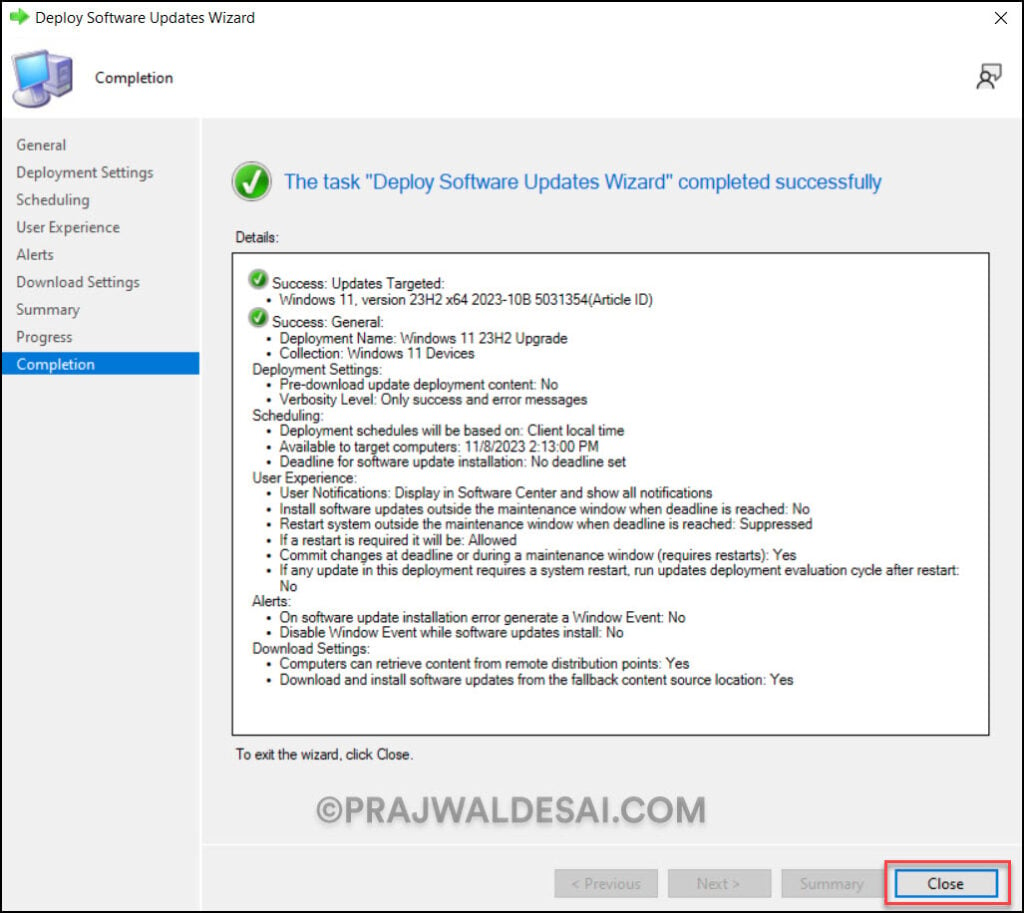
Review the deployment settings of Windows 11 23H2 on the Summary page and click Next. On the completion window, click Close.
Windows 11 23H2 Update Installation: End-User Experience for Upgrade
After you have deployed the Windows 11 23H2 enablement package update using Windows Servicing, it’s time to test the upgrade installation on Windows computers. The end-user experience is similar to other feature upgrades.
On the client computer, launch the Software Center. Once the Software Center has been opened, select Windows 11, version 23H2 x64 2023-10B update by clicking the Updates tab. Click on the Install button.
Confirm that you want to upgrade this computer’s operating system. The Windows 11 23H2 Enablement Package should make the operating system upgrade faster. Note that this is an in-place upgrade to version 23H2, and the setup automatically migrates your apps, data, and settings. Click on the Install button to begin the Windows 11 23H2 upgrade.
The Windows 11, version 23H2 update took less than 10 minutes to install. Click on Restart and now the computer reboots. Sign in to your Windows PC after it has rebooted and look at the build number. The version is Windows 11 23H2, and the build number is 22631. Congratulations, you now know how to upgrade to Windows 11 23H2 using SCCM.

Hi,
We followed this process and the systems in the collection are showing as “Compliant” so they never get the 23h2 update. Any ideas to get past this?
I am experiencing the same problem – perhaps the latest Windows 11 22H2 is too similar to Windows 11 23H2 for ConfigMgr to tell the difference, or a detection method is wrong.
I had this issue too. The 22h2 and 23h2 packages share the same core dll’s, and so they detect the same way. You just need the 23h2 enablement package to make it display “23h2” instead of “22h2”, but this is not available via WSUS/SCCM. I used the offline installer and deployed it as an application.
Deploy the standalone update as an application (you’ll have to manually specify the application information) I renamed the downloaded file to ‘KB5027397’ to make it easier (the default filename is several dozen characters).
The installation command I use is: wusa.exe kb5027397.msu /quiet /norestart (these switches make it install silently and allow the user to restart on their own timeframe…if you don’t specify ‘norestart’ it will immediately reboot after installing.
The detection method is a custom powershell script: get-hotfix | Where-Object {$_.HotFixID -match “KB5027397”}
So Config manager 2309 does’nt solve this?
An enablement package with a size of 14GB… WHY WHY WHY Microsoft!? The new Unified Update sucks a lot of. It’s not better then the old method.