How to Enable Biometric Login in Bitwarden Password Manager
In this article, I will show you how to enable biometric login in Bitwarden password manager on different devices. With Bitwarden’s passwordless feature, you can avoid typing your password by unlocking your vault using biometrics rather than a password.
Biometric authentication is a secure way to authenticate, and the methods include Voice Recognition, Fingerprint Scanning and Facial Recognition. Biometric authentication performs the verification by checking distinctive biological or behavioural characteristics
Password managers were not widely used a few years ago and were considered optional by the majority of users. These days, many users prefer to use password managers and save their credentials because they have multiple accounts and find it difficult to remember their passwords.
I once wrote an article on how to create secure, reliable email passwords. This task has now become simple, thanks to password managers that include password generators. These password generators can create complex passwords for you that are hard to guess by adding special characters and numbers.
Among the different password managers, I prefer and recommend Bitwarden password manager because it’s an open-source code, secure, and offers more features compared to its competitors. I have an interesting article for you citing the reasons why I ditched LastPass and migrated to Bitwarden.
How to go passwordless with Bitwarden
So, what exactly is passwordless login, and how do you make it work with the Bitwarden Password Manager? Let’s understand this new feature with an example.
Suppose you have installed Bitwarden password manager. The first step that you do is secure your account with a master password. This master password is required every time you launch the Bitwarden password manager. Only after successful authentication, you can view your Bitwarden vault which includes stored credentials.
Now you visit a website on your desktop or mobile which requires your login. You log in to the Bitwarden password manager and then search for the account in question, copy the password for the account, and then paste the password into the required login field for the account. With the right password, you’re granted access to the account.
In the above case, you still had to enter the master password, copy and paste the credentials from the vault for site authentication. With Bitwarden passwordless feature, you can eliminate both these steps and don’t need to enter the password nor copy any credentials.
The benefit of using biometric login is that you don’t need to input any passwords, and hackers cannot use your fingerprint scan against you nor one can see you physically type your password.
How to Enable Biometric Login in Bitwarden Password Manager
In this section, we will look at the steps to enable biometric login in Bitwarden password manager. When you enable the biometric login in Bitwarden, you eliminate the need of typing the passwords every time.
The biometric login feature is available for Bitwarden installed on Android devices, Apple iPhone, macOS, and Windows operating system. I will show you how to enable biometric login in Bitwarden on different kinds of devices.
Enable Unlock with Face ID for Bitwarden on iPhone
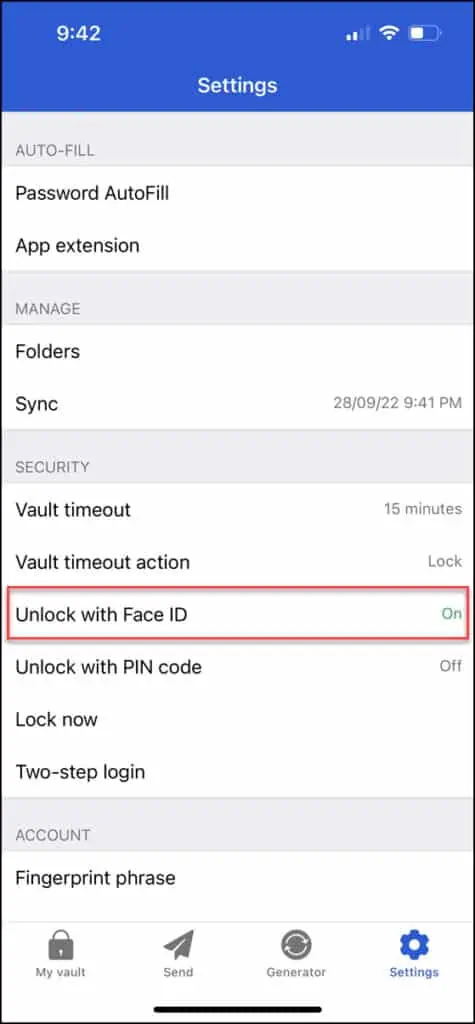
The first example shows enabling the unlock with face ID option for Bitwarden on Apple iPhone. This option is turned off by default, and you need to enable this manually for once. On your Apple iPhone, launch the Bitwarden app and enter the master password. Tap on Settings and under Security, tap Unlock with Face ID.
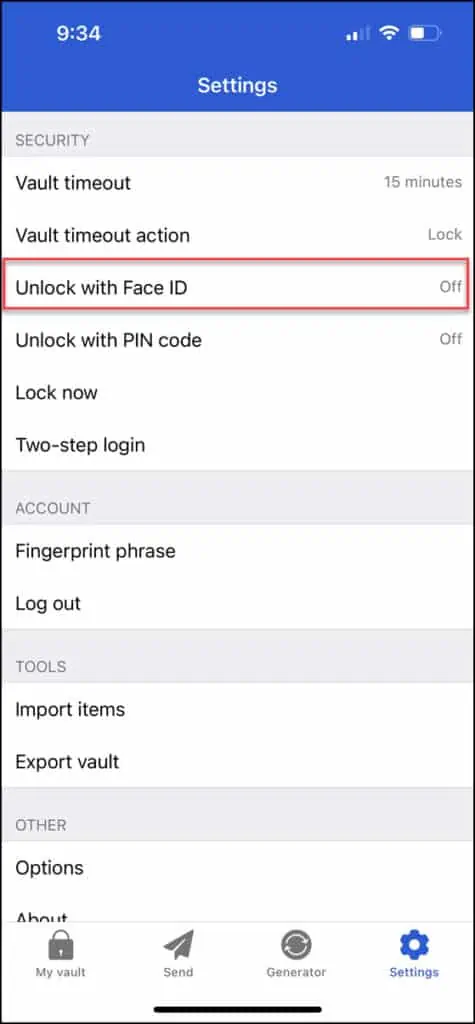
A pop-up appears asking “Do you want to allow Bitwarden to use Face ID?“. Tap OK to use your Face ID to unlock your vault.

The Unlock with Face ID is turned on now. So, what you have done here is enabled the option to authenticate the Bitwarden using your Face ID instead of entering the master password. When you browse a site that requires your login, you can unlock the Bitwarden with your face ID and use the autofill feature to submit the username and password. This is the best example of going passwordless with Bitwarden password manager.
Enable Unlock with Touch ID for Bitwarden on Mac
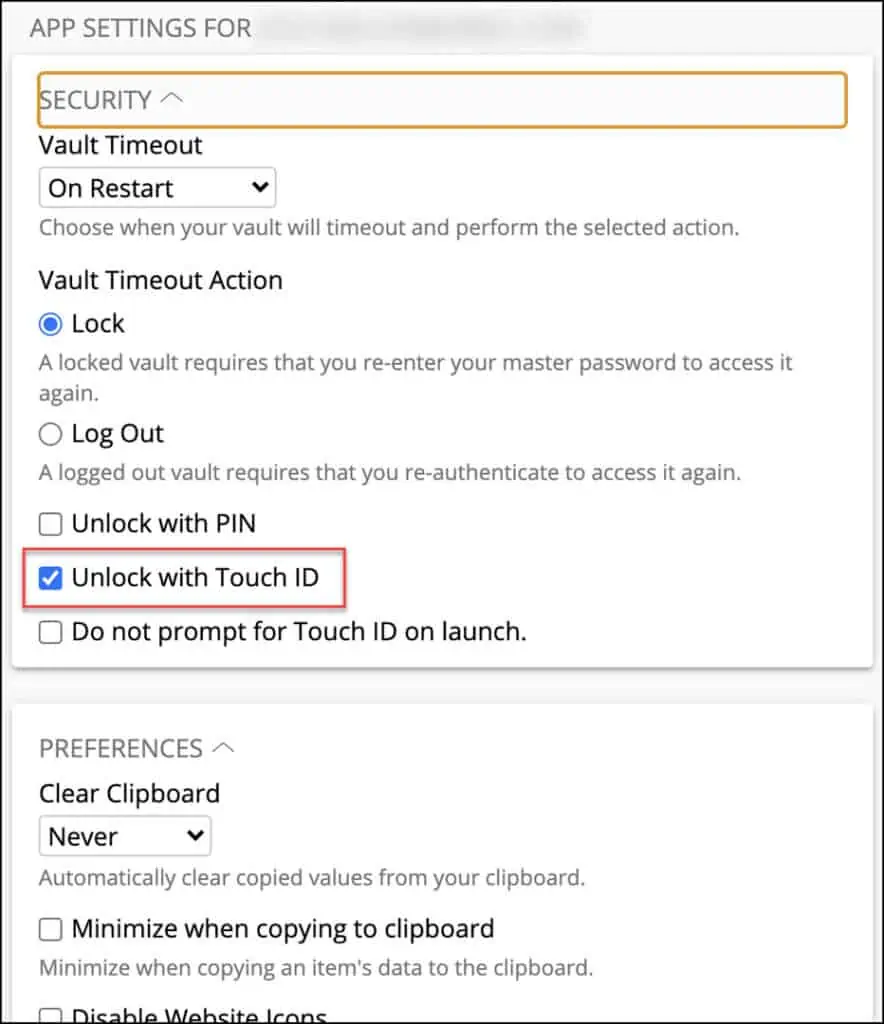
If you are Mac user, you can enable the “Unlock with Touch ID” option within the Bitwarden. Open the Bitwarden password manager and go to Settings > Security. Activate the checkbox for “Unlock with Touch ID“. After making this change, the next time you launch the Bitwarden password manager, you can authenticate using the Touch ID. On any sites that you wish to enter the credentials, you can now authenticate with your Touch ID and use the credentials for login.
Enable Unlock with Biometrics for Bitwarden on Android Devices
On Android devices, the Bitwarden passwordless feature works by enabling unlock with biometrics option. On your Android phone, if you have enabled only fingerprint authentication, you can unlock the Bitwarden using the same. And if you have enabled both Fingerprint and Facial authentication, you get a choice of both options during authentication.
Here is how you can turn on “Unlock with Biometrics” option in Bitwarden on your Android device. First launch the Bitwarden app and complete the authentication. Select Settings > Security and tap on “Unlock with Biometrics“. You will be asked to enter the master password to save the configuration changes.
Once you have turned on unlock with biometrics for Bitwarden, you can now use either fingerprint authentication or facial recognition feature to authenticate to Bitwarden and autofill the credentials on a site. I haven’t included any screenshots here because on Android phones, a security policy restricts taking the screenshots for Bitwarden app.
Turn on Unlock with Biometrics for Bitwarden on Windows OS
On Windows OS such as Windows 11, Windows 10, you typically install the Bitwarden browser extension on your choice of browser. After authenticating to Bitwarden extension, you have the option to enable the “Unlock with biometrics” under Settings.
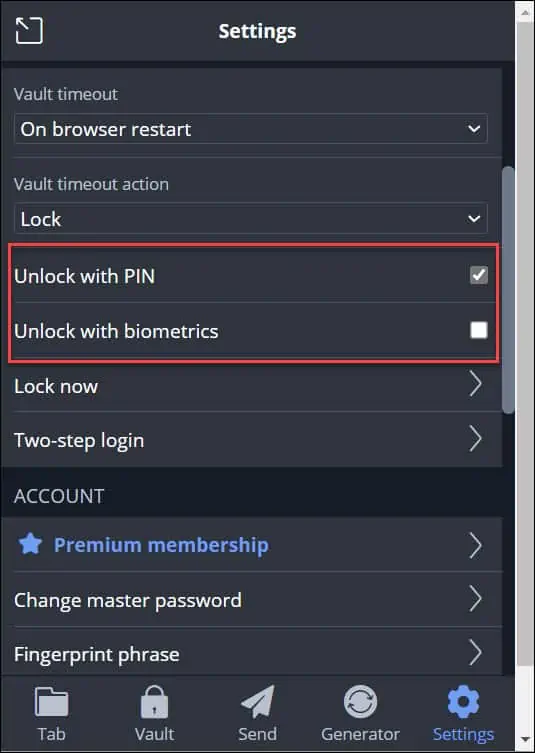
When you attempt to enable the biometrics unlock option for Bitwarden extension, you get an error “Browser integration is not enabled“. Browser integration is not enabled in the Bitwarden Desktop application. Please enable it in the settings within the desktop application. The description is clear, and you know what you have to do next.
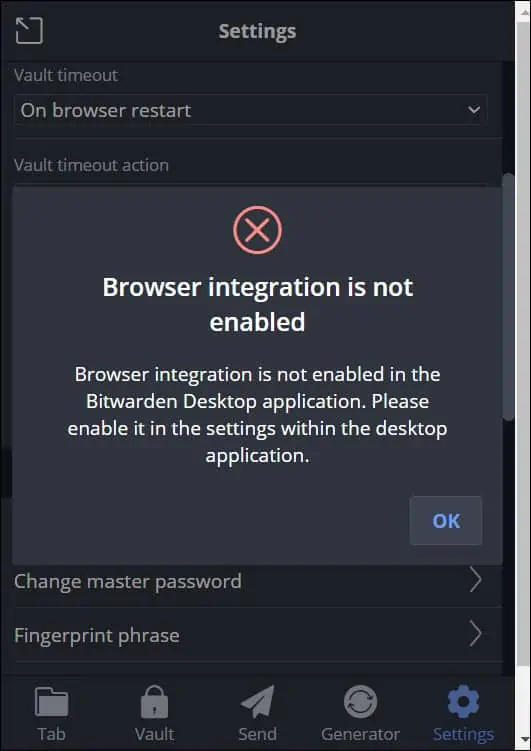
To resolve the above error, you must download and install the Bitwarden for Windows. Once you have done that, launch the Bitwarden application and authenticate with your master password. Click on File and select Settings. Scroll down and under App Settings, enable the option “Allow browser integration“. Click Close.
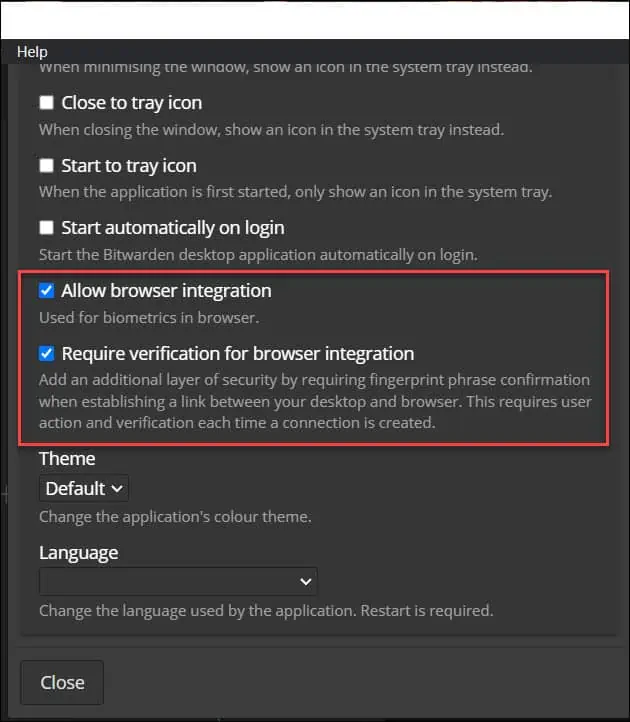
After you have successfully enabled the browser integration in Bitwarden desktop application, click on the Bitwarden browser extension and sign in with your master password. Click on Settings and under Security, turn on “Unlock with Biometrics“. That’s it !!
