Step-by-Step SCCM 1810 Upgrade Guide
Welcome to my post on step by step SCCM 1810 upgrade guide. SCCM 1810 is released and it comes with lot’s of new features and fixes.
After SCCM 1806, I have been asked about the release of SCCM 1810. Finally we have SCCM 1810 update available in the console.
The product team has been working on this release since couple of months. Now finally we see SCCM 1810 is released. You can read about all ConfigMgr 1810 features here. This guide will be part of my SCCM current branch guides as well. Click here to download Configuration Manager current branch guides.
Table of Contents
SCCM 1810 Prerequisites
Here are some of the SCCM 1810 system requirements that you need to meet before you install SCCM 1810 update.
- To install ConfigMgr 1810 update, you must have installed at least SCCM 1710, SCCM 1802 or SCCM 1806.
- Ensure that you are running a supported Operating System and SQL version.
- If you’re running a multi-tier hierarchy, start at the top-level site in the hierarchy. First perform the CAS upgrade, later you can begin the upgrade of each child site. Complete the upgrade of each site before you begin to upgrade the next site.
How to get SCCM 1810 Update
We have seen in this past that every SCCM update is rolled out globally. For existing customers it might take some time to appear in the updates and servicing node. However you will be notified when it is ready to install from the “Updates and Servicing” node in your Configuration Manager console.
Quick Info – The package GUID for SCCM 1810 is C8799F92-DC23-42A0-96FA-1862414C3967. The approx download size of this update is 2.22 GB.
Step-by-Step SCCM 1810 Upgrade Guide
In this step by step SCCM 1810 upgrade guide, we will see how to upgrade your SCCM current branch to SCCM 1810. This guide includes following steps.
- SCCM 1810 Prerequisites
- SCCM 1810 Prerequisite check
- Installing SCCM 1810 Update
- Monitor Installation Progress
- SCCM Console Upgrade
- Verify SCCM 1810 Installation
- Update Boot Images
- Upgrade SCCM Client Agents
Step 1 – SCCM 1810 Prerequisite Check
We will first do a prerequisite check before installing SCCM 1810 update. In my lab setup, i got an error and two warnings during SCCM prerequisite check. The error was pending system restart which I fixed by rebooting the server. However those two SQL related warnings is something that I ignored and went ahead with installation.
The Configuration Manager 1810 errors and warnings are covered in below post.
- ConfigMgr 1810 SQL Server Native Client Update Warning Prerequisite
- SCCM 1810 Prerequisite Check Failed
Run the PowerShell script and open the SCCM console and go to Administration > Updates and Servicing. If you don’t find the update 1810, click Check for Updates button.
Once you see the update is downloaded, right click Configuration Manager 1810 and click Run prerequisite check.
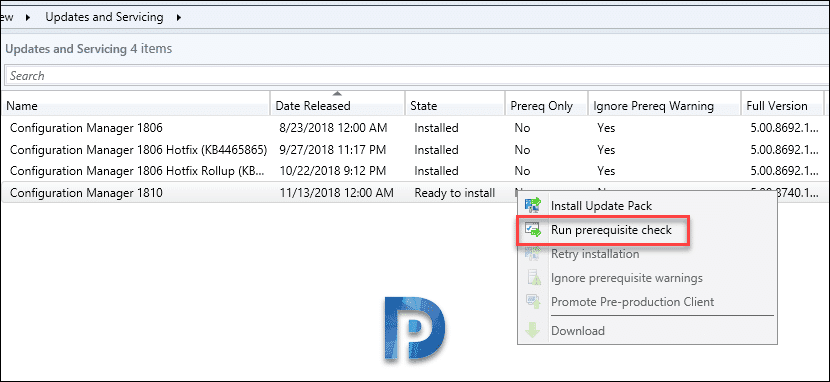 Open the ConfigMgrPrereq.log file located on C: drive of site server. Look for the line at the end which reads Prerequisite checking is completed. That confirms the prerequisite check is passed/complete. If you see any warnings or errors during prerequisite check, that should be logged in log file.
Step 2 – Installing SCCM 1810 Update
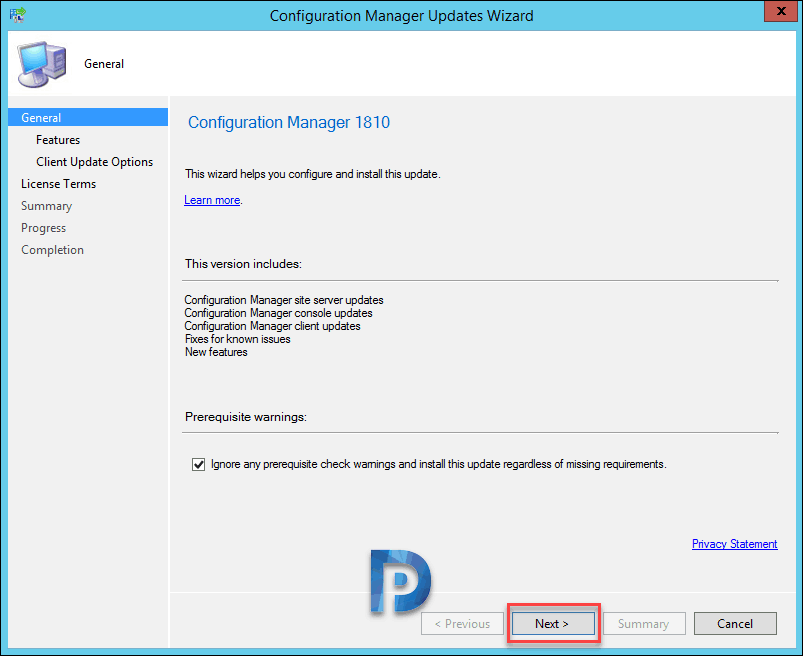
Now that the SCCM 1810 update is ready to install, right click Configuration Manager 1810 update and click Install Update Pack.
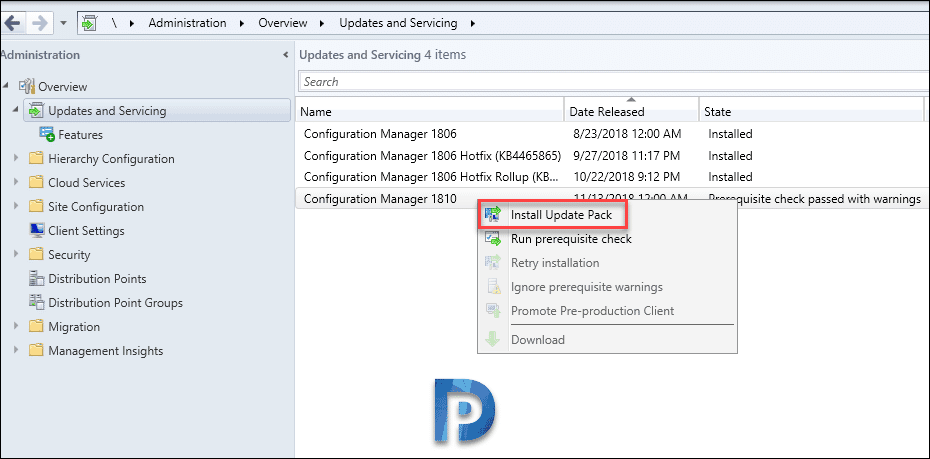 The Configuration Manager 1810 update includes.
- Configuration Manager site server updates and console updates.
- Configuration Manager client updates.
- Fixes for known issues.
- New features
At this point i will check the box “Ignore any prerequisite check warnings and install the updates regardless of missing requirements”. Click Next.
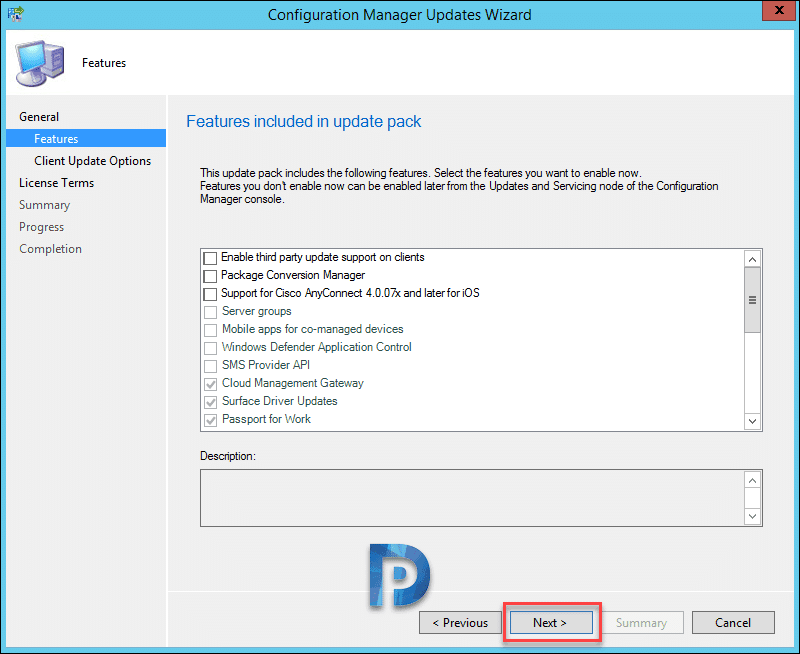
Select the New features that you want to enable. If not you can enable them later. Click Next.
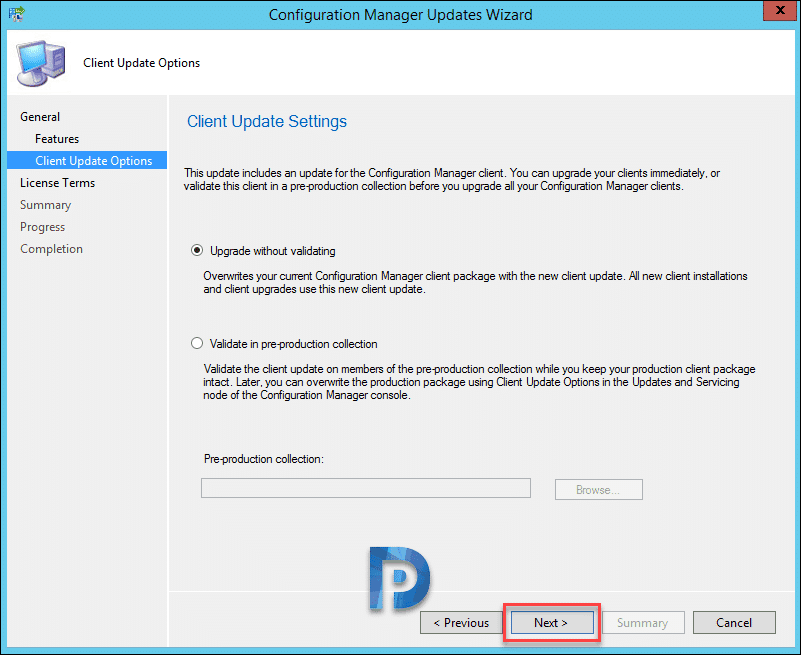
If you wish to validate client update on members of pre-prod collection, click Validate in pre-prod collection. Else go with upgrade without validating and click Next.
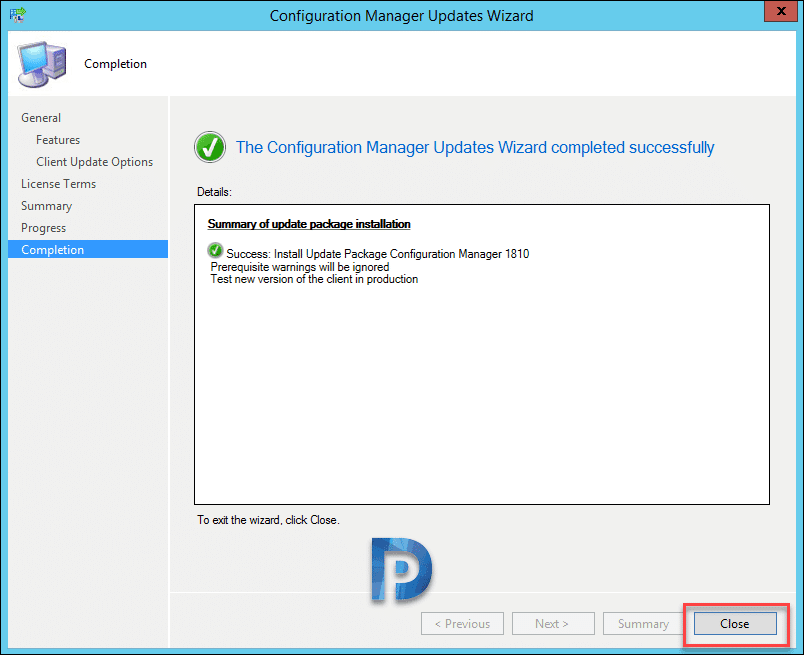
Click Next on rest of the pages and on Completion page click Close.
Step 3 – Monitor Installation Progress
While the SCCM 1810 update is installing, you can monitor installation progress. Click Overview > Updates and Servicing Status. Select the Configuration Manager 1810 update and click Show Status.
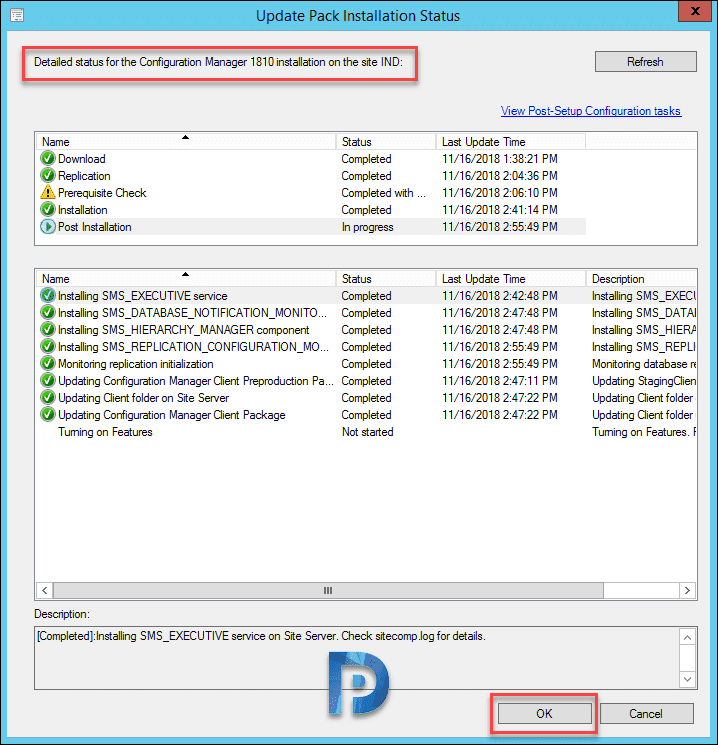
You can now see the detailed status for Configuration Manager 1810 installation. Keep clicking Refresh button until you see all the steps marked with green check.
Step 4 – SCCM Console Upgrade
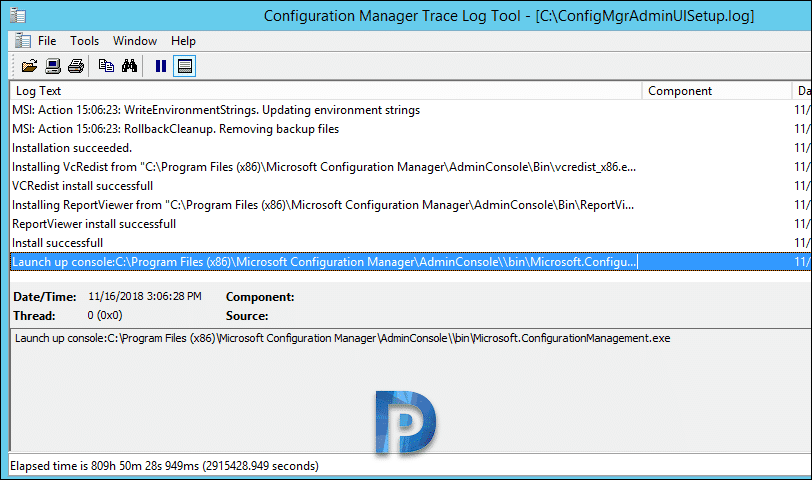
Once the update is installed, either refresh or close and re-open the console. You will see the console upgrade box. Click OK to begin the console upgrade. The old version of console 5.1806.1074.1500 will be upgraded to version 5.1810.1075.1300.
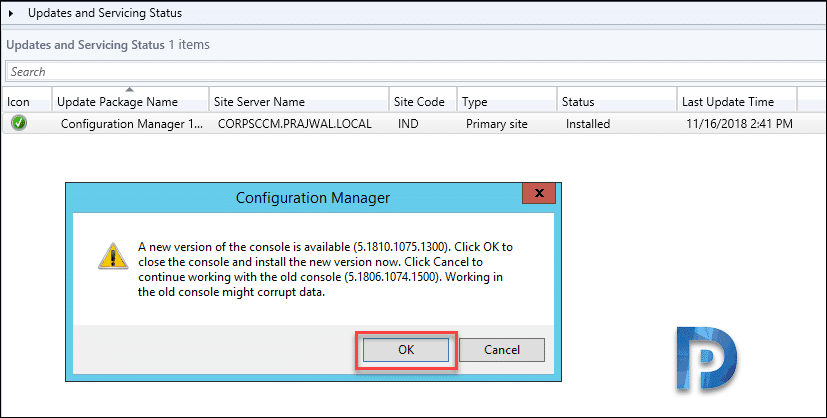
If you see any errors during console upgrade, there are two logs that can help you – ConfigMgrAdminUISetup.log and ConfigMgrAdminUISetupVerbose.log. Both of these are present on C: drive of site server.
Step 5 – Verify Update Installation
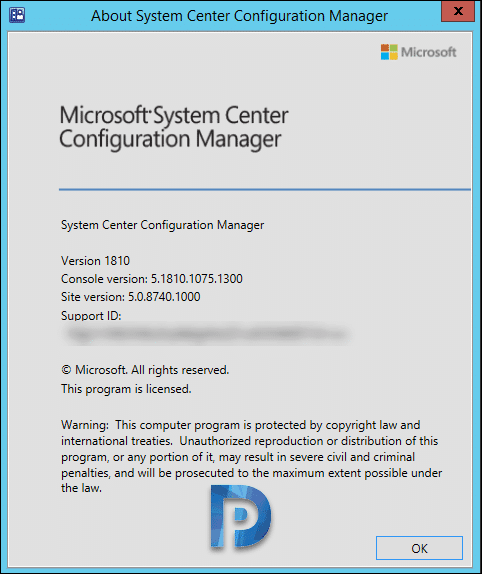
In this step we will verify update installation. After the console upgrade, the console will re-launch. Click on drop-down at top left and click About Configuration Manager. You should see the following details.
- Version 1810
- Console Version: 5.1810.1075.1300
- Site Version: 5.0.8740.1000
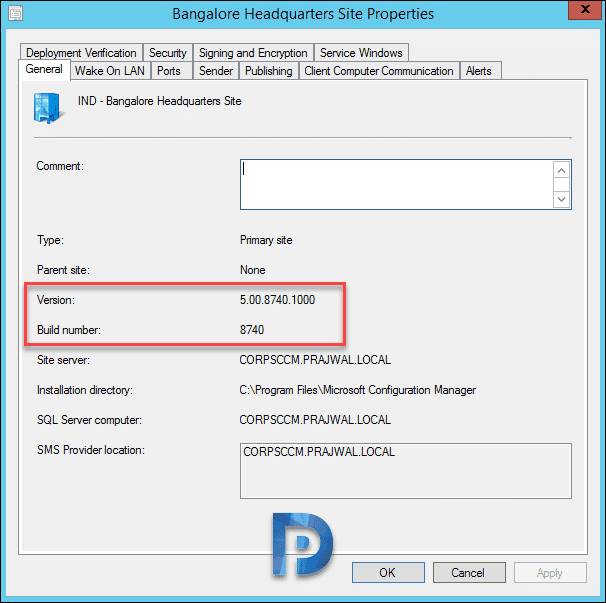
Let’s check the site properties. The version is 5.00.8740.1000 and build number is 8740.
Step 6 – Update Boot Images
Once you complete Configuration Manager 1810 upgrade, the next steps are :-
- Update Boot Images to all the distribution points.
- Update Configuration Manager client package to all DP’s if they are not updated. You can check the content status to see last update.
Step 7 – Upgrading SCCM 1810 Client Agents
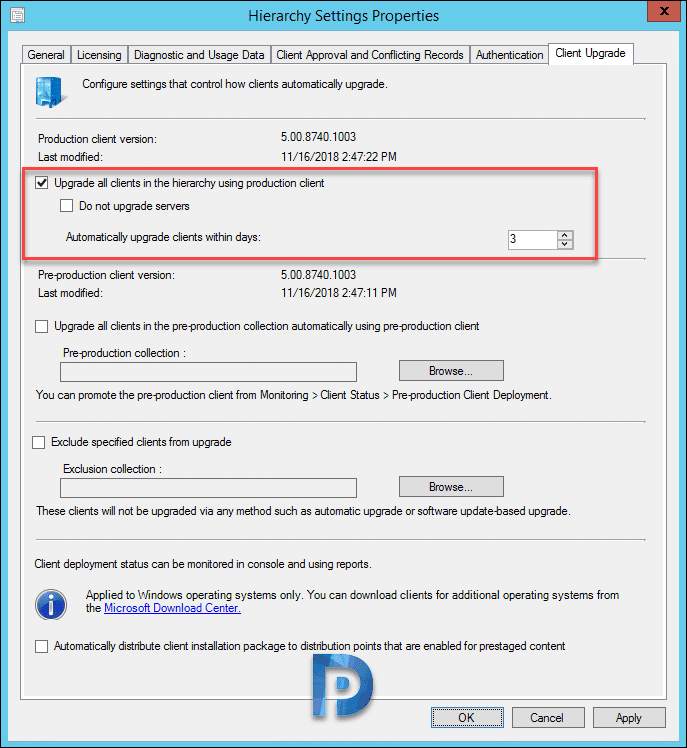
Once you complete SCCM 1810 upgrade, you must the client agents in the hierarchy. You can upgrade client agents using client upgrade feature. Go to Administration > Site Configuration > Sites. Click the Hierarchy Settings on top ribbon. Select Client Upgrade tab.
Make sure that Upgrade all clients in hierarchy using production client box is selected. You also also choose to not upgrade servers.
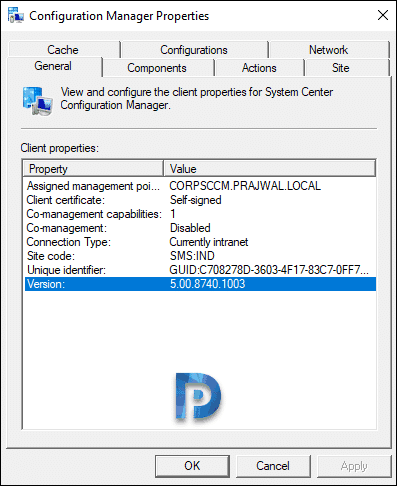
The upgraded client agent should display it’s version as 5.00.8740.1003.
 You can use the below query to find out the devices without the latest SCCM client version 5.00.8740.1003.
select SMS_R_SYSTEM.ResourceID,SMS_R_SYSTEM.ResourceType,SMS_R_SYSTEM.Name,SMS_R_SYSTEM.SMSUniqueIdentifier,SMS_R_SYSTEM.ResourceDomainORWorkgroup,SMS_R_SYSTEM.Client from SMS_R_System where SMS_R_System.ClientVersion != '5.00.8740.1003'

I install SCCM 1606 and then upgrade it to 1810. I found issue to push windows updates to Windows 10 and Windows 2012 client appear as “unknown” can you guide me how can I fix this issue.
Did you upgrade the client agents to latest version after upgrading to 1810.
i have installed with licensed SCCM 1806 version. Version 1810 and 1902 upgrade is available to install in the console. can i upgrade to 1810 / 1902 with out purchasing any extra license (free of cost), can i use same license of 1806 to 1810/1902.
Hi Vinod, check with your licensing team once.
The package GUID that I see for 1810 is different than the one mentioned above. I am using service connection tool and downloading the payloads on a different system than the primary site server. However, when I look at the version of the ccmcore.dll it matches the 1810 version. I downloaded on 11 April 2019. Could you guide me how it can be different?
Hi Team,
We did an upgrade to SCCM 1810 and could see that during online media, machine is picking HTTPS MP. From the logs, we could see that HTTPS is taking precedence over http. Any idea?
And under Management Point properties, what’s configured under client connections – https or http ?.
Earlier it was set to HTTPS.. Have changed to HTTP as a work around. However, this was not the case before prior upgrade.
Many thanks for another great article.
There’s a typo here: “without the latest SCCM client version 5.00.8634.1007.”, but the script to create the collection is correct: 5.00.8740.1003
Thank you so much. I have corrected it.
Hi Prag, the query still references the latest version ( 5.00.8740.1003)
Anything wrong with the query ?.
My pre req check says: Completed with warnings: Verifies that the version of Microsoft SQL Native Client installed on the site server meets the minimum requirements to enable TLS 1.2 support.
My sql is native is : 2012 / 11.2.5058.0 I dont know how to resolve this. Any help please?
Install SQL Server 2012 Native Client SP4. https://www.microsoft.com/en-us/download/details.aspx?id=56041
Since upgrading to 1810 applications no longer download. Prior, no issues. Have you encountered this?
Do you need to remove ADK 1802 and install 1809 before you start the upgrade of SCCM to 1810
it’s not necessary, but recommended as the below link
https://docs.microsoft.com/en-us/sccm/core/plan-design/configs/support-for-windows-10
“If you need to update the Windows ADK, do so before you begin the update of Configuration Manager. This order makes sure the default boot images are automatically updated to the latest version of Windows PE…” (https://docs.microsoft.com/en-us/sccm/core/servers/manage/checklist-for-installing-update-1810)
Thanks for that note.
it’s needed as below link
https://docs.microsoft.com/en-us/sccm/core/plan-design/configs/support-for-windows-10
Hi Prajwal. Thanks. this worked. I’m having trouble however running the client sql query against my site database. Error;
Msg 208, Level 16, State 1, Line 1
Invalid object name ‘SMS_R_System’.
Hi Prajwal, nice guide. I ran the powershell script but I am still not seeing the update. Any suggestions ?
Try restarting smsexec service after you run the powershell script.