2 Ways to Check Secure Boot Status on Windows 11
This tutorial will help you to check secure boot status on Windows 11 using different methods. With multiple methods, you can easily find if secure boot is enabled, disabled or unsupported in Windows 11.
According to Microsoft, Secure Boot is a security standard developed by members of the PC industry to help make sure that a device boots using only software that is trusted by the original equipment manufacturer (OEM).
Most new laptops or PCs loaded with Windows 11 OS comes enabled with Secure boot. Enabling Secure boot is beneficial for every Windows PC along with UEFI mode.
Another setting related to Secure boot is BIOS mode, UEFI. UEFI is a specification for a software program that connects a computer’s firmware to its operating system (OS).
Secure Boot feature when enabled protects your machine from malicious malware that can hamper the normal boot process. This means only systems with proper cryptography, digital signature enabled, can be loaded.
You can check secure boot status on Windows PC only when it has been enabled. In case the secure boot isn’t enabled on Windows 11, you can enable it with simple steps.
Read: How to Enable Microsoft Defender Application Guard for Edge
Enable Secure Boot from PC BIOS menu
On Windows 11 PC, you can enable Secure Boot from the PC BIOS menu with following steps:
- Reboot your PC and open the PC BIOS menu by pressing a key while your PC is booting, such as F1, F2, F12, or Esc.
- This Secure Boot setting is usually in either the Security tab, the Boot tab, or the Authentication tab. Find the option and set it to Enabled.
- Save the changes done to BIOS and restart your PC.
Note: If the Windows 11 PC doesn’t allow you to enable Secure Boot, try resetting the BIOS back to the factory settings.
There are different ways to enable Secure boot on your Windows 11 PC and you can go any of the easy method. If secure boot is enabled but not active or if secure boot status is unsupported, you may need to check it with hardware vendor about the issue.
Read: Secure Windows Systems against Meltdown Spectre CPU Flaws
Method 1 – Check Secure Boot Status using MSInfo32
To check the status of Secure Boot on your PC using system information:
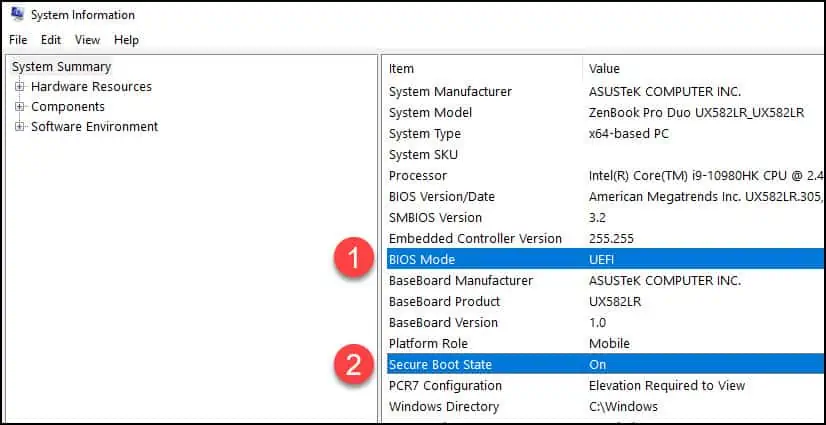
- Press Windows+R to open Run Window. Type msinfo32 and press Enter.
- System Information opens. Select System Summary.
- On the right-side of the screen, look at BIOS Mode and Secure Boot State. If Bios Mode shows UEFI, and Secure Boot State shows On, then Secure Boot is Enabled.

Method 2 – Check Secure Boot Status via Windows Security Settings
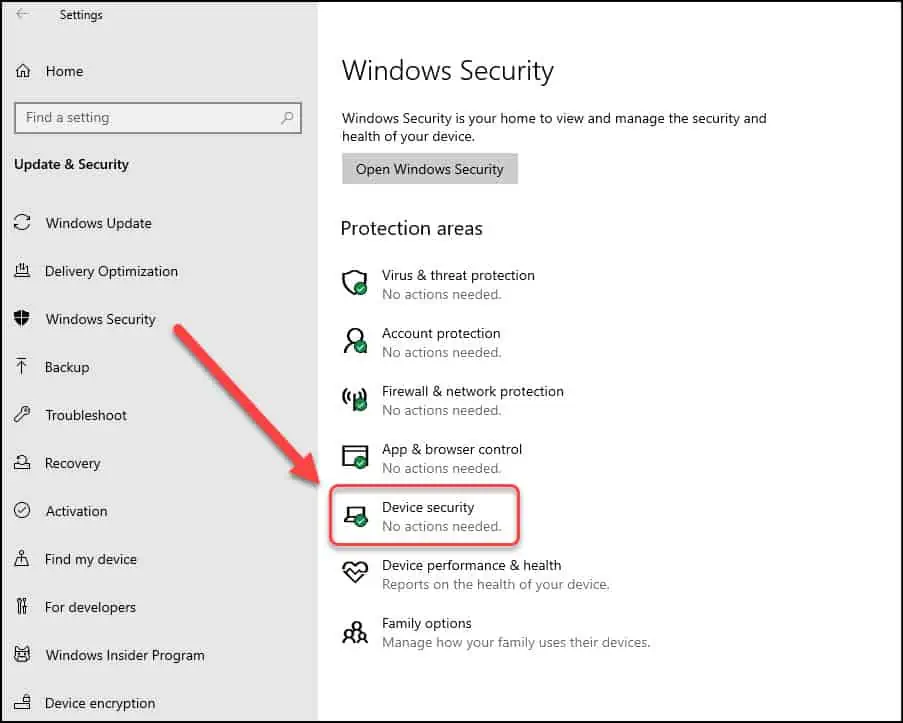
On your Windows 11 PC, click Start and open the Settings app to enter Windows settings interface. Choose Update & Security option from Windows Settings.
On the Windows Settings screen, select Windows Security. The Windows Security screen displays the security and health of your device. From the list of options, select Device Security.

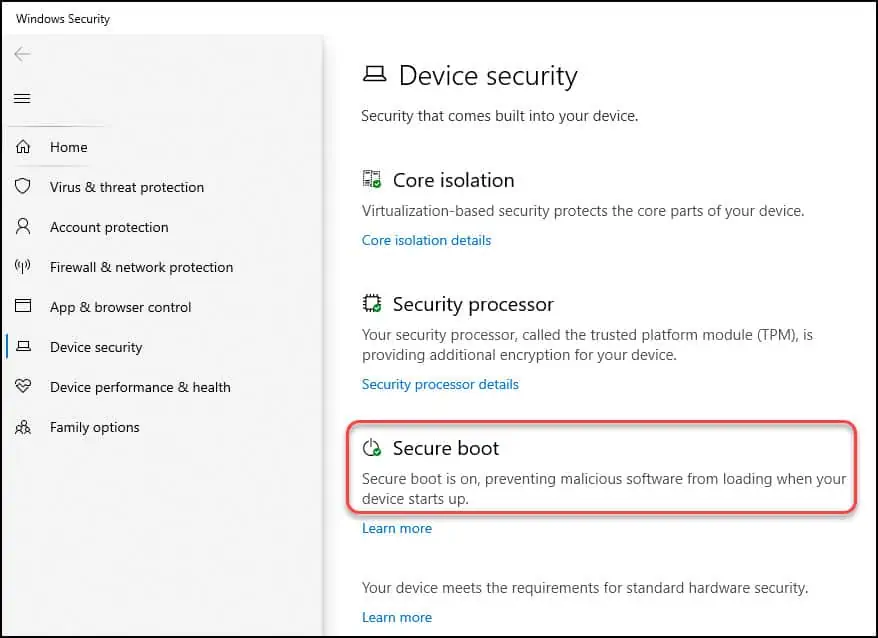
On the Device Security window, you can find out if Secure Boot is enabled or disabled on Windows 11 PC.
If you find no secure boot option on Device security settings, your secure boot is disabled. And if you see Secure boot is On, it means the secure boot feature is enabled on the PC.

Conclusion
A Secure Boot is a security measure that ensures your computer starts only if the firmware is authenticated. This prevents unauthorized software from running at startup and infecting your system. One of the ways to secure your PC is enabled the Secure Boot feature which protects your machine from malicious malware that can hamper the normal boot process. If you have any questions, kindly let me know in the comments section below.
