Capture Windows 7 Using SCCM 2012 R2
In this post we will see the steps to capture windows 7 using SCCM 2012 R2. This post is different from the one which shows the steps to build and capture the operating systems using SCCM 2012 R2. We will not be using build and capture approach here rather we will capture a reference operating system, i.e. capture windows 7 using SCCM 2012 R2 and we will also see how to deploy the same using SCCM 2012 R2 in the next post. Please note that the computer operating system that we are going to capture should not be part of domain, else the sysprep fails during this process. So you capture a computer that has windows 7 installed (along with softwares like office, adobe reader etc) which is not joined to the domain. At any point of time you can check the step by step guide for SCCM 2012 R2 which contains all the posts related to SCCM 2012 R2.
Capture Windows 7 Using SCCM 2012 R2
We will first create a task sequence media and create a capture media which is in saved .iso format. This .iso file contains the necessary files and instructions to capture a reference operating system. The same .iso file captures the operating system and stores the captured OS in .wim format. Once we get the .wim file we will import the file to SCCM 2012 R2 and we can use this .wim to deploy this OS to another computer either by using SCCM or WDS.
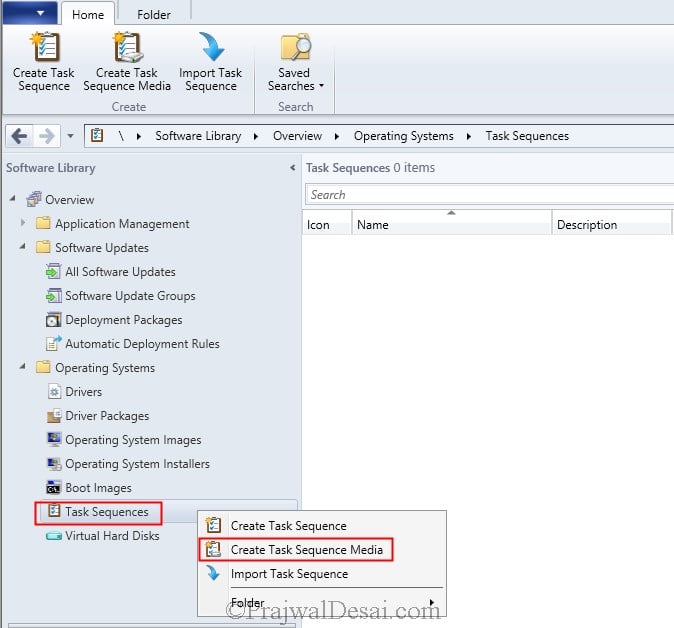
The first step involves creating a capture media which is in .iso file. Launch the ConfigMgr console, click on Software Library, expand Overview, expand Operating Systems, right click Task Sequences and click on Create Task Sequence Media.
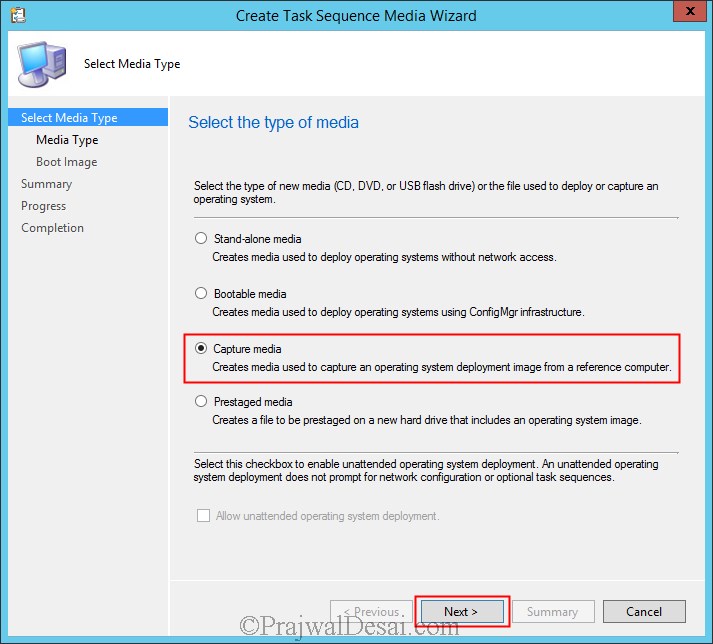
Type of Media – Select the type of media as Capture Media. Click Next.
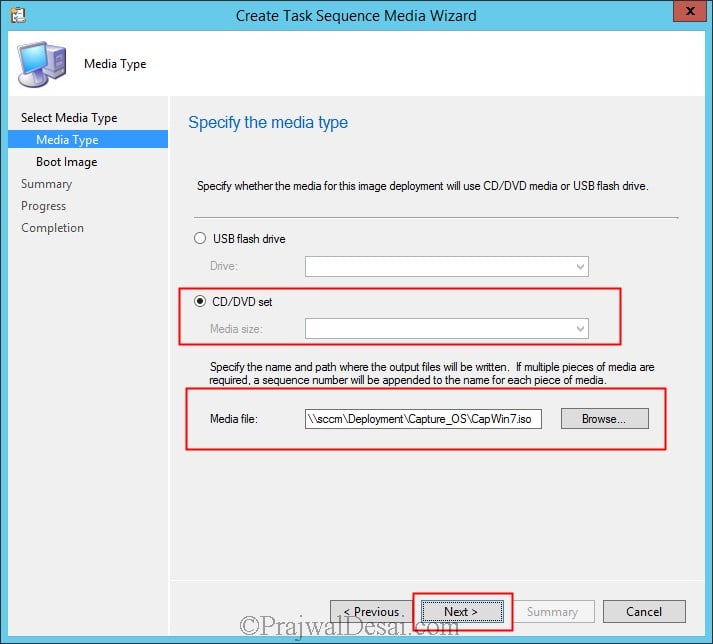
Media Type – You can select either USB flash drive or CD/DVD. I have tried using USB flash drive and even that works. In this example we will choose CD/DVD, and we will store the media file in one of the shared location on SCCM server. You can choose to store the capture media on any shared location, it may not be necessarily SCCM server. One important thing here you must save the capture media with .iso extension. Click on Next.
Selecting Boot Image – This is very important step. Select the Boot Image by clicking on Browse. Select Boot Image (x64) and for DP click on Browse and select the desired DP. Click Next.
NOTE – You must first enable the command support on both the boot images(x64 and x86) and then distribute it to the distribution point. To enable the command support right click on each of the boot image, click on properties and under Customization tab check the box Enable Command Support (testing only). Enable command support for both the boot images. By default the boot images are not distributed to DP and if you don’t distribute the boot images you will not be able to select the DP in the below step. To distribute the boot images to DP, right click on each boot image and click Distribute Content.
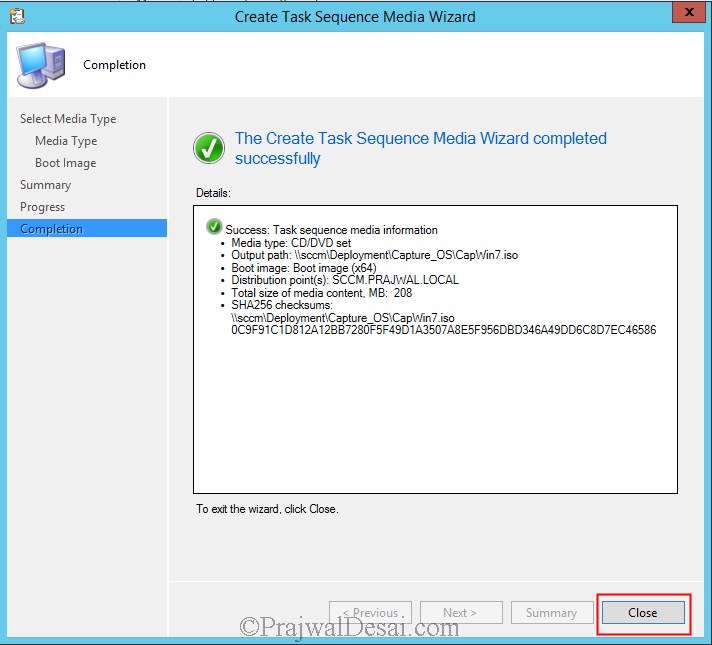
The capture media has been created by the wizard. Click on Close.
After creating the capture media we will now mount the capture media (.iso file) on the windows 7 machine and run the image capture wizard. In this example I have a virtual machine which has been installed with windows 7 professional SP1 x64 OS and we will be capturing this computer OS image. If its a physical machine you can burn the capture media .iso to a CD and insert it in the CD tray and run the image capture wizard. If its a virtual machine you can mount the .iso file by providing the path where the capture media .iso file exists. On a virtual machine when you mount the .iso file by providing a shared location, it asks for a user account to access the .iso file, provide a domain user account which has enough permissions to access the folder where the .iso file exists.
Once you mount the capture media on a windows 7 machine you will see the autorun box. Click Run TSMBAutorun.exe, you will see the Image Capture Wizard. Click on Next.
Image Destination – Provide a folder path where the captured image should be stored. The name of the captured image should have .wim as extension. Also provide a user account that has enough permissions to store the captured file to the shared folder. Click Next.
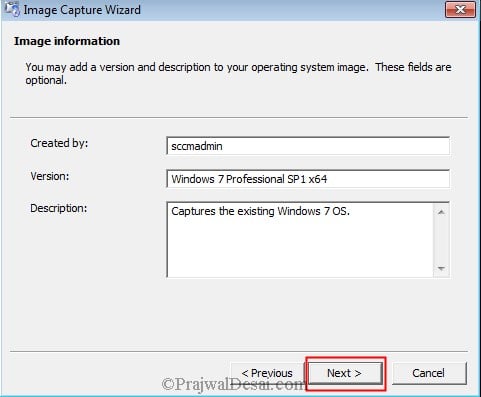
Image Information – Provide the image information such as Created by, Version and Description. Click on Next.
Click on Finish to complete the Image Capture Wizard. Note that we have just run the image capture wizard, in the next step sysprep captures the OS.
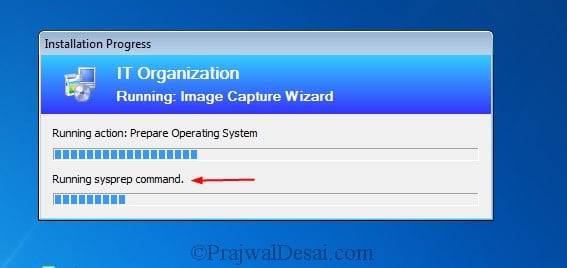
In the below screenshot we can see that the sysprep command is running. Wait for the computer to restart automatically where the actual capture process begins.
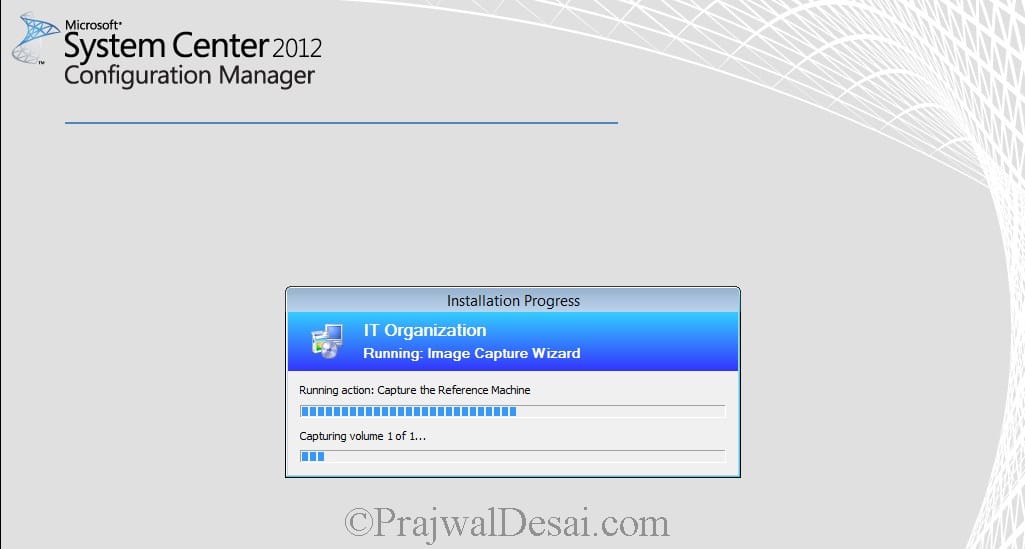
The computer restarts and we see that the wizard now starts capturing volume and the OS. This process took around 25 minutes to complete in my lab setup.
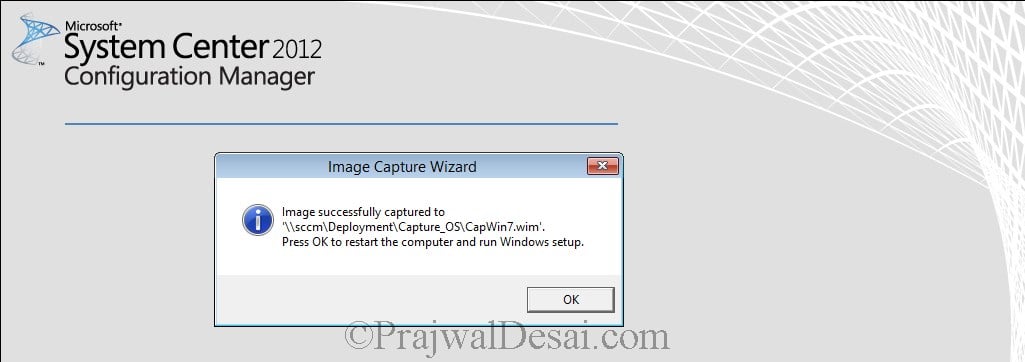
Alright, we now see that the windows 7 OS image has been captured and saved to the destination folder. Click on OK. The computer now restarts and enters Out of Box experience (OOBE).
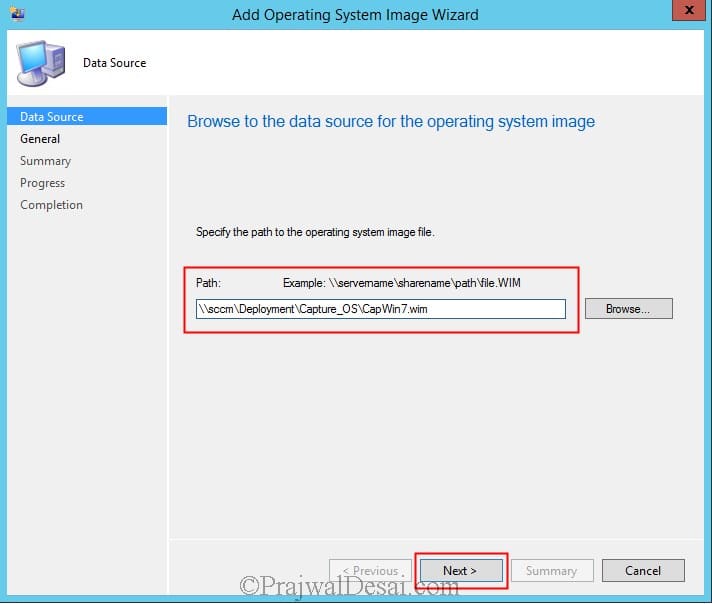
Once we have got the .wim file, we can import the .wim as operating system image in SCCM 2012 R2. To import the operating system image, right click Operating System Images, click on Add Operating System Image. Enter the path where the captured .wim file is present. Click on Next.
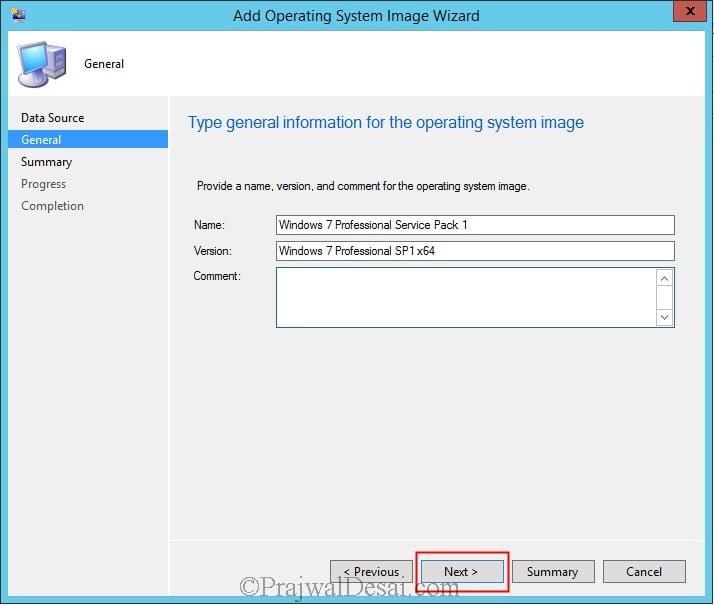
The name and version is picked up automatically, click on Next.
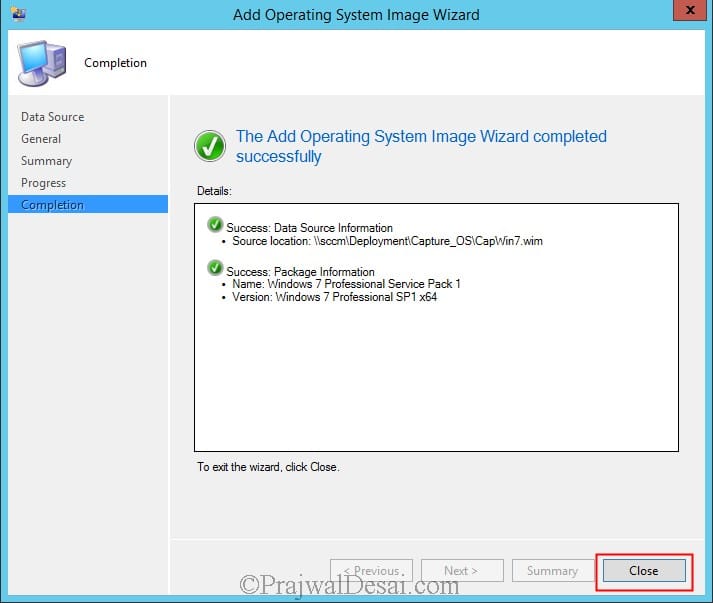
The operating system image has been imported successfully. Click on Close.
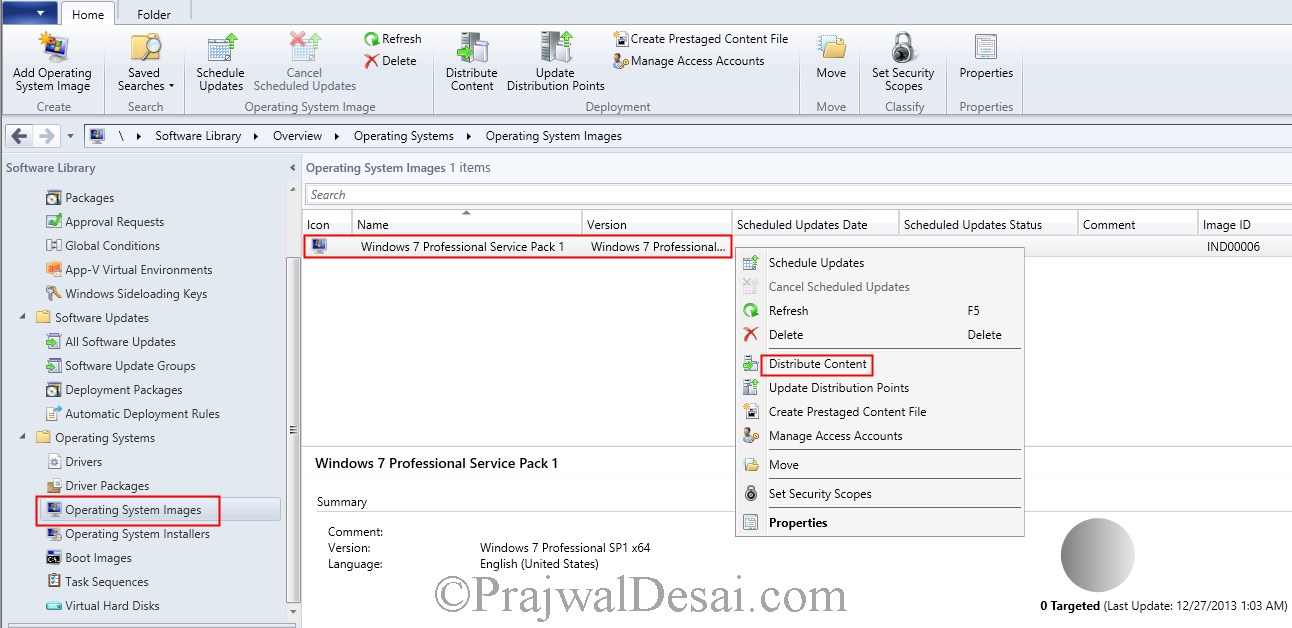
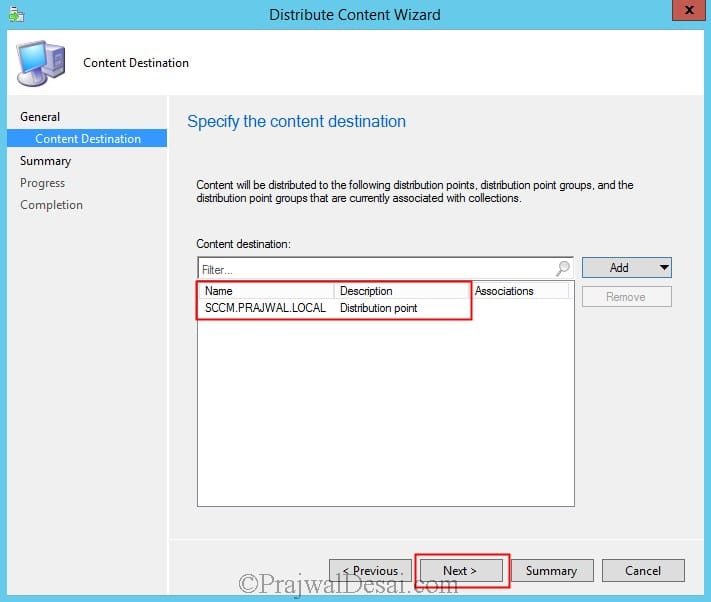
After importing the image the next step is to distribute the image to the DP. Right click on the windows 7 image and click on Distribute Content.
Add the DP and click Next.
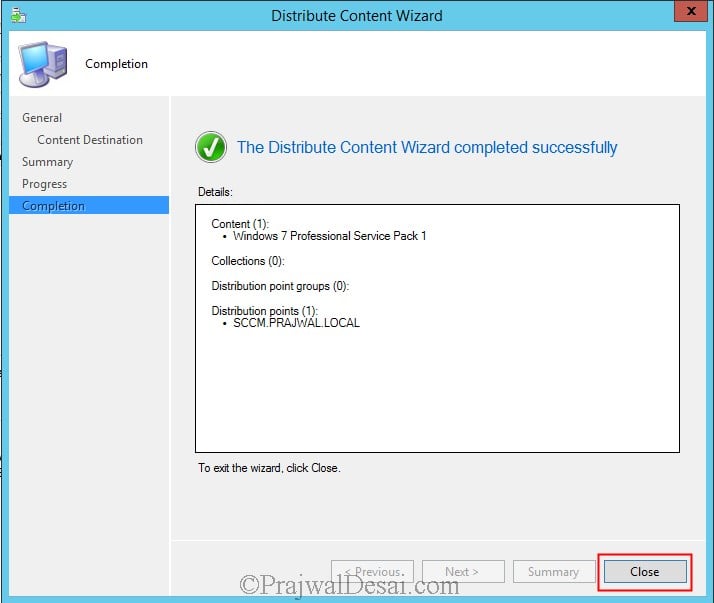
The image file has been distributed to the DP. Click on Close. Wait for sometime while the DP updates the content, check the content status and you must see a green circle which means that content is now available with DP.





My Windows 7 Enterprise reference image is in audit mode prior to running this capture sequence. However the .wim file it creates is only about 80MB. Our other Win 7 images are around 10GB. Should the device not be in audit mode?
Hi Prajwal,
I’m using SCCM 2012 R2 and tried several times but still getting the error. Plz advice if possible. Thanks,
i had the 1st time ther error code 0x80040154 and then 0x00000057
Please help me -.-
Hi Prajwal,
After configuration of image whenever i tried to but the system it gives me the error: TFTP Download :smsboot/x64/abortpxe.com
PXE Boot aborted. Booting to next device…..
Is there any configuration sould be done in Domain controller and dhcp server?
Kindly help me to fix this issue.
Hi Prajwal
This set of step-by-step articles is one of the best sources of good solid information I have seen for a long time. It is really excellent and it helped me greatly in deploying SCCM 2012r2. Well done!
Didnt got Micdam, what you are trying to say
Hi,
did the sysprep process capture also registry values from the source computer?
Hi Prajwal,
i am following your link for OS image capture , after captured the image, source computer is rebooted and got an error unable to read task sequence configuration disk. for more information contact administrator.
I rebooted multiple times still same error, even i am not getting my windows OS also, Could you please help me how to resolve this issue?
Hi Prajwal,
am following this link to capture an image through SCCM
https://www.prajwaldesai.com/capture-windows-7-using-sccm-2012-r2/
But I am not able to capture image and facing below issue,
https://uploads.disquscdn.com/images/75313aab1f11b2e1b3f67e7d8310679e69378c928266bea17f1414e7e80b0297.png
hi prajwal,
after creating capture & mount on win7 Click Run TSMBAutorun.exe, after doing yes there is no process of congfiguration manager please help.. i have done all step in two times
mount the .iso file and run the TSMBAutorun.exe
DO NOT extract the file
Hi Prajwal,
Part 14 : Capture Windows 7 Image Using SCCM 2012 R2
Create Task Sequence Media.-Capture Media-CD/DVD & selected path for media file.
after this stage, I am not able to distribution point.
Could not have learnt SCCM OSD without your posts. Thanks for all the help!
Thanks you Danny.
Hi Prajwal,
I have followed above steps to capture machine running on VMware workstation. Workstation machine gets rebooted every time after showing “Preparing Network Configurations” and not going ahead to capture volume or OS. Please let me know what I am missing.
Please find below about my Lab Configurations.
1. have created Lab on Vmware Workstation and everything is connected through bridged network.
2. I am trying to capture Windows 7 SP1 64 bit running on virtual machine.
3. Added network Adapter (VMXNET3) to Boot Image X64 (Not in Boot Image X32) but both boot images are distributed to DP. Later on I created ISO file by selecting Boot Image X64.
Hi Prajwal,
I’m using SCCM 2012 R2 and tried several times but still getting the same error. Plz advice if possible. Thanks,
https://uploads.disquscdn.com/images/87b1fda12052fc441553b3d2292a85762c76027954448ce973a6552e5aeff2cf.gif
check this – https://www.prajwaldesai.com/task-sequence-has-failed-with-the-error-code-0x80070070/
Edit the task sequence and remove any “Format and Partition Disk” step. You can’t use this step without wiping the disk at all. In the “Apply Operating System Image” step, make the following modifications before deployment: Set the destination to a specific Disk 0 and Partition 1 so it’s fixed after that.
i got this error , i tried to choose Disk 0 and partition 2 but with no luck too , Any suggestion ?
Hi Prajwal, when i deploy windows 8 using sccm 2012 r2 , it format all the partition so i lost the data , is there any way to format only c partition without format others partitions , i tried many ways with no luck
Hi prajwal is it possible to store the .wim file locally? when making the capture image? I tried to save the .wim locally on a vm with Win7, that worked just fine. but now that I copied it to my sccm server and I have to do the step “add operating system image” it gives me the following error:
Nick, reference the full UNC path on the SCCM server.
In filename \servernamesharefilename.wim
You must also distribute content.
Is this the most recommended way to make a capture image? Would using MDT lite touch, be easier or handier? I don’t know it but I’ve heard of it.
I guess Yes.
https://technet.microsoft.com/en-in/library/hh824849.aspx
Is it possible to add a custom answer file for the sysprep in this process?
Hi Prajwal, I love your website very awesome!!! I am glad there are still Sys Admins/Engineers out there that still like helping the next guy out. I salute you sir!!!
Thank you so much 🙂
Hi,
Could you show me step by step zti deployment of os using sccm 2012
Hi Prajwal,
I am just following this guide but for Windows 10, however when I get to the sysprep part it fails with 0x0004005. This is a new build so its not related to the max 3 sysprep limit. I can successfully sysprep a Windows 8.1 machine, this is running now. For Windows 10 do I need to install the Windows Assessment and Deployment Kit (Windows ADK) for Windows 10 and remove the 8.1 version?
Many Thanks.
Windows ADK 10 is required. You can install it and keep the older version.
Thanks Prajwal, I got this working in the end. However if anyone else is looking to do this. There are two types of the Windows 10 ADK. You need to make sure you use the RTM one as the 1511 version doesnt work, MS advise you stick with the RTM version if your using SCCM and plan to deploy Windows 10 using Win PE. The 1511 fails when capturing a Windows 10 reference machine on the identifying hardware part.
sorry solved problem
somehow changed the SQL server his network connection to public i changed it back en everything was working
Some questions concerning not connectid to the site is this also a couse
i wanna try now zero touch
greetings Paul
That’s great.
Hello Prajwal
nice site and this amazing blog. It is super
I am stuck with booting from PXE i deployed een OS
i am using a lab environment with Vmware
but after PXE it says no operating system can be found
can you take a look Teamviewer available
i do not fully comprehend VMWare workstation 10
greetings Paul
Hello Paul,
I’ve got the same problem. Could you solve it and how? Thanks in advance.
Hi Prajwal
I am getting quite stuck with ‘Selecting Boot Image’ and ‘Distribution Point’, I don’t seem to be getting any options to select. Can you help?
i am unable to update SCCM in windows 7 , getting sms agent services is disable mode pls suggest
Hei Prajwal,
First thank you for this amazing blog. It is awesome. It is Possible to deploy 100 of Devices with different WindowsKeys? How I can initialize all the OEM Keys in the SCCM.
Cheers
Mergim
I am not sure if that be done with SCCM in easy way.
Hi Prajwal,
When i try to import my device into a device collection, it doesnt show up in the “Captured OS” collection but it does show up in the “All Systems” collection. Does it take time before it will show up or will it show up only after i deploy it? Any ideas? thanks!
Apologies, this is meant to be posted on the next instruction guide – Deploying windows 7. Let me know if you want me to repost it there.
Cheers,
Eric
It takes some time to show up the computer entry in the collection. Make sure the computer is online during the process of importing it.
Hi Prajwal,
As stated by Banyu, I ran the TSMBAutorun but nothing happened after the wizard end (no smsts.log). I’m currently trying to capture a windows 7 x86 reference image.
Please advice.
Hi Prajwal,
I have following all the steps in this post, all step by step. But, sysprep and capturing process is not showing up and not running after I have finished the Image Capture Wizard. After I have click Finish on Summary page, is no present anything process. How I can to troubleshoot and also solving this issue, so I can capturing the Windows 7 OS?
Thanks.
Hi Prjwal,
nice to meet you again ,,
It was very help full for setting up the SCCM2012r2 lab ,, Application create and deployment its working fine ,,
Need help in capturing the OSD ,, i tried the same steps , Image was capturing but after 15 min i am getting the below error
i was able to see the wim file which was storing on my share drive while capturing the image .But after get this error WIM image file also disappearing , please help
Did you check the SMSTS.log file ?
https://www.prajwaldesai.com/location-of-smsts-log-during-sccm-osd/
Hi I am unable to find the solution with error log ,, if posible please help
Again me Prajwal. I want to capture image of Windows 7 Pro SP1 x64 virtual machine (on vSphere) with Adobe Reader and Office installed. In order to do this I have to import vmxnet3 drivers into x64 boot image. Do you recommend doing so with default sccm 2k12 r2 x64 boot image or I should import boot image for Win7 and then import vmxnet3 drivers into it thus not modifying default sccm 2k12 r2 boot image? I ask you this because while working with MDT and WDS I did not have default boot images.
Hiya! Love the stuff on your blog, very helpful for an SCCM novice. =) Anyway, I have a question regarding capturing:
Is it possible to do your method as a common Task Sequence? i.e. make the task sequence available for a device collection in Software Center and have it do the same thing as the capture media method? Thanks, Martin
Hi there! Thank for this, very helpful indeed. I have one question though. The Win7 reference image does it need to have all drivers installed or do I just make sure the drivers are imported to SCCM? Thanks, Gui
You must import the required drivers before you deploy the windows 7 reference image to any computer.
But as per previous post u mention machine will be part of work group not domain. for example my laptop in domain with so many software and desktop shortcut setting configured also outlook configured. can i take image from my laptop with exiting setting.
Hi Deepak, the computer operating system that you capture should not be part of domain, else the sysprep fails during this process.
Hi Prajwal,
can we capture the windows 7 image from running laptop or desktop with running setting capture.
Yes you can capture the windows image from laptop/desktop.
While capturing the windows 7 its showing your machine in domain . So ,after remove domain its captured perfectly.
My concern is can we capture windows 7 within the domain.
If possible please share some screeshots.
Hi Varun, I have mentioned in my post “Please note that the computer operating system that we are going to capture should not be part of domain, else the sysprep fails during this process.”
Hi Friend,
Greetings..!!
Could you share Upgrading OS from XP to WIN 7/8 (USMT) document please……………………………………………………… 🙂
Regards,
Sagar Kandi
TechMahindra
i hope for windows 8 os also be the same setps .
If Existing OS Windows 7 to windows 8 upgradation steps avaiable as well , Please post it.
Sure Ashad, I am working on it..
Thank you very much for this post & i will try later time.
Regards,
Arshad
thanks for this great post. but i am facing a problem when i try to capture windows 7 on physical machine it always hanging, and also for virtual machine after the required restart for the sysprep i got this error :-
your PC ran into problem and need restart . you can search on line for this error: HAL_INITIALIZATION_FAILED.
while when i capture windows 8 it work fine.
thanks.
Hi,
Any update on HAL_INITIALIZATION_FAILED as am getting too this error after sysprep.
This is the best tutorial I have seen regarding anything to do with SCCM. Your instructions are clear and easy to follow. Thank you so much for going to the trouble. I’m eagerly waiting for the next step in this tutorial – creating a Task Sequence to deploy this Windows 7 image. Thanks again Prajwal
Hi Prajwal..
i am a big fan of you.. all the articles which you are publishing excellent.
Can you share a guide for XP to WIN 7/8 (USMT) migration document.
Regards,
Sagar Kandi
Tech Mahindra
will post on that soon..
Hi Prajwal
it’s necessary to
createmodify Unattended.XML file using Windows SIM Tool after capturing
reference image for e.g. clear start up menu, configure maintenance, create
local admin account etc
@sccmghost – You can do that if its your requirement.
can i know the steps with screenshot customize answer file of build & capturing reference image
@SCCM – As of now I don’t have the screenshots and the content ready.. It shall be posted later.