How to Deploy Java using Configuration Manager SCCM
In this post, I will show you how to deploy Java using Configuration Manager. You can download the latest version of Java, package the Java application in SCCM and deploy it to your clients.
Configuration Manager makes it easy to package and deploy Java and create deployment that gives instructions to the SCCM client on how and when to install the software.
Before you can deploy an application, create at least one deployment type for the application. For more information, see Create deployment types for the application.
There are other ways to deploy Java in SCCM, for example, you can use Patch My PC tool to deploy Java and even Java updates to your client computers. If you don’t have access to third-party tools, you can manually download and package Java application in SCCM.
The Java application is compatible with both Windows 10 and Windows 11 OS. The Java SE version 16.01 and later is fully compatible with Windows 11. For manual installation of Java, refer to the guide on how to install the Java on Windows 11.
What is Java?
Java is a popular programming language and computing platform first developed and released by Sun Microsystems in 1995. There are plenty of applications and websites that will not work unless you have Java installed, and more are created every day.
Java is fast, secure, and reliable. From laptops to data-centers, game consoles to scientific supercomputers, cell phones to the Internet,is everywhere.
The free version of Java is available for download on Java website. However, you need to be aware of the Java licensing. The free version of Java license permits certain uses, such as personal use and development use, at no cost. Commercial license and support is available with a low-cost Java SE Subscription.
Download Java Offline Installer for SCCM
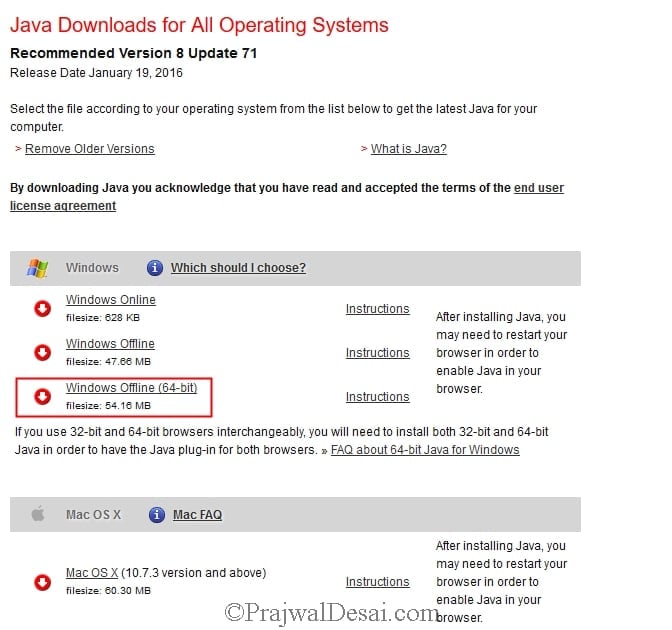
In this section, we will look at the steps to download the Java installer for Configuration Manager. Java installer is available for Windows, macOS, Linux and Solaris. There is no .msi installer available for Java, the offline installer is an executable file. There is a trick to get the Java MSI installer which is covered in the next section.
You must download the Java installer based on the version of operating systems that you have in your setup. If you have a mix of 32-bit and 64-bit OS, you must download both the installers, create 2 deployment types and deploy it using SCCM.
In case you have only 64-bit operating systems, then download only 64 Bit version of Java installer. You can download the latest version of Java offline installer from Java Site. In this article, we will deploy 64 bit of Java using Configuration Manager.
How to Get Java MSI Installer?
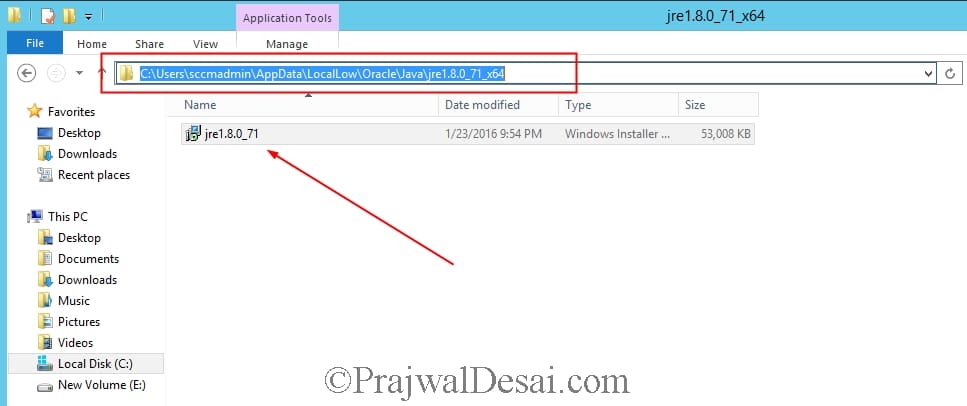
You can extract the .msi file out of Java.exe installer which will make it easy to populate install and uninstall commands automatically in Configuration Manager. To get the Java msi file you either need to install the java on one of the computers, or you need to run the Java executable (do not install the entire application).
When you install or run the executable, the Java msi file is extracted in the following path %userprofile%>appdata>Locallow>Oracle>Java. Copy the Java MSI installer to Sources folder or a shared folder that you typically use for storing the applications for Configuration Manager.
How to Deploy Java using Configuration Manager
Let’s see how to deploy Java using Configuration Manager. Launch the Configuration Manager console. Click on Software Library > Overview > Application Management. Right click Applications and click Create Application.
On the Create Application Wizard page, select Automatically detect information about this application from installation files. Specify the folder path of the Java MSI installer file and click Next.
The Java MSI installer file will be read by Configuration Manager and the required information will be imported. The Product Code is one such important info that is populated from the Java msi file. Wait for the other information to be imported. Once you see it’s complete, click Next.
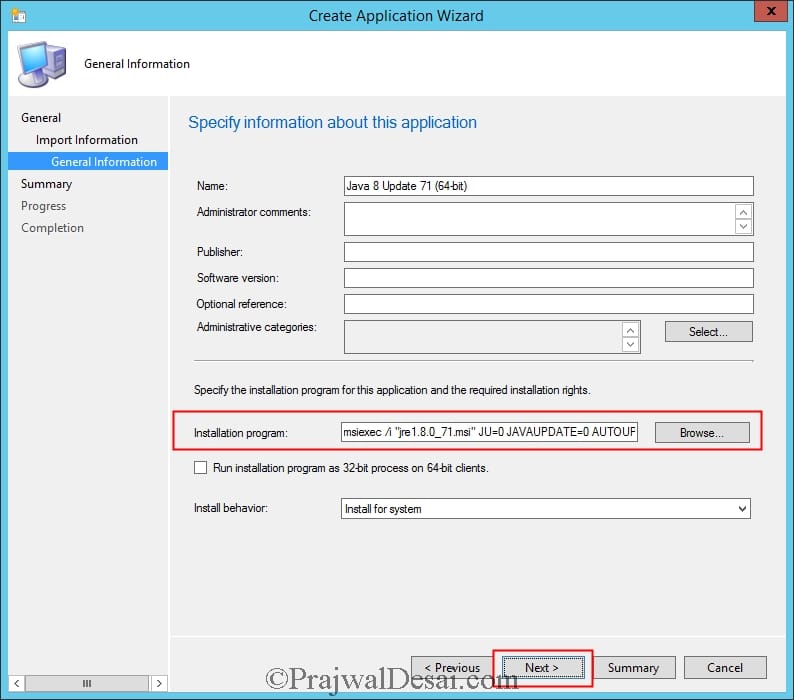
On the General Information window, you must specify basics details about the Java application such as Name, Publisher etc. The Java application details that you specify here will appear in Software Center for users.
To install Java silently on the client computers, enter the below install command. If you are deploying a newer version of Java application, ensure you update the version of Java in below command. The /q parameter is essential if you want to install Java silently using Configuration Manager.
msiexec /i "jre1.8.0_71.msi" JU=0 JAVAUPDATE=0 AUTOUPDATECHECK=0 RebootYesNo=No WEB_JAVA=1 /q
The install behavior should be set to install for system. Click Next.
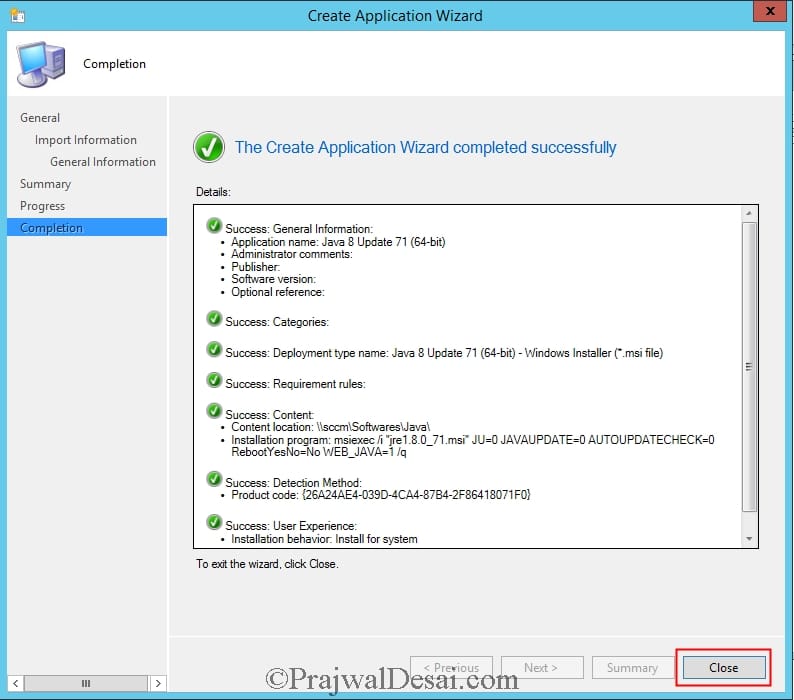
Review the Java application settings on Summary window and click Next. On the Completion window, click Close.
Distribute the Java Application to Distribution Points
In Configuration Manager, when you create a new application or package, the content must be distributed to all the distribution points. If the content is not available on SCCM DP, the clients will fail to download the application or application gets stuck at downloading content in Software Center.
To distribute the Java application content to distribution points, right-click Java application in SCCM console and select the Distribute Content option. In the distribute content wizard, select the distribution points to which you want to send the content and complete the wizard.
In the event where the Java application fails to distribute to remote distribution point, you can always redistribute the failed content in SCCM.
Next, you must deploy the Java application to device collection. Choose a device collection to test the application installation, and then you can expand the deployment to a larger collection. Read the below helpful guides on creating device collections in Configuration Manager.
- Create Microsoft Edge Device Collection in SCCM
- Create SCCM Windows Server 2022 Device Collection
- Windows 11 SCCM Device Collection
- Windows 10 Device Collection in SCCM
Test Java Application installation on Computers
After you have deployed the Java application to device collection in Configuration Manager, you can test the Java application installation on client computers. Log in to a client computer and launch the Software Center.
If you haven’t enabled the new Software Center yet, you can do so which gives you more customization and branding options. Take a look at the SCCM Software Center customization guide to explore all the customization options available for Software Center.
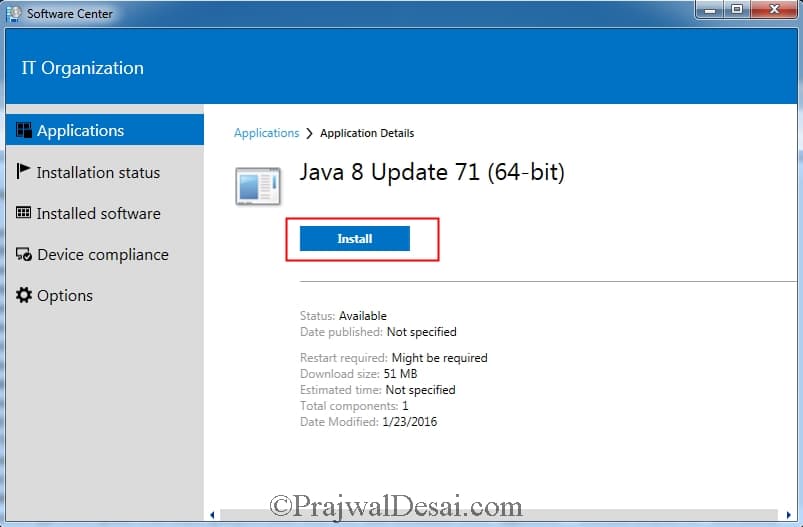
In the Software Center window, click the Applications tab and from the list of apps, select Java application and click Install. The client now downloads the Java application installation files from the distribution point associated with the boundary group and the installation begins.
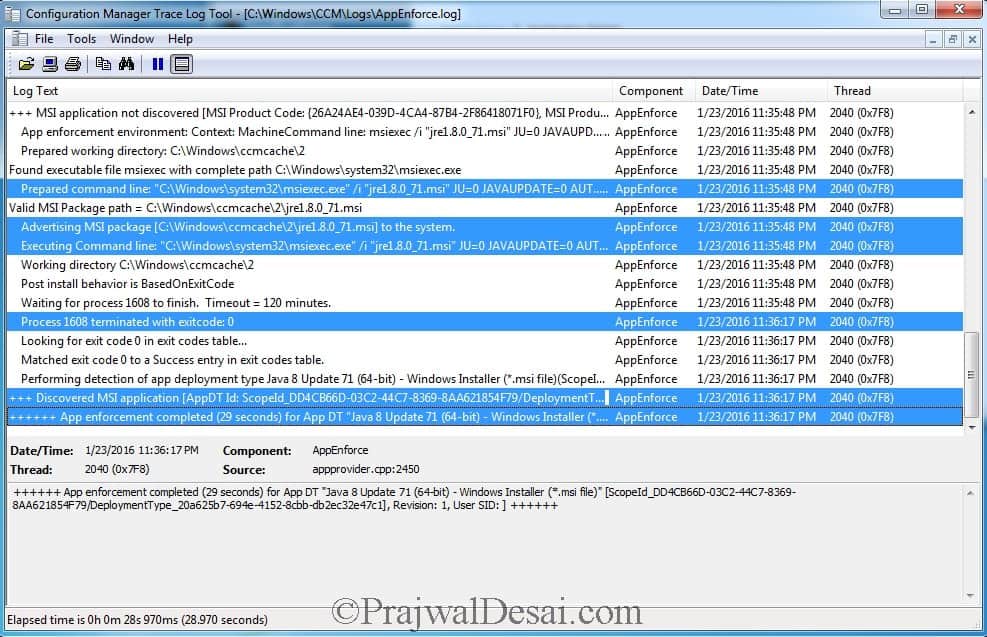
You can monitor the AppEnforce.log on the client computer to monitor the progress of application installation. Any Java application installation failures along with errors will be logged in this file. For more information, take a look at all the SCCM log files.
As we have specified /q parameter in the Java application install command, the Java application installs silently and the user will not see any installation window.
We see the Java application has been installed successfully on the client computer. The status of the application shows as Installed. The Uninstall option also works fine if you decide to uninstall Java from Software Center. If you want to uninstall the Java app, just click on Uninstall.
If the app fails to install, open the AppEnforce.log file and look for errors. In the below screenshot you can see the command line that we used to install Java worked perfectly fine. This completes the Java application deployment in SCCM.
Read Next
Take a look at useful application deployment guides in Configuration Manager:




Hello
I installed jre 1.8 333 in my environment. I still have old versions 32 bit Java on the devices. How can I remove these in SCCM?
Hi,
How to Deploye JDK application through SCCM
Hello,
I wanted to know how to update Java once it has been deployed? Or, how to update non-Microsoft software with SCCM.
i need to update all client machines with the latest Version of java 8u162 but first i need to clean all java already installed, do you have any idea about it
i have used the below :
Task Sequences .
uninstall : wmic product where “name like ‘Java%%’ and not name like ‘Java 8 Update 162%%'” call uninstall /nointeractive
install Java 8u162 with Comment below :
@ECHO OFF
xcopy deployment.properties “C:\Windows\Sun\Java\Deployment\” /Y /Q /V
xcopy exception.sites “C:\Windows\Sun\Java\Deployment\” /Y /Q /V
jre-8u162-windows-i586.exe /s AUTO_UPDATE=Disable REMOVEOUTOFDATEJRES=1
Hi Prajwal,
I did follow your instruction above and works well to only users with admin right but not for standard user in Win 7 Pro.
Do you have any suggestion for standard users deployment?
How do you do this with Windows 10. I had no problems with finding the MSI file but now with Windows ten the folder does not show. Has anyone else ran into this issue?
Same here sir
Same here
On windows 10 the MSI file does not show or could not be found. The folder path is also not available and if we extract manually the msi file is missing.
HI,
I think above is different with update 121 ?
As
Hello, I followed the step-by-step guide and everything is perfect, I have doubts if this command uninstalls the previous versions of java ??
There is definitely something wrong with Java’s installers.
We’re currently using Oracle’s Java Enterprise MSI files, trying to deploy Java 8 Update 102.
Using a vbscript I developed that will elevate with UAC when needed, it runs perfect with an account with administrative privileges.
I’ve given this package to my VDI administrator that tries to inject it in with an admin account, the installation fails.
I try to push out the package via SCCM, it gives me error 1603 (and further investigation in the MSI log file, it gives an error 1722 when the MSI reaches Oracle’s custome action to run “installer.exe” with parameters).
Making matters worse, this enterprise MSI file fails when you simple double-click on it and try to install with an admin account. It will only install fine when you instantiate an elevated command prompt and run with a silent install with /q. In GUI mode, it simply fails too.
My hinch is that although the MSI is being run as administrator, Oracle somehow screwed up their custom action and runs it with a non elevated access, which causes it to crash.
Just follow the sequence well, you will see that the MSI will install Java Installer files to “C:Program Files (x86)Javajre*yourversionhere*” and the installer.exe is the real application that will install Java on the workstation.
Here’s the exact MSI log about where it crashes:
MSI (s) (E0:54) [16:55:21:246]: Product: Java 8 Update 102 — Error 1722. There is a problem with this Windows Installer package. A program run as part of the setup did not finish as expected. Contact your support personnel or package vendor. Action installexe, location: C:Program Files (x86)Javajre1.8.0_102installer.exe, command: /s INSTALLDIR=”C:Program Files (x86)Javajre1.8.0_102\” WEB_JAVA_SECURITY_LEVEL=H STATIC=0 WEB_ANALYTICS=0 EULA=0 NOSTARTMENU=1 INSTALL_SILENT=1 AUTO_UPDATE=0 REPAIRMODE=1 ProductCode={26A24AE4-039D-4CA4-87B4-2F32180102F0}
the msi file does not run… I think it happens to the latest version of java, which they are trying to charge for msi files download.
What version of java are you deploying ?.
Hi
I would like to ask you if there is any way to automatical uninstal older java version after launching automatical instalation of java. I Have an issue, because some comuters in my network have 4 or 5 javas on them. I was using your method to install newest java versions on all devices.
Have you tried this with update 77 & 91 at all? This method of deployment used to work, but with the last 2 releases when you grab the MSI it seems to be corrupted and will not execute. I have tested it from several machines. Wondering if anyone else is experiencing this issue?
Nope. I need to test this in the lab setup once.
Check this.
Hi Karol, I have not removed the comment. I never do that, I checked the spam and the comment was not there in the spam. I am still wondering where did your old comment go.
Maybe just something didn’t work well. Anyway – can you please answer me to the question above? Seems like you’re using few parameters with same meaning (“JU=0 JAVAUPDATE=0 AUTOUPDATECHECK=0”) and some that could be seen in other installers but not this one (“RebootYesNo=No”) according do Oracle website.
Why did you remove my comment about parameters?
Which comment ?. I will check if it has marked as Spam.
I wrote: Where did you get options like “JU=0 JAVAUPDATE=0 AUTOUPDATECHECK=0 RebootYesNo=No” ? They seems to be different according to Java website: http://docs.oracle.com/javase/8/docs/technotes/guides/install/config.html#table_config_file_options ; and it was tagged as “removed”.
Have you tried deploying 32-bit Java to a 64-bit machine? I believe its broken.
Hey i will give a try tomorrow on my lab setup.
@Jonathan – Deployed 32 bit java to 64 bit machine successfully. I believe it works fine.
In what regard? Do you get an installer error when manually testing the deployment? Also when deploying a new version of java I find it useful to do this with an install.cmd that also includes the removed of the last version of java deployed to the machines and a complete removal of all icons that are sun/ oracle related.