Installing And Configuring Windows Deployment Services
In this post we will see how to install and configure Windows Deployment Services. Windows Deployment Services is a technology from Microsoft for network-based installation of Windows operating systems. In windows server 2003 it was called as Remote Installation Services (RIS). The purpose of WDS is to remotely deploy the windows operating systems, Windows Deployment Services role in server 2008 R2 enables you to efficiently deploy Windows operating systems, particularly Windows 7, Windows Vista and Windows Server 2008 R2. Windows Deployment Services role can be used to set up new computers through a network-based installation without the IT Professional having to be physically present at each computer and without having to install directly from CD or DVD media.
Lab Setup – I have setup 2 virtual machines, the first virtual machine is installed with Windows Server 2008 R2 Enterprise SP1 OS and its our domain controller. The second virtual machine is installed with Windows Server 2008 R2 Enterprise SP1 OS and its our WDS server. The DHCP server role has been installed on the domain controller, this DHCP service will provide IP addresses to the other machines.
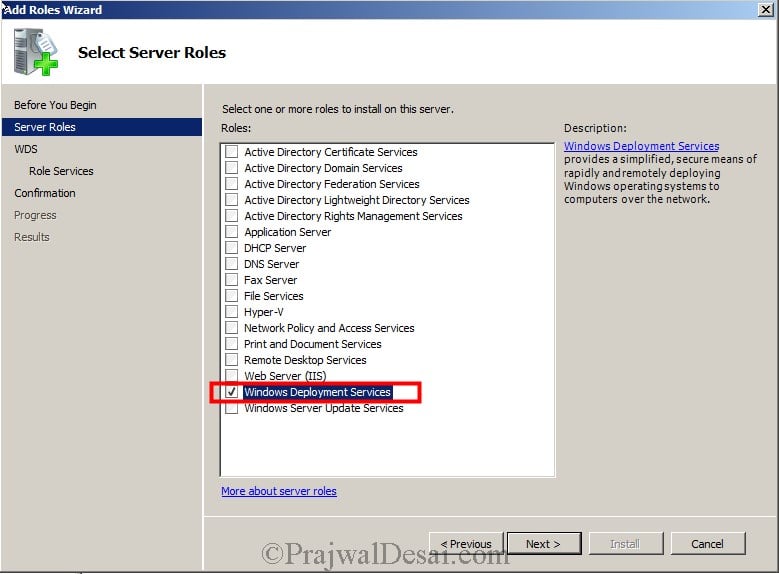
On the server where you are installing Windows Deployment Services role, launch the Server Manager, right click on Roles, click on Add Roles. On the Server Roles page, select Windows Deployment Services. Click on Next.
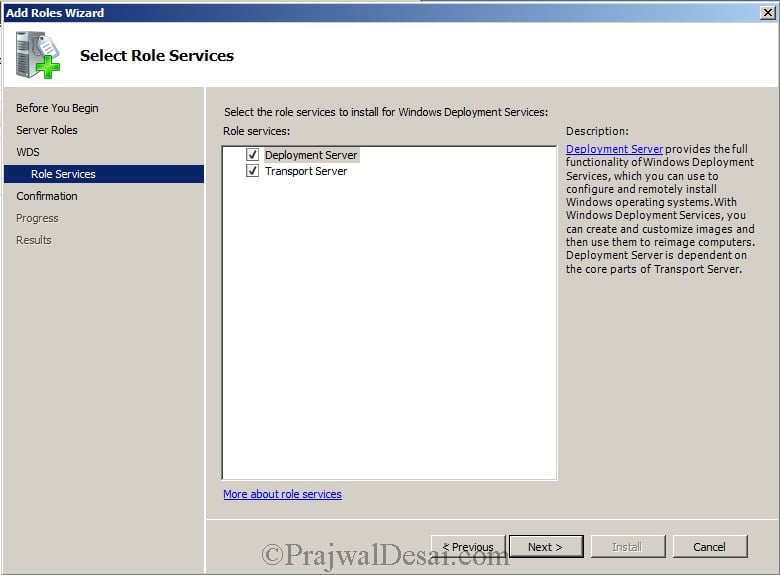
On the Role Services page, the Deployment Server and Transport Server roles are checked by default. Click on Next.
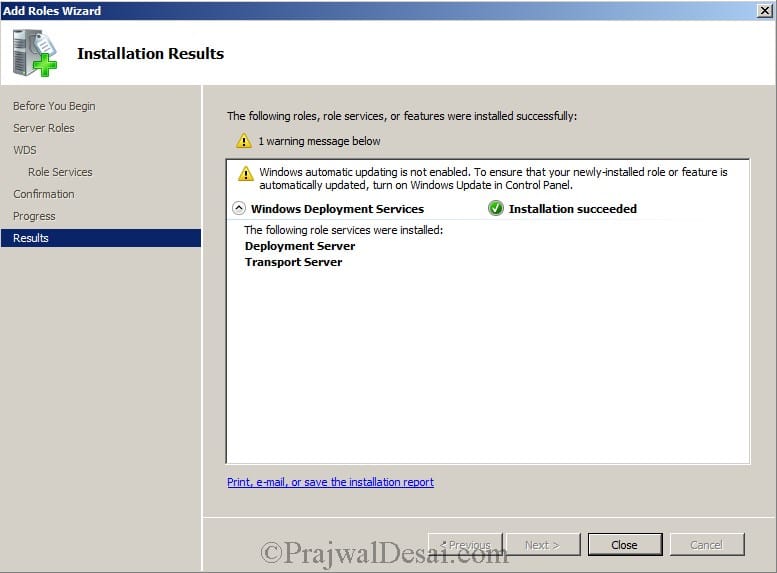
Once the installation is complete click on close.
If you are looking for command line installation of WDS server, then use the below command.
Open the powershell and run the command ServerManagerCmd -install WDS.
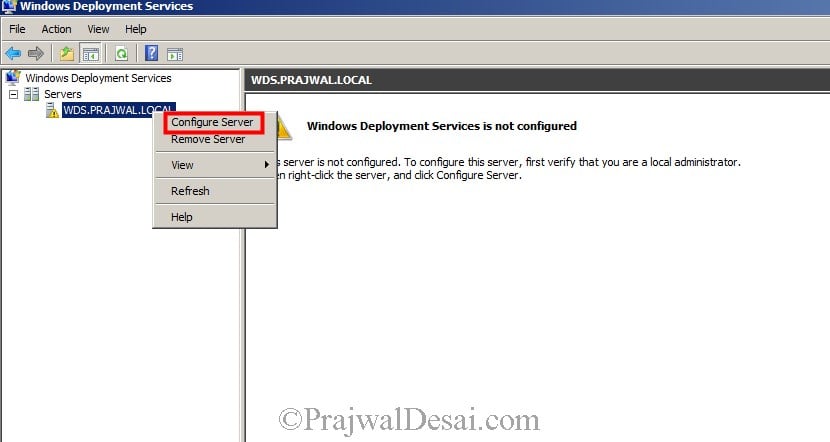
Click on Start, click on Administrative Tools, click on Windows Deployment Services. On the WDS console, expand Servers, right click on the WDS server and click on Configure Server.
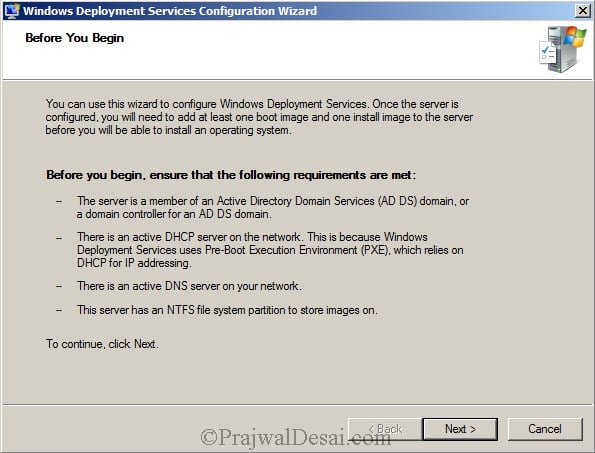
Read the requirements once before you click next.
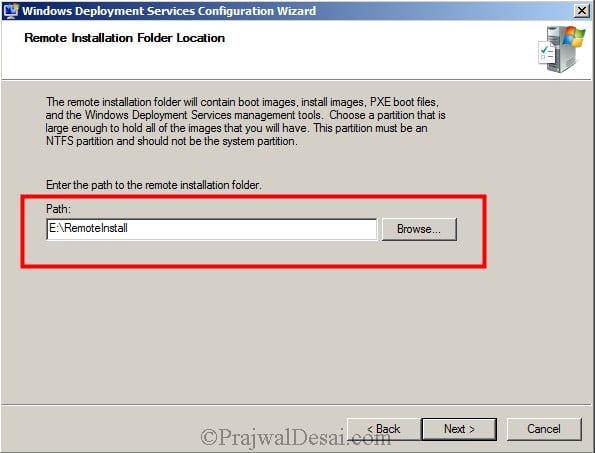
Choose the Remote Installation Folder location on other drive. The folder contains the boot images, install images, so make sure this drive has enough space to hold the data. Click on Next.
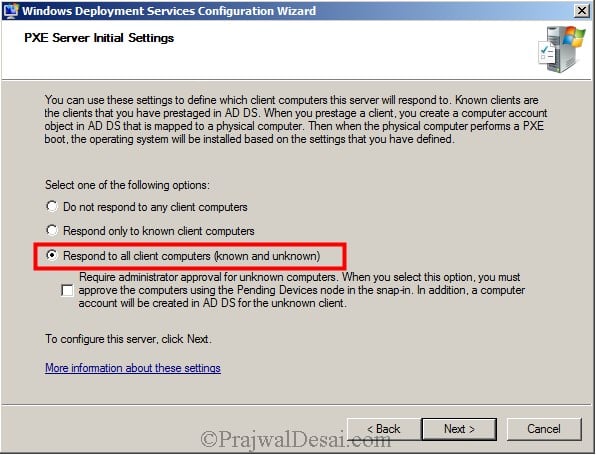
Select Respond to all client computers (known and unknown). Click on Next.
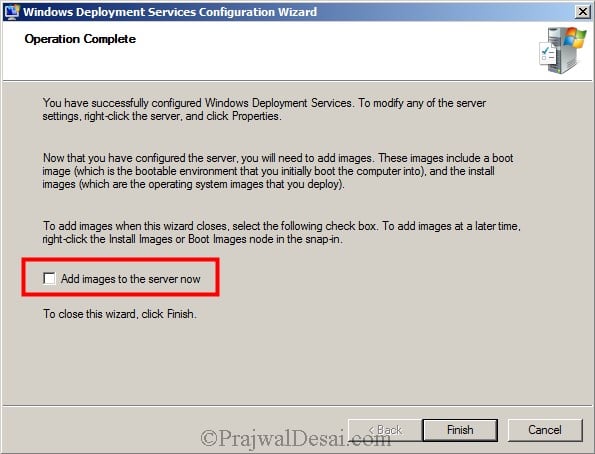
Uncheck the checkbox for Add images to the server now. We will add the images in the next step. Click Finish.
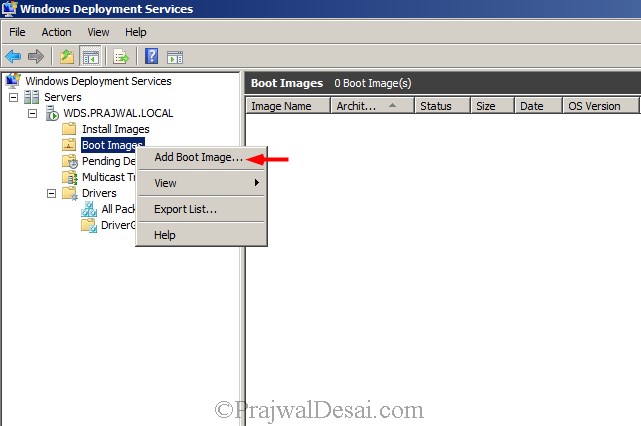
In this step we will add Boot Image and Install Image. Boot images are images that you boot a client computer into to perform an operating system installation. To add the boot image, right click Boot Images and click on Add Boot Image.
Browse to the location where the operating system installation files are stored. In this example we will importing boot.wim from windows 7 professional SP1 64 bit DVD as boot image. The boot.wim file can be found under folder named Sources. Select boot.wim and click on Open.
Enter the name for the boot image. Click on Next.
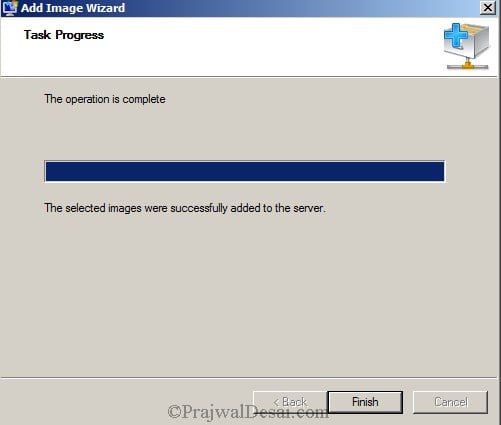
We have imported or added a boot image to our WDS server. Click on Finish.
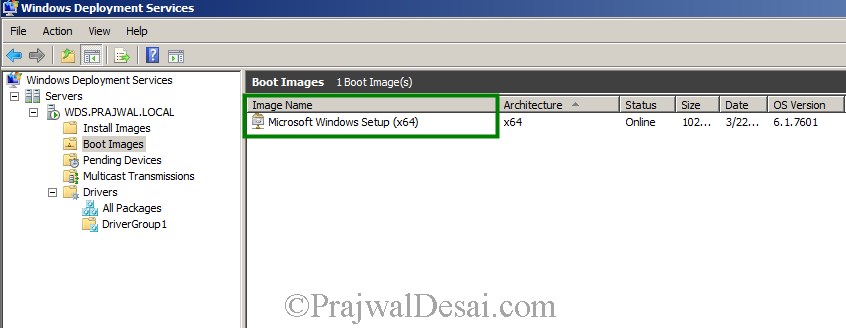
The boot image can be seen under Boot Images folder.
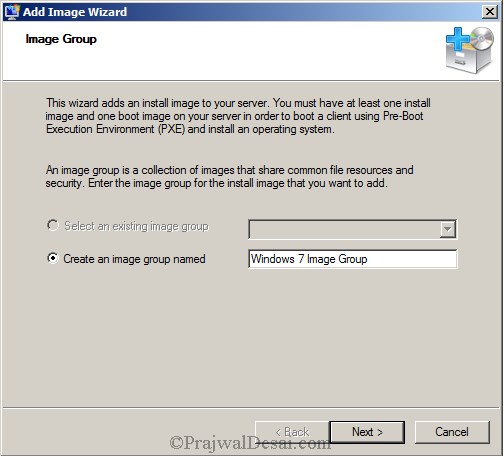
To add the Install image, right click Install Image, click on Add Install Image, provide a name and create a new Image Group. Click on Next.
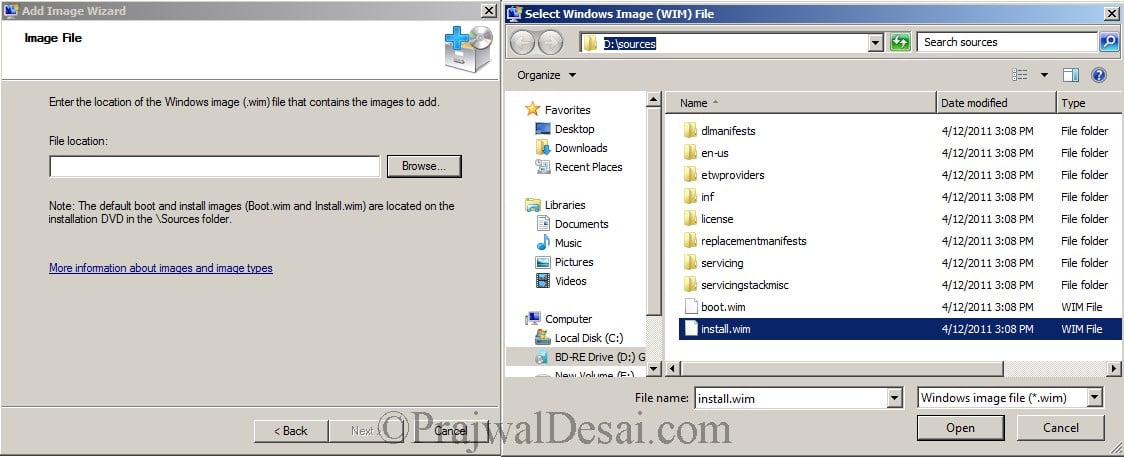
Now we have to select and add the Install image. Install images are the operating system images that you deploy to the client computer. Click on Browse and the select Install.wim. Click on Open.
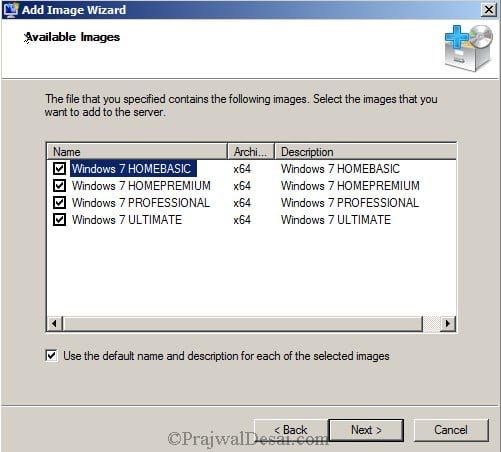
In the below screenshot we will select all the editions of windows 7 that are listed. click on Next.
Click on Finish to close the Add Image Wizard.
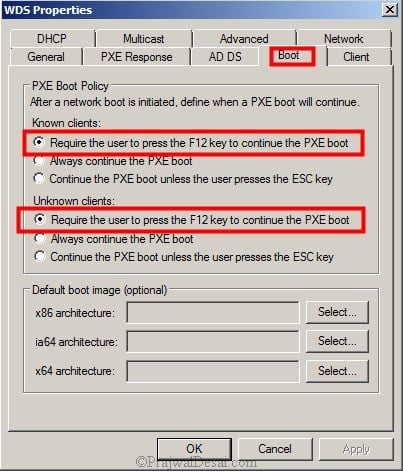
Lets configure the WDS server properties now. Launch the Windows Deployment Services Console, right click the WDS server and click on Properties. Click on Boot and make sure Require the user to press the F12 key to continue the PXE boot is selected for known and unknown clients.
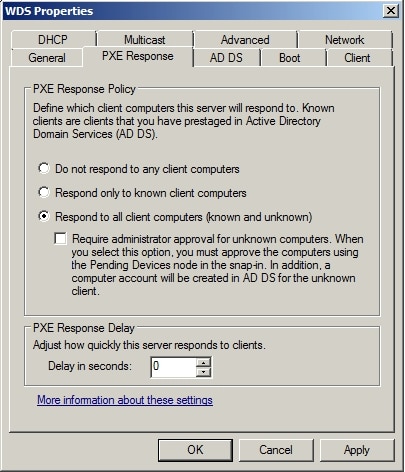
Click on PXE Response and make sure that Respond to all client computers (known and unknown) is selected. Click on Apply and Okay.
In the next post we will look at steps to deploy an image using WDS and also to capture it.





At the Remote Installation Folder Location, I keep getting the following error: “The filename, directory name, or volume label syntax is incorrect.” It doesn’t help that I’m still using the C:\ drive as well. I’m wondering if that is the issue and I simply need to redirect the path to another drive/folder? I’ve seen it work from the C:\ drive before so I don’t see what the issue is this time. Any news is good news! Thank you again.
Carry out the steps to enforce inherited. Group policy settings
Hey There. I found your blog using Bing. This is a really well written article. I’ll be sure to bookmark it and return to read more of your useful information. Thanks for the post. I will definitely comeback.
Please do you put next link
please provide the next link in this regard. thank you
Tks, it’s work!
This post help’s me a lot.
Thank you
Nice post
Thank you
Hi,
Thanks for the post
When we trying to change the WDS server properties , PXE Response tab unable to change the options getting ACCESS is denied issue.[ windows server 2016 ]
kindly help me to resolve this issue.
Thanks
Hi ,
I don’t have a DHCP server in my Server. i have DHCP in firewall (sonic wall ) How can i Map that firewall DHCP scope to WDS
The client user’s using firewall scope only
Please help me on this
Sonicwall documentation has a clear info on configuring DHCP. Have you checked that ?.
sir its really usefull to me. And iam working in a polytechnic college. but i would like to change my track to server side. but i hv not know about server wel. how could i get i get job as system admin. ubutu server admin line and windows server, i choosed. i hd completed BE 5 yrs before but i didnot wrk in admin side. so i dnt know hw i show my experiance in server side job. pls help me
thank you
karthick
Hey Prajwal,
Great guide! I’m new to WDS and I’ve built a WDS server on a Windows 2008 R2 box. I’ve loaded a boot.wim (Win 8.1 Pro x64) and a install.wim from my sysprepped image (Win7 Pro x64). I’ve also loaded drivers to the boot.wim so that it loads over PXE now. My install image is set to auto-multicast and shows in the Multicast Transmissions group with no authorization needed for known or unknown clients. When I boot a client PC, DHCP picks up, I press F12, it loads the boot image but stops at a cmd prompt window within the boot image. I loaded imagex and gimagex into the system32 folder and used gimagex to quickly look for the install.wim and found nothing. From everything I’ve read and seen, the install image should link or launch once the boot image is up automatically. Obviously I’m doing something wrong here and I’m at a loss on how to resolve it. Thank you for any advice you may have for me.
Hi Prajwal,
I am unable to see any server to configure under Configure Server in Windows Deployment services page. This is because I am unable to configure my Virtual machine to a Domain controller.
After this step I have my second virtual computer on which I added the role for Windows Deployment Services and then tried configure server which did not show any server.
Can you please help me solving this.
Thanks,
Balaji S D.
Hi Balaji, you can post your queries on the community forums.
Ok Sure.
My post is also in the community. you can find it.
Hi Prajwal,
please find the screen shot of the issue posted.
thanks in advance,
Balaji S D
Thanks For Windows Deployment Services.
Hi Sandeep, you can post your queries on the community forums.
Nice
Hello nice write up I’m looking for information regarding getting the RPK installation tool kit for OEM’s to play nice with WDS on MS Server 2008 std r2. I have the domain controller and DHCP server roles installed and functioning along with WDS on a static IP in my subnet of the workshop. But it keeps sending me back to square one. Even though everything is pointed in the right location regarding boot and Install wim’s and the RPK server shows up in WDS as online, it appears that for whatever reason the default PE that the RPK kit creates is a road to nowhere for anything booting PXE on the subnet as anything that boots PXE on this subnet complains that No boot or PE Image is accessible. I’m thinking it has something to do with the range settings of the server any suggestions.
super boss any one can understood easily with ur page
Thanks Mohan.
Thanks for the great tutorial. Must better than the Microsoft texts for getting quickly up to speed.
@envision_it:disqus – Thank you.
Hi Prajwal thanks for posting this article was great help implementing it.Well explained..:)
Thank you Ranjina..
Very nice step by step explanation.
Great article mate. Help me to start with WDS
Hi Prajwal, I am using VMware 10 workstation, MS server 2008 R2 configured with DHCP and WDS, while booting client boot.wim is loaded while loading windows 7 screen its shown WdsClient : An error occurred while communication with the WDS server. please check to ensure that the server is operation and that the necessary ports are open on the server’s firewall.
In this scenario server Firewall status is off only.
Check the status of WDS service…
Nice post sir. It’s really help me. Sir can you kindly post about lync 2013
Thank you Amit, there are few posts on Lync. You can find them under Lync Category
I want image installation for WDS . Please let me know the steps .
Very nice step by step explanation.
thank you for the post … very easy and step by step guide with image …. thanks a lot can you tell me about unattend installation …
easy, useful and it has complete details. Thanx
thanks..
nice post
we can learn by this, very easily. Good.. make sure all links are avaliable, it helps many
thanq prajwal ,
through wds is it possible for unattended installation operating system and third party software help me out
Try Microsoft Deployment Toolkit 2012 … You want zero touch installation of Windows 7 ?
very nice post … every one can understand very easily by seeing your post .. thanks a lot ..can you tell me how to make unattend installation using wds… once again thank you …
@darshan – There are posts on deploying windows 7 using MDT + WDS. I highly recommend you to use MDT because you can perform lite-touch and Zero-touch installation of windows 7 using MDT 2010/2012.