Best Guide to Deploy Windows 10 20H2 using SCCM
This post covers the steps to deploy Windows 10 20H2 using SCCM (ConfigMgr/MEMCM). We will use the SCCM task sequence to deploy Windows 10 20H2 version to end devices.
In my previous post I covered on upgrading to Windows 10 20H2 using ConfigMgr. In this post, we will import and deploy the Windows 10 20H2 to our end devices using ConfigMgr task sequence.
Check out what’s new in Windows 10 20H2 for IT Pros.
Table of Contents
About Windows 10 20H2 Release
Windows 10 20H2 is the latest Windows 10 release by Microsoft. It is also known as October 2020 update. Windows 10, version 20H2 is available for users with devices running Windows 10, versions 1903 and higher.
End users can manually seek to Check for updates via Windows Update. The recommended servicing status is Semi-Annual Channel.
Note – Before you deploy Windows 10 20H2 using SCCM, you must test the deployment and have a proper plan for the roll out. Be it a bare metal deployment or an in-place upgrade to 20H2, a proper planning is required. Not everyone has a lab setup however I suggest you first perform the deployment in an isolated setup. Deploy it to a limited group and test all your business applications before broad deployment.
Windows ADK requirement for Windows 10 20H2
While most of you want to deploy Windows 10 20H2 using SCCM, you might be concerned about the Windows 10 ADK version. The good news is there is no new ADK for Windows 10, version 20H2. The ADK for Windows 10, version 2004 will also work with Windows 10, version 20H2.
Read the following blog post to know about Windows 10 ADK versions.
You must always use the latest version of ADK. If you have an older version of ADK installed, you can use the step-by-step guide to update Windows ADK on SCCM Server.
Windows 10 20H2 – ConfigMgr Supported Version
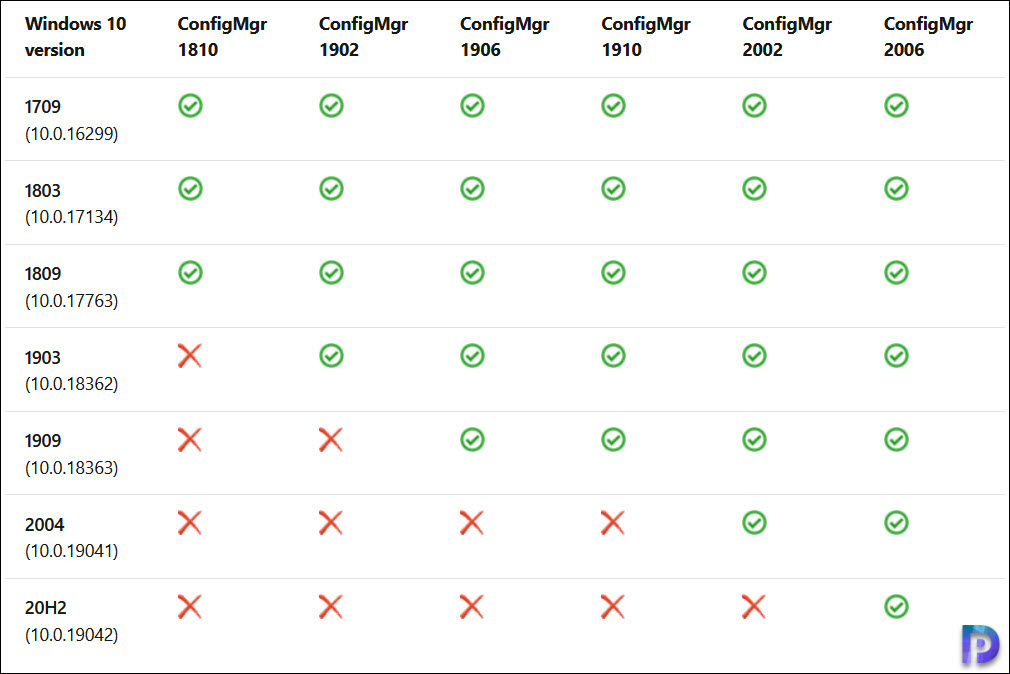
When you deploy Windows 10 20H2 using SCCM, the SCCM client agent should be compatible with Windows 10 version.
If you want to manage Windows 10 20H2 as a client, you need at least ConfigMgr 2006.
Download Windows 10 20H2 ISO File
Before you deploy Windows 10 20H2 using SCCM to new laptops, you must first download the ISO file. To download Windows 10 20H2, you can either download it from Microsoft VLSC or Visual Studio.
Normally enterprise versions are deployed to new laptop in organizations. So I am going to download Windows 10 20H2 (business editions).
We will extract the Windows 10 20H2 files to a folder. You can either mount it and copy the files to a folder or use a software to extract it.
Import Windows 10 20H2 Operating System Image
The steps to add or import Windows 20H2 operating system image in Configuration Manager include.
- Launch the Configuration Manager console.
- Navigate to Software Library\Overview\Operating Systems\Operating System Images.
- Right click Operating System Images and click Add Operating System Image.
- Provide the path of Windows 10 20H2 files in the next step.
In the next step specify the data source of OS image. Click Browse and specify the path of install.wim. You can also extract specific image index from the WIM file.
I am going to extract Windows 10 Enterprise. Click Next.
On the General page, you may add version info and comments. Click Next.
Click Next on Summary page and on Completion Window, click Close.
We have successfully imported Windows 10 20H2 OS image into the Configuration Manager.
Distribute the Operating System Image
When you import any content into SCCM, you must distribute the content to the distribution points. In the above step we imported Windows 10 20H2 image, let’s distribute the image.
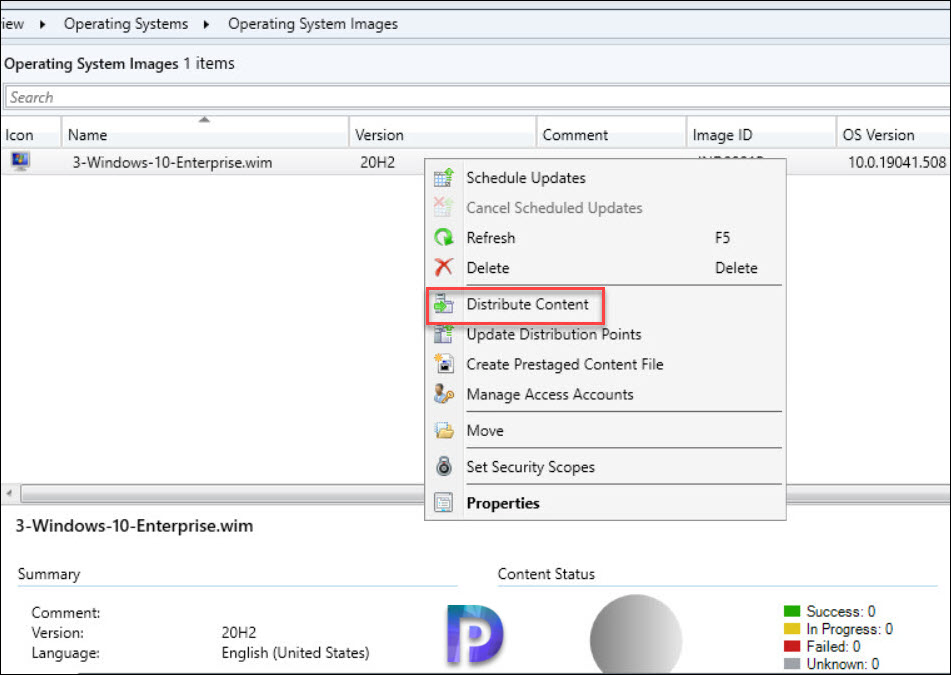
In the SCCM console, go to Software Library > Overview > Operating Systems > Operating System Images. Right click Windows 10 20H2 enterprise image and click Distribute content.
You must select the content destination. Click Add button and select distribution points or distribution point groups. Click Next.
Click Next on the Summary page and on Completion window, click Close.
Tip – You can find the Windows 10 20H2 image details by clicking the image and then the details tab.
When you distribute the content to distribution points, you must ensure it is successful. Select the operating system image and look for Content Status. If it’s green, it means the content is distributed successfully.
Create Task sequence to deploy Windows 10 20H2 using SCCM
In this step we will create a new task sequence to deploy Windows 10 20H2 using SCCM to end devices.
- In the ConfigMgr console, go to Software Library\Overview\Operating Systems\Task Sequences.
- Right click Task Sequences and click Create Task Sequence.
Select Install an existing image package. Click Next.
Specify the task sequence information such as name, description. Click Browse and select a boot image. Click Next.
In this step you specify the Windows 10 20H2 image package, product key. In addition, you may specify a local administrator password instead of randomly generated one. Click Next.
On the Configure Network window, select Join a domain. Click Browse and specify the destination OU. Next, select an account that permissions to join the machine to the domain. Click Next.
You may specify additional client installation properties. Click Next.
Click Next.
Since we want to deploy Windows 10 20H2 using SCCM, we will not include any software updates. We can later deploy the updates using an ADR. Click Next.
You can add some applications in the SCCM task sequence to install it along with Windows 10 20H2. Click Next.
Finally on the Completion window, click Close.
Edit the Task Sequence and Add drivers for Windows 20H2
Along with Windows 10 20H2 deployment, deploying the drivers is also important. Otherwise you will have just the Windows 10 20H2 and no drivers installed.
You must first import the drivers into SCCM and then edit the task sequence and add Drivers > Apply Driver Package step. You can use the WMI to detect the laptop model and apply the right drivers.
Here is a guide to import dell CAB drivers into SCCM.
After adding the drivers, you may add more steps to task sequence and customize it based on your requirements. Once the task sequence is ready, go to the next step.
Deploy Windows 10 20H2 using SCCM
In the above step we create a SCCM task sequence to deploy Windows 10 20H2. Now we will deploy the Windows 10 20H2 using SCCM task sequence to our devices.
Right click Windows 10 20H2 task sequence and click Deploy.
On the General page, specify the target collection to which you want to deploy Windows 10 20H2 task sequence. Click Next.
Select the purpose as Available and make the deployment available to only media and PXE. Click Next.
If you wish to schedule the deployment, you may do it here. Otherwise click Next.
Specify the user experience settings for the deployment. Click Next.
Nothing to configure here, so click Next.
Click Next.
On the Completion window, click Close.
Windows 10 20H2 Deployment using SCCM
In the next step, PXE boot the device. First the boot image gets downloaded from the distribution point and then task sequence window loads.
Select the Windows 10 20H2 task sequence and click Next. Wait until the deployment is complete. If you see any task sequence errors, note down the error code. You may also review the smsts.log file to determine why your task sequence failed.
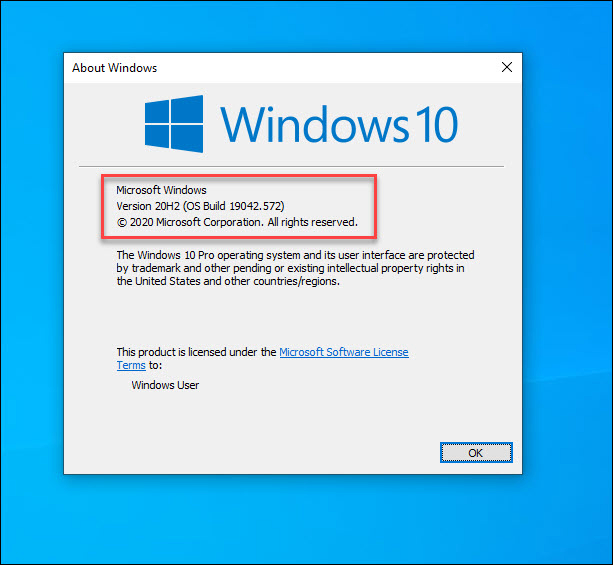
Finally login to the Windows 10 device and verify the version. This completes the steps to deploy Windows 10 20H2 using SCCM.


Hi I have Win10 1809. What is best way to upgrade to 20 H2 and keep user profile without losing it? Thanks for all you do.
Please provide some steps for how to add the Drivers in Task sequence ( Like Lenovo / DELL )
Hi Prajwal,
Did you notice any missing certs in your 20H2 build? I am seeing that the DigiCert Assured ID Root CA cert is missing from the Trusted Root Certificate Authorities store, which is causing some issues. Is that one present after your build?
Thank you for any feedback!
Hello you make great guides.
I have a problem when the pc reboot at the end of the Task Sequence, seems it cant find the boot partition.
if i use an older task sequence with 1909 it work.
If i use the same task and i change the image for 20H2, the pc wont boot. I tried a new TS like in your guide and it happen the same.
Seems the PC does not find the boot partition.
We tried changing UEFI or Legacy nothing
Our SCCM version is 2006 from 20/08/31.
thx
Can you try manually formatting the HDD first and then deploy the TS ?. Let me know if that works – https://www.prajwal.org/sccm-osd-diskpart-commands-troubleshooting/
Hello,
I got an issue here. I need to use BIOS Activation. So in 1903, I always left the product key field in blank and after W10 Install the WIndows activated for itself. Now on 20H2 it’s not working. Computer not activate automatically. But if I get machine Key with the command bellow, I can activate it normally, so it’s a key problem.
SoftwareLicensingService get OA3xOriginalProductKey”
hello prajwal
Is there any way to upgrade to windows 10 20h2? I have 12 thousand machines and different Current Branchs, and i would you like to unify all versions. Do you have any suggestions?
deploy using Windows 10 Servicing method it is in-place upgrade! all the user profiles and user data and apps will not be touched at all! this is a smooth way of upgrading to windows 10 latest.
Configuration Manager Console(version2006) -> Software Library -> Windows 10 Servicing -> All windows 10 Updates -> search for the “Feature update to Windows 10 (Business edtions), version 20H2, en-us x64” -> select it and right click on it and download -> create deployment package -> go to the deployment packages and find the one you just created!! -> select it and deploy to desired collection-> The end of the Story!