How to Add Language Packs Offline Using DISM (Offline WIM File)
This post covers the steps to add language packs offline using DISM. We will see how to use Deployment Image Servicing and Management (DISM) to add additional language packs to a wim file. When you deploy operating system using SCCM, you deploy it with a specific language pack. In Windows 7, language packs can be installed only from the Optional Updates section in Windows Update. So if one needs a different language pack, it has to be installed manually. This is a tedious task especially when you have more than one language packs to be installed.
In large deployments, you might want to install the additional language packs for OS that you deploy. There are two ways to simplify this task. Deploy the OS and install all the language packs. Capture the OS and then use this captured wim file and deploy this wim file. There is also another way to do this. Get the wim file and using DISM add the language packs. The second method is what we are going to cover in this post.
Language packs are available as .cab files and are usually named with their locale. You need to know the locale before you add the LP to wim file. A list of all language packs available for windows 10 are listed here. In addition language packs can be downloaded from Microsoft volume licensing site. If you are using SCCM, you would have installed Windows ADK as a prerequisite. To service and prepare you images, we use DISM tool. It’s a command line tool and can be used to service wim and virtual hard disk files. More info about DISM is documented here.
If you are running Windows 10, the DISM tool comes pre-installed and is located in System32 folder. So bringing up command prompt and running DISM command should launch it. Note that when you inject language packs to a wim file, the size of wim file increases. So i would suggest you add only required language packs and not all of them unless it is really required.
How to Add Language Packs Offline Using DISM (Offline WIM File)
The below steps shows how to add language packs offline using DISM. I have got the Windows 7 wim file with me (install.wim is located in sources folder withing ISO file). Launch the command prompt as administrator and type the below commands. I am currently performing the below steps on my primary site server where ADK 1803 is installed. You may choose any other machine as well to achieve this task.
Step 1 – Determine Image Index Number
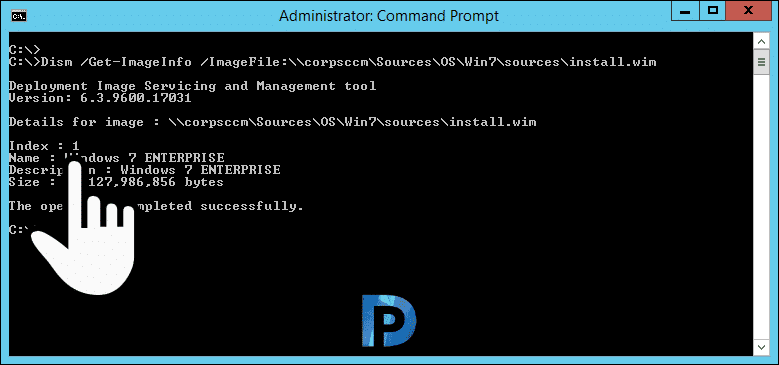
It is essential to find the image index before you proceed further. Type the following command to retrieve the name or index number. Using the below command we can find out index number and name of the image as well.
Syntax - Dism /Get-ImageInfo /ImageFile:<path to wim file>
In this example, my command looks like this
Command Used - Dism /Get-ImageInfo /ImageFile:\\corpsccm\Sources\OS\Win7\sources\install.wim
Step 2 – Mount the WIM File
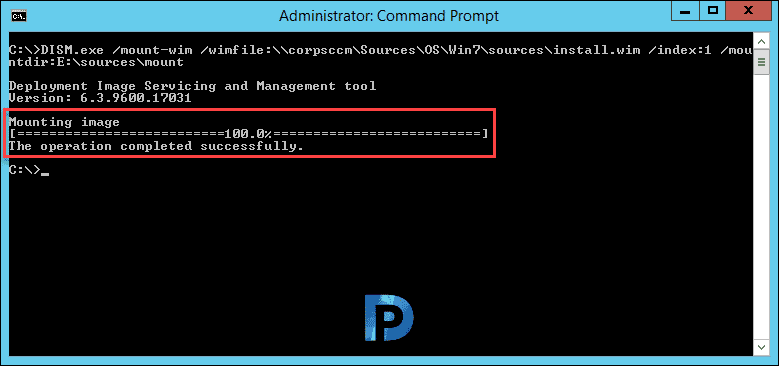
The first step is to mount the wim file. Create a folder and name it as mount.
Syntax - DISM /mount-wim /wimfile:<path to wim file> /index:<image in WIM, e.g. 1> /mountdir:<mount dir path>
In this example, my command looks like this
Command Used - DISM /mount-wim /wimfile:\\corpsccm\Sources\OS\Win7\sources\install.wim /index:1 /mountdir:E:\sources\mount
Step 3 – Add or Inject Language Packs
I have got two language packs which I will be adding it to wim file. Ensure that you have language packs copied over to a folder. Create a new folder and name it as Scratch. Type the below command to add a language pack to the mounted offline image.
Syntax - dism /image:<mount folder path> /scratchdir:<scratch folder path> /add-package /packagepath: <path to .cab file>
In this example, my command looks like this
Command Used - dism /image:E:\sources\mount /scratchdir:E:\sources\scratch /add-package /packagepath:\\corpsccm\Sources\LP\ja-jp\lp.cab
Step 4 – Commit Changes
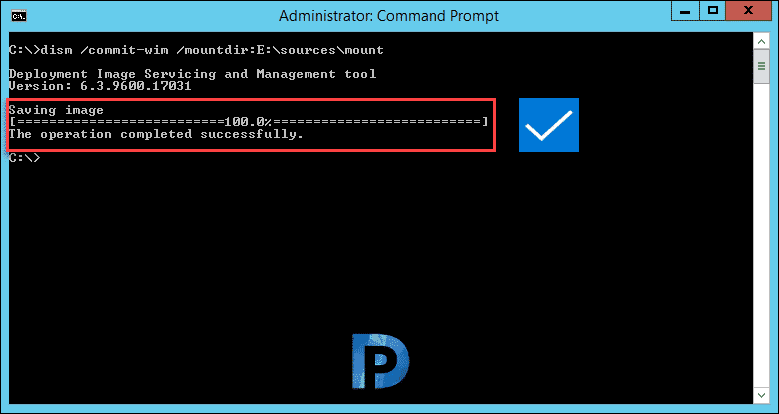
We have added the language packs offline using DISM. The last step is to commit the changes. Type the following command to commit the changes. You can now use the wim file to deploy the OS which also includes language packs.
Syntax - dism /commit-wim /mountdir:<path to mount dir>
My command looks like this
Command Used - dism /commit-wim /mountdir:E:\sources\mount


Hello,
I was “successful” in adding an es-MX language pack to my WIM, but the pack doesn’t show installed when deploying via my SCCM task sequence. I used the commands below and get a successful operation.
c:\>dism /image:C:\mount /add-package /packagepath=F:\x64\langpacks\Microsoft-Windows-Client-Language-Pack_x64_es-mx.cab
Deployment Image Servicing and Management tool
Version: 10.0.19041.844
Image Version: 10.0.19044.1586
Processing 1 of 1 – Adding package Microsoft-Windows-Client-LanguagePack-Package~31bf3856ad364e35~amd64~es-MX~10.0.19041.1
[==========================100.0%==========================]
The operation completed successfully.
c:\>dism /unmount-wim /mountdir:C:\mount /commit
I re-mounted my WIM and verified the package is installed as you can see by the different date of install.
Microsoft-Windows-Client-LanguagePack-Package~31bf3856ad364e35~amd64~en-US~10.0.19041.1586 | Installed | Language Pack | 3/8/2022 9:20 PM
Microsoft-Windows-Client-LanguagePack-Package~31bf3856ad364e35~amd64~es-MX~10.0.19041.1 | Installed | Language Pack | 3/9/2022 4:10 PM
Please advise as I need this language pack available for roughly 10k machines. Thank you so much for this guide! I just need a little more help.
Hi,
Maybe should use “DISM /Unmount-Wim /MountDir:E:\sources\mount /commit” in the last step as this will save all the changes, cleanup the directories and release the files in use.
How do you do this in 1809 as the you can not inject the languages anymore
How to setup default language during inplace upgrade?
Have just completed. Thanks a lot!
thank you