Enable TPM on a Virtual Machine and Encrypt VMware VM
In this post, I will show you how to encrypt a VMware VM (virtual machine) and enable TPM on a virtual machine. The latest versions of VMware Workstation Pro support TPM version 2.0, and you can enable the trusted platform module on a virtual machine.
Before you can install Windows 11 on a VM, TPM 2.0 must be turned on. The good news is that you can enable TPM on a virtual machine and encrypt a VMware Workstation VM, so you can install Windows 11. This guide should help you encrypt the workstation virtual machine (VM) and turn on the trusted platform module on the VM.
According to VMware, you can add a virtual cryptoprocessor that uses Trusted Platform Module (TPM) technology to an encrypted virtual machine. Later, you can also remove the cryptoprocessor from the virtual machine. TPM technology provides hardware-based, security-related functions. A TPM cryptoprocessor carries out cryptographic operations.
In Windows 10, BitLocker is an encryption feature available in both Professional and Enterprise editions. However, it requires a Trusted Platform Module (TPM) on the system. If you don’t have TPM, you can still enable BitLocker encryption. Read this excellent guide to enable BitLocker encryption on Windows 10 without TPM.
You can add a Trusted Platform Module to an encrypted virtual machine with a minimum hardware version of 14 that uses the UEFI firmware type.
Unable to add TPM on VMware VM
On a VMware virtual machine, when you attempt to add a trusted platform module, it won’t allow you to do that. “The virtual machine must be encrypted and use UEFI firmware,” says the explanation. You see this because the VM must be encrypted before you enable TPM.
Let’s look at the steps to encrypt VMware VM and then enable tpm on a virtual machine.
Step 1: Encrypt VMware VM (Virtual Machine)
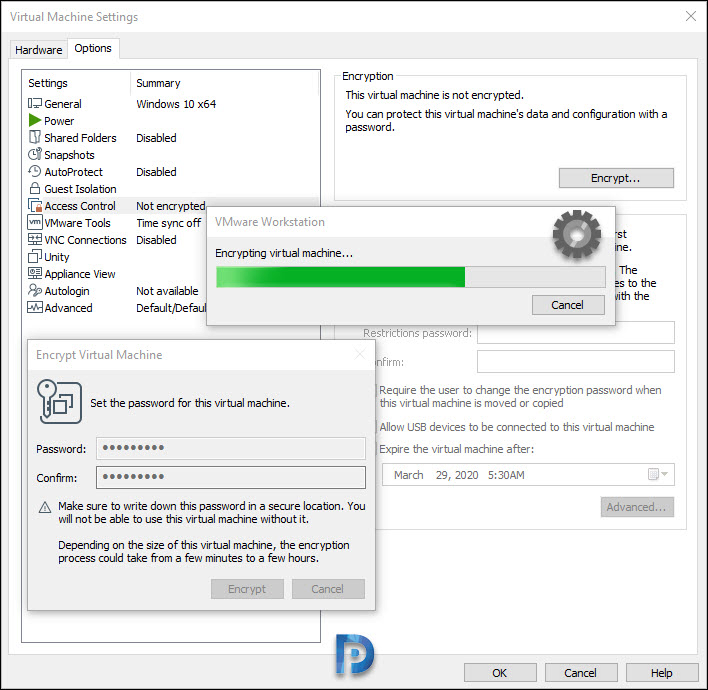
Before you enable the Trusted Platform Module, you must first encrypt the virtual machine. If you are using VMware Workstation, you can follow the below steps to encrypt the virtual machine in VMware:
- First of all Power Off the VM. You cannot encrypt a VM while it is in Power On state.
- Edit the VM settings and click Options tab.
- Under Settings, select Access Control.
- To encrypt the VM, select Encrypt.
Encrypting a virtual machine requires you to set a password for the virtual machine. Enter a strong password and click Encrypt. Remember to write down this password because it is required to turn on the VM. The encrypted VM passwords can be saved to a password manager such as Bitwarden.
Depending on the size of the virtual machine, the encryption process could take some time. While the encryption is taking place, you cannot work with the other VMs.
After the VMware VM encryption is complete, edit the VM settings and select Access Control. Now you see the message “This virtual machine is encrypted.” If you wish to change the secure password, you can do that by clicking the Change Password button.
Click OK to close the Virtual Machine Settings window.
Step 2: Enable TPM on a Virtual Machine
After you encrypt the virtual machine, use the below steps to enable TPM on a virtual machine:
- Power off the VM (In case if it is turned on).
- Go to the virtual machine settings and under Hardware tab, click Add button.
- On the Add hardware wizard, select Trusted Platform Module and click Finish.
- Click Finish button to complete adding the Trusted Platform Module to a virtual machine.
Once you have added the Trusted Platform Module for a VM, you can verify it under the VM settings. The Trusted Platform Module appears to be “present.”
To verify if the TPM has been enabled on the VM, restart the VM and go to BIOS. Check the TPM configuration, and you should now see the current TPM device version as 2.0.
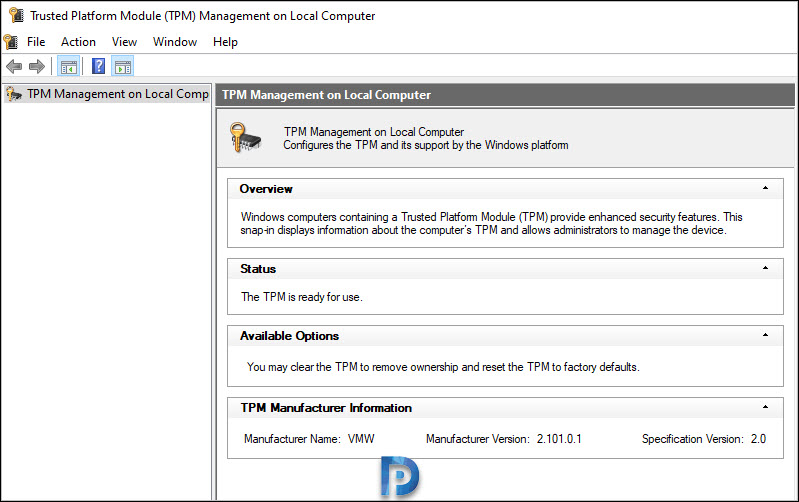
In addition to the above method, you can also log in to the Windows Operating System and check the TPM details. Type TPM.msc in the run command and press Enter. This launches the TPM management interface on the local computer. Under Status, we see the TPM is ready for use. For the TPM version, look for the details under TPM Manufacturer Information.
If you are interested, there is an easy way to check the TPM status from command line.


It seems more useful say what version of VMware Workstation Pro actually started supporting TPM 2.0, rather than “The latest versions of VMware Workstation Pro support TPM version 2.0”. If anyone knows, please chime in!
Having difficulty with imaging a VM with SCCM that has a TPM option enabled. We only need the TPM for Windows 11 compatibility. We currently do not have it set to encrypt the hard drive, but the configuration files are still getting encrypted. When we go to image the machine through SCCM, it errors out immediately. We have had this issue with laptops where the drive was still BitLocked, and before we would reimage the laptop, the drive needed to be decrypted.
Any assistance on how to setup TPM in VCenter for VMWare for Windows 11 compatibility would be greatly appreciated. We use SCCM for imaging and managment of all of our systems.
Thanks PD.
So it seems there is no way to do this with a standalone ESXi host. Looks like it requires vCenter. If that is correct then that’s too bad. We are a small shop and use standalone ESXi host as a test environment.
thank you
It wont allow me to add a TPM it says i need to have UEFI firmware how do I fix it?
perform step 1 in this article first.
Ditto to comments above! Thanks for publishing
For our work it’s required to have turned on Bitlocker as well which requires a TPM in our case. Due to TPM the VM is already encrypted bu Fusion or VMware Workstation which does mean we are doubling encryption if I’m correct. Is there a way around the requirement to encrypt the VM from fusion or VMware Workstation so we will benefit from disk performance. Bitlocker seems to have much less impact compared to the VMware encryption of the VM.
Nice
Amazing article. Bundle of thanks and keep up the good work.