SCCM 1511 Quick Installation Guide
Welcome to the SCCM 1511 quick installation guide or SCCM 1511 install guide. In this post you will see how to install SCCM 1511 step by step. In December 2015, Microsoft released latest version of Configuration Manager which is called as System Center Configuration Manager current branch (CB). CB indicates this is a version of System Center Configuration Manager that supports incremental updates to the product.
This ConfigMgr 1511 quick installation guide assumes that no previous version of Configuration Manager is installed in the Active Directory domain and I will be installing ConfigMgr 1511 in my lab setup. Most the steps that we perform here are documented in SCCM 2012 R2 Step-by-Step Guide. The SCCM 1511 can be downloaded from the Microsoft Evaluation Center, MSDN, and Volume Licensing Service Center.
Here are few links that will help you to understand more about SCCM 1511.
Plan for System Center Configuration Manager infrastructure – Use this information to plan for a new deployment of System Center Configuration Manager 1511.
Recommended hardware for System Center Configuration Manager – Use this information to plan for hardware that can meet the processing loads for clients and sites that use the available Configuration Manager features with the default configurations.
Supported operating systems for sites and clients for System Center Configuration Manager – Use this information to know about the supported OS, Prerequisites for site system roles, for SCCM 1511.
Support for SQL Server versions for System Center Configuration Manager – Use this information to decide which SQL server version you need to install for SCCM 1511.
Before we begin ConfigMgr 1511 installation, here is the list of steps that we be performing in this post.
1) Create System Management Container
a) Extend Active Directory Schema and assign the SCCM server permissions to create objects under the system container.
2) Install Prerequisites for Configuration Manager 1511.
Launch the Server Manager and Install the following Roles and features:
a) Install IIS role and all required features:
b) .Net Framework 3.5 Features [Install all sub features]
c) .Net Framework 4.5 Features [Install all sub features]
d) BITS
e) Remote Differential Compression
3) Install Windows Assessment and Deployment Kit (Windows ADK) for Windows 10. Download Windows ADK 10 here.
4) Install Supported SQL Server version for SCCM 1511. More info here.
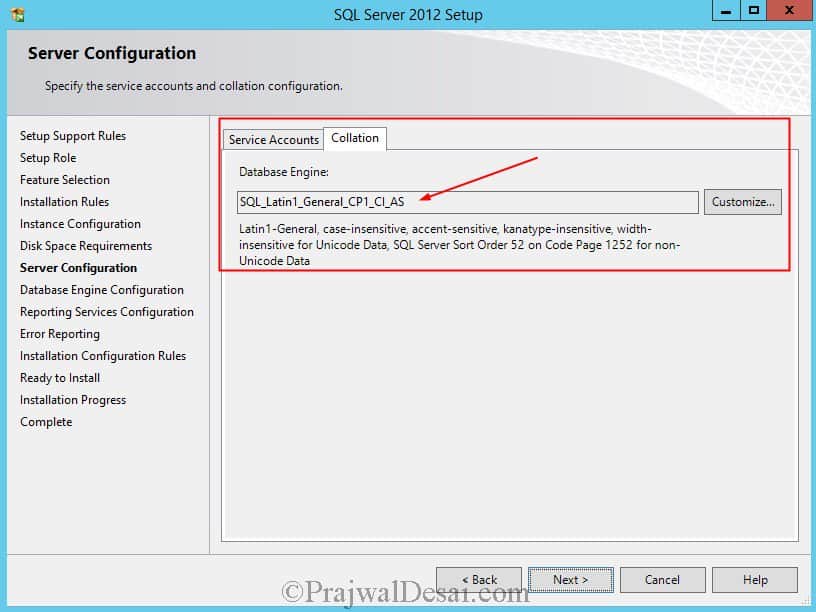
a) Very Important – During the SQL install, the collation should be set to SQL_Latin1_General_CP1_CI_AS.
b) Open SQL ports on Firewall (port 1433 and port 4022) by configuring GPO. Click here for more info.
5) Install WSUS
SCCM 1511 Quick Installation Guide
1) Create System Management Container
To create a container log on to the Domain controller with administrator account, click on Server Manager, Tools, click on ADSI Edit. Right click ADSI Edit and click on Connect to. On the Connection Settings window, the naming context should be Default naming context. Do not change anything here, click on OK. In the ADSI Edit Console, expand the Default Naming Context, right click CN=System, click on New and create an Object.
On the Create Object windows, select the class as container and click on Next. Provide the value as System Management. Click on Next and click on Finish to close the wizard.
The primary site server computer account must be granted Full Control permissions to the System Management container and all its child objects. Click on Server Manager, click on Tools, click on Active Directory Users and Computers. Click on View and click Advanced Features. Expand System, right click System Management and click on Delegate Control. Click on Add, on select users,computers or groups window click on Object Types and check for Computers as object types. Click on OK. Type the name of the primary site server computer account and click on OK. On the Tasks to Delegate page, click on Create a custom task to delegate. Click on Next.
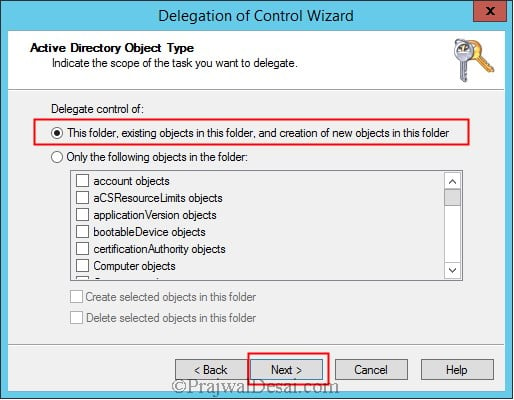
On the Active Directory Object Type window, select the option This folder, existing objects in this folder and creation of new objects in this folder. Click on Next.
We need to select the permissions to delegate, choose General, Property Specific and Creation/deletion of specific child objects. Under the permissions, click on Full Control. Click on Next and click on Finish to close the wizard. We have delegated full permissions to primary site server computer account on System Management container.
To extend the Active Directory Schema using extadsh.exe utility, locate the extadsh.exe which can be found in SMSSETUP>BIN>X64 of the configuration manager setup DVD. Hold the shift key on your keyboard and right click extadsh.exe and click on Copy as Path. Launch the command prompt. Right click and click paste and hit enter. You should see the line Successfully extended the Active Directory Schema.
2) Install Prerequisites for Configuration Manager 1511
On the SCCM server, click on Server Manager, click on Manage, click on Add Roles and Features. Select Web Server (IIS) as the server role and click on Next.
You need to enable the following features for installing configuration manager 1511 on Windows server 2012 R2
1) .Net Framework 3.5 Features [Install all sub features]
2) .Net Framework 4.5 Features [Install all sub features]
3) BITS
4) Remote Differential Compression
Install the following Roles Services
Common HTTP Features – Default Document, Static Content.
Application Development – ASP.NET 3.5, .NET Extensibility 3.5, ASP.NET 4.5, .NET Extensibility 4.5, ISAPI extensions.
Security – Windows Authentication.
IIS 6 Management Compatibility – IIS Management Console, IIS 6 Metabase Compatibility, IIS 6 WMI Compatibility, IIS Management Scripts and Tools.
3) Install Windows Assessment and Deployment Kit (Windows ADK) for Windows 10
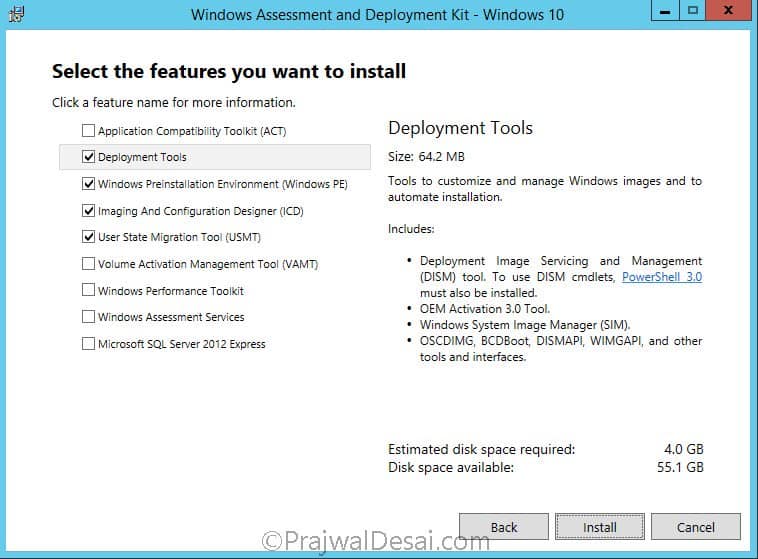
Download the adksetup.exe, right click on the file and click on Run as Administrator. On the Specify Location page, choose the install path. Click on Next. Select the following features to install Deployment Tools, Windows Preinstallation Environment, Imaging and Configuration Designer and User State Migration Tool. Click on Install. Once the features are installed click on Close.
4) Install Supported SQL Server version for SCCM 1511
I have got SQL Server 2014 enterprise edition with SP1 with me, this is one of the Supported versions of SQL Server for ConfigMgr 1511. For Supported versions of SQL Server check TechNet here. Open the SQL server folder, run the setup as administrator. Click on Installation and click on New SQL server standalone installation. Check the box for I accept the license terms and click on Next. After the Setup Support Rules are completed click on Next. Select the Setup Role as SQL Server Feature Installation and click Next.
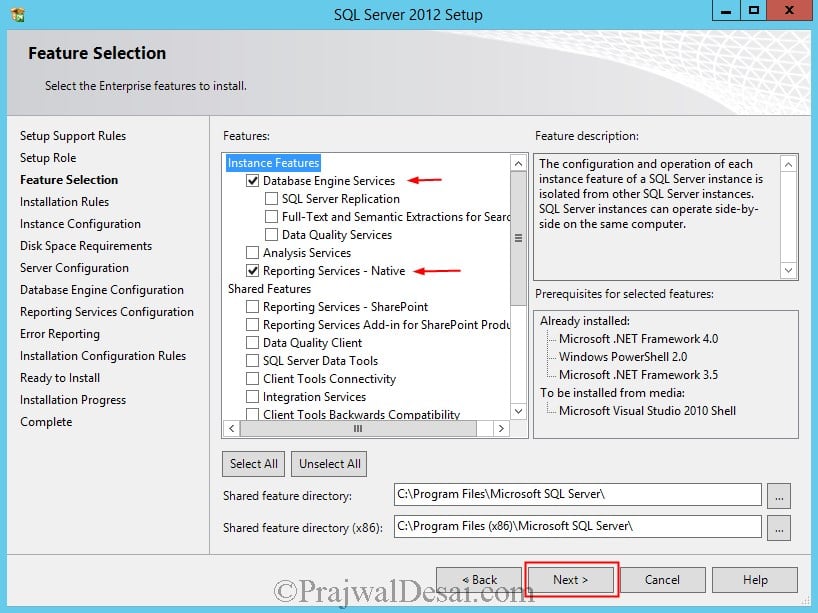
On the Feature Selection window, select Database Engine Services, Reporting Services-Native and Management Tools – Complete.
Important – During the SQL install, the collation should be SQL_Latin1_General_CP1_CI_AS.
Click on Next. Click on Install to start the installation. We have installed SQL server 2014 with SP1. Click on Close.
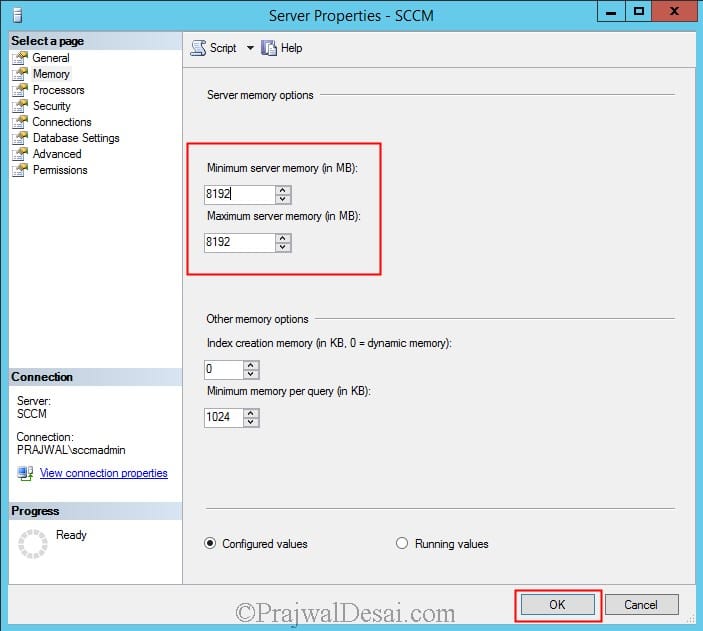
During the installation of Configuration Manager 1511, the configuration manager checks if the SQL server memory limit is limited. If the memory is not limited, then a warning is displayed. To avoid that lets limit our server with a memory limit. Launch the SQL Server Management Studio. Login to the server and right click the Server and click on Properties. Click on Memory, set Minimum server memory value to 8192 MB (The minimum value can be less that 8192 MB) and set Maximum server memory as 8192 MB. Click on OK and close the SQL management studio.
5) Install WSUS
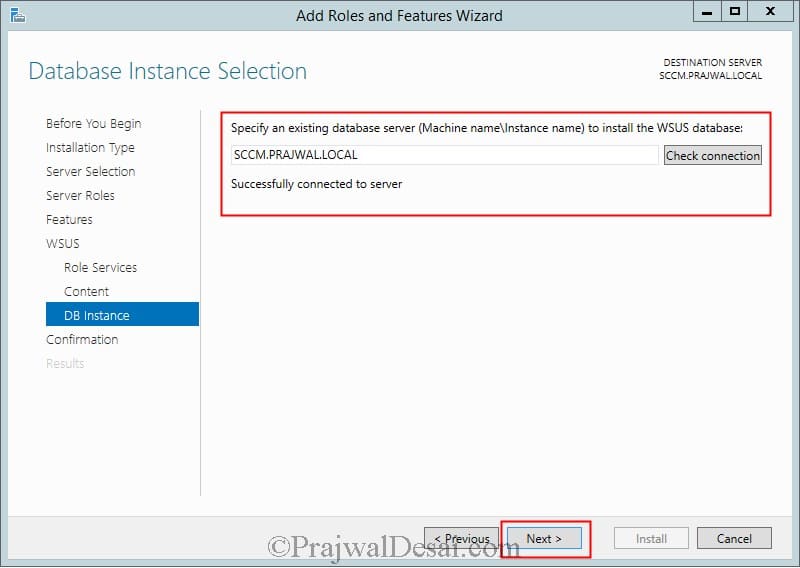
To install WSUS on Windows Server 2012 R2, click on Server Manager, click on Manage, click Add Roles and Features, select Windows Server Update Services and click on Next. Choose WSUS Services and Database as these are the ones that are actually required. We will not select WID Database here. Click on Next. In the next step select the folder where the updates are stored. Specify the database server where you want to store the WSUS database. Click on Check connection and you must see the message Successfully connected to server. Click on Next.
Now launch the post installation tasks. Wait for some time to complete. Close the wizard.
After you install WSUS, install the hotfix KB3095113 (This hotfix contains update to enable WSUS support for Windows 10 feature upgrades). Download the KB3095113 hotfix from here and install it. A restart is required when you install the hotfix.
ConfigMgr 1511 / SCCM 1511 installation
After completing above steps, let’s move on and install SCCM 1511. The SCCM 1511 can be downloaded from the Microsoft Evaluation Center, MSDN, and Volume Licensing Service Center. Download the SCCM media and run the splash.hta file. Click Install.
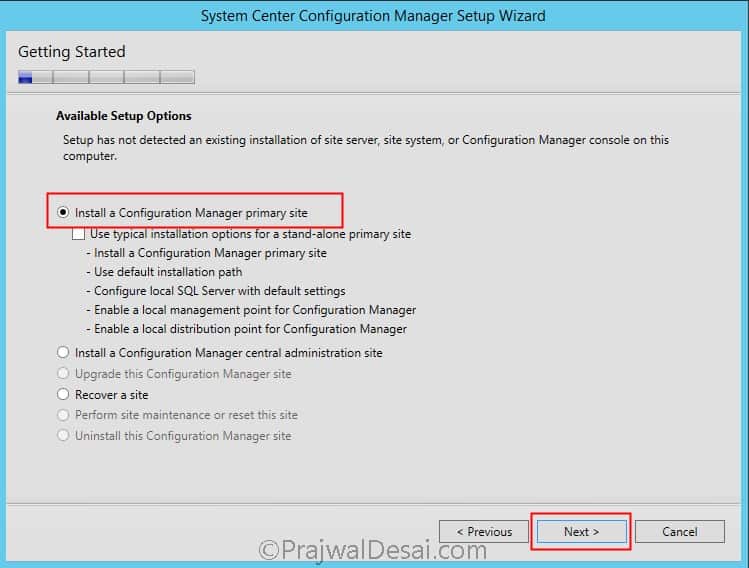
Click on Install a Configuration Manager Primary Site and click Next.
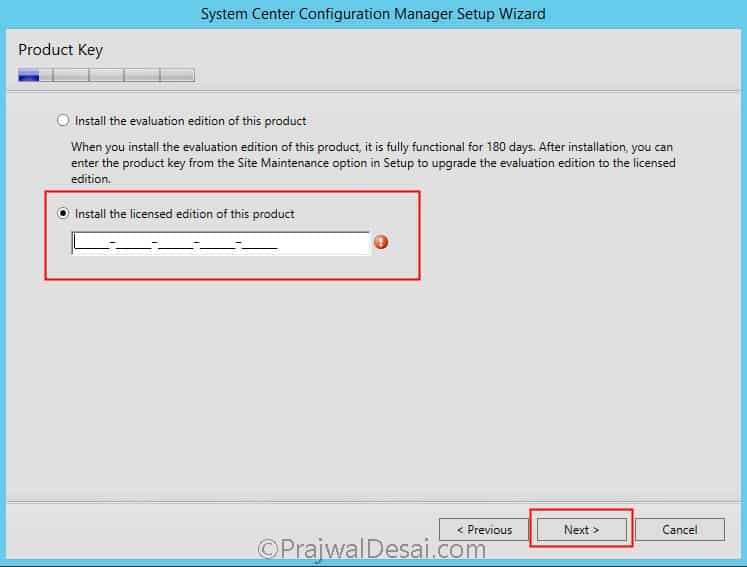
Enter the product key if you have it or else choose Install the evaluation edition and click on Next.
Accept the license terms for Microsoft SQL Server 2012 Express, SQL 2012 Native Client and Silverlight 5 and click on Next.
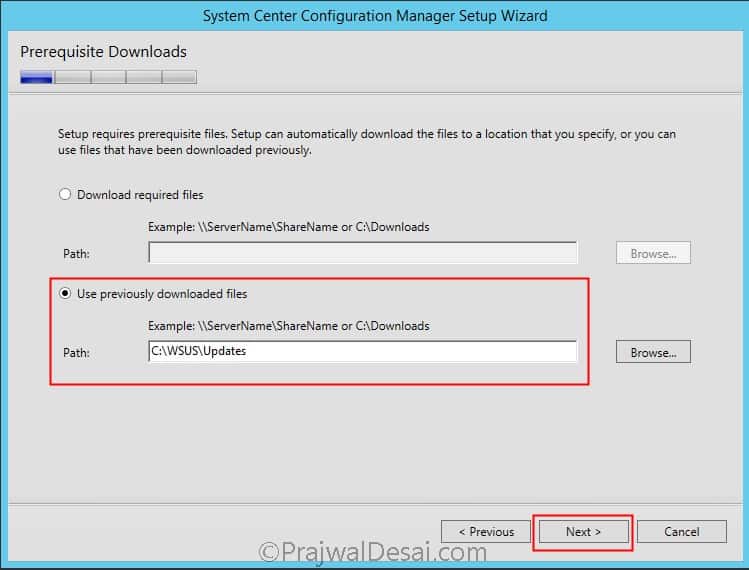
Prerequisite Downloads – There are 2 options that we see here.
1) Download required files – Select this option to download the setup prerequisites from Microsoft and you can store them in a folder or shared path.
2) Use previously downloaded files – Select this option if you have downloaded the prerequisites. Browse to the folder where the prerequisites are stored and click on Next.
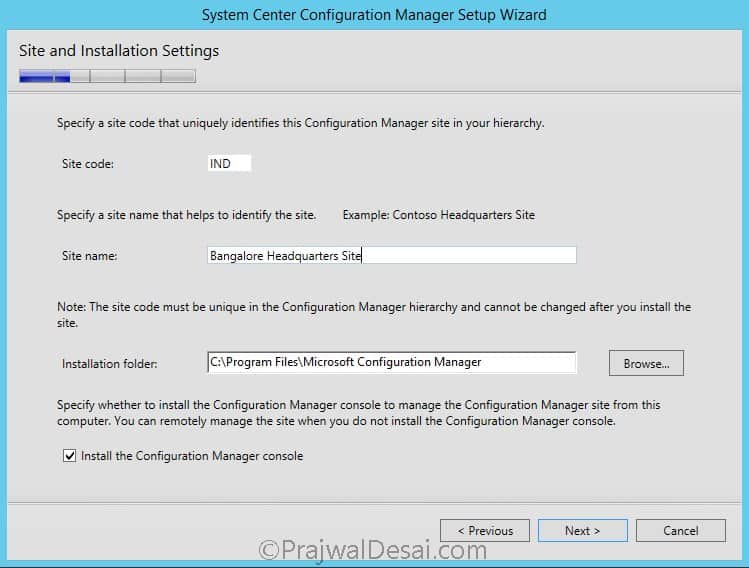
Specify a Site Code, Site name and check the box Install the Configuration Manager Console. Click on Next.
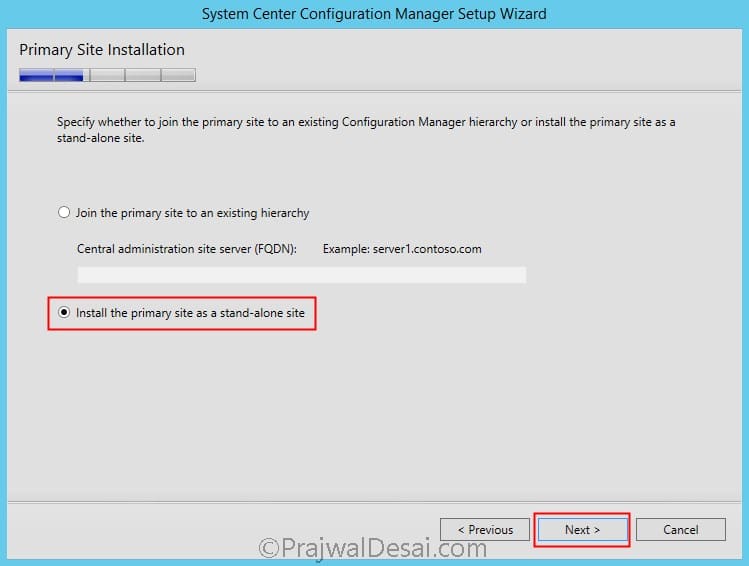
If you plan to join this primary site to CAS then choose Join the primary site to an existing hierarchy, you must provide the CAS server FQDN to join the hierarchy. If you plan to build hierarchy with more than one primary site, you must install CAS first. Else if you are installing primary site as a standalone site then choose the second option. Click Yes on the message box and click on Next.
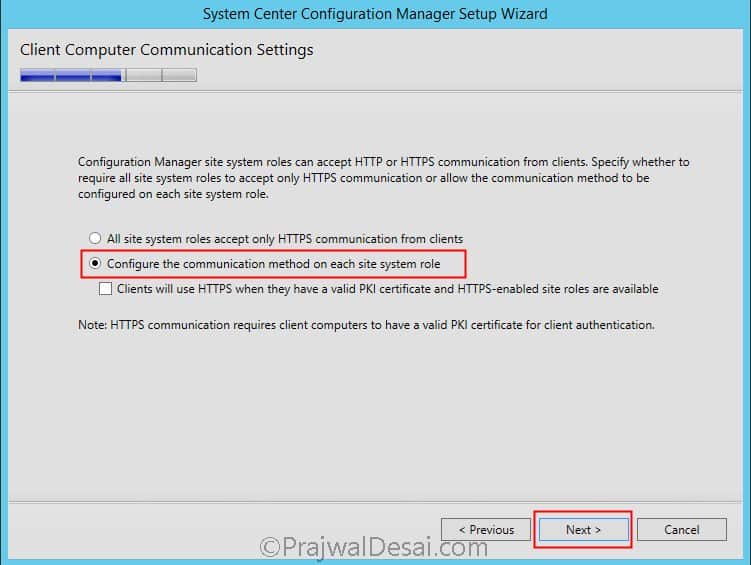
Client Computer Communication Settings – Choose Configure the communication method on each site system role and click Next. In the next step configuration manager does a prerequisite check, if all the prerequisites are installed correctly then you will see the message “All prerequisites rules pass successfully“. Click on Begin Install.
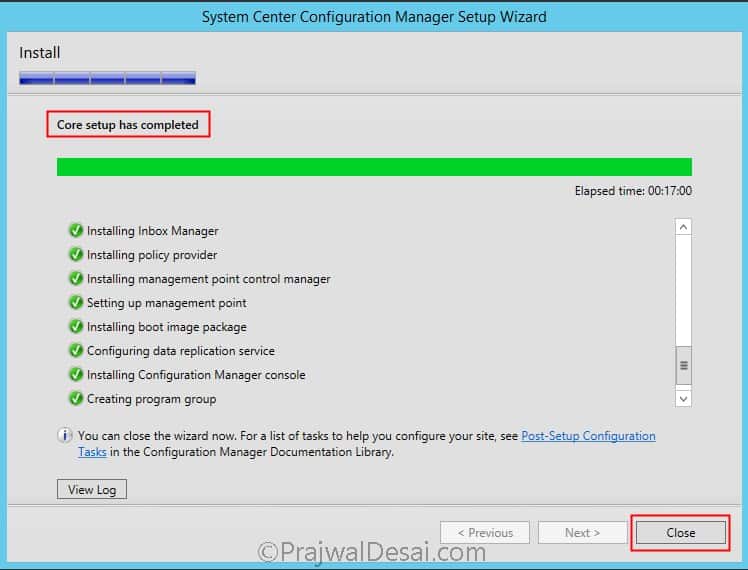
The installation takes sometime to get completed. Once the installation is complete you can click on Close.
After the setup is complete, open the SCCM Console, click on the upper left corner on the blue arrow, select About Configuration Manager. The Console has version 500.8325.1000 and ConfigMgr Version is 1511.







Hi Prajwal,
At my work, we are currently using SCCM 1511. As per MS, I cannot do in-console update, and only way is to do using baseline updates. However, I am using setup.exe file under SMSsetup folder to execute the “System Center Configuration Manager Setup Wizard”, the option to “Upgrade this configuration Manager site’ is greyed out.
I would like to take your suggestion to know if there is any permission issue or would this cause any AD breakdown if I am able to update? How can make this version of SCCM to the most latest one
Thank in the advance.
-Parth
Hi Prajwal,
The upgrade from 2012R2 to 1511 isn’t suggested. The upgrade should be to 1602. I just want to know will that make a difference ? As i am new to sccm , I need to know the mere basic things to proceed further.
I am trying to find documentation on upgrading my Configuration Manager. I do not like doing OS upgrades. I want to do a new install of Server 2016 and SCCM 2016 but all documents are in-place upgrades. Are there things i need to worry about doing a new install in an environment that already has 2012 R2?
What is the “…primary site server computer account…” ? The actual server where we are installing SCCM? A domain controller with FSMO or GC? All the sudden in the procedure, Full Control permissions are to be Delegated to this computer account, but you never explicitly state and or imply “for example…” what account this is. What did we miss?
The ADK link that you have is ADK10 v1511. But v1511 has issues with ConfigMgr.
Hi Ann, is that link incorrect ? – This older version of the Windows 10 ADK can still be downloaded directly from the Microsoft Download Center