Install Enterprise Root Certificate Authority
In this post I will show you how to install Enterprise root certificate authority (root CA) in your lab setup. I will be installing the Root CA on a Windows Server 2019 OS.
This guide will be part of my PKI certificates for SCCM post. Deploying a PKI is not a simple task, so read those posts carefully if you’ve not done this before. I had published almost all the required PKI guides for SCCM however install Enterprise root certificate authority guide was missing.
When you plan to install Enterprise Root Certificate Authority, it isn’t something you’ll do on a regular basis. That’s because once you properly set up a root CA for organization, you will not need to set it up again.
By definition, a certification authority (CA) is responsible for attesting to the identity of users, computers, and organizations. The root CA authenticates an entity and vouches for that identity by issuing a digitally signed certificate. The CA can also manage, revoke, and renew certificates.
Membership in both the Enterprise Admins and the root domain’s Domain Admins group is the minimum required to complete this procedure. Let’s look at the steps to install Enterprise root certificate authority.
Table of Contents
Install Enterprise Root Certificate Authority
I will be installing Enterprise Root Certificate Authority on a virtual machine running Windows Server 2019. The VM is installed with latest windows updates and has been assigned with a static IP address.
Install Active Directory Certificate Services
Begin installing Active Directory Certificate Services (AD CS) using the below steps.
- On your Windows Server 2019, launch Server Manager.
- On top right, click Manage > Add Roles and Features.
- Using the Add Roles and Features wizard, install Active Directory Certificate Services.
- On Before you begin window, click Next.
Select Role-based or feature-based installation. Click Next.
On the Server Selection page, ensure the selected server is correct one. Click Next.
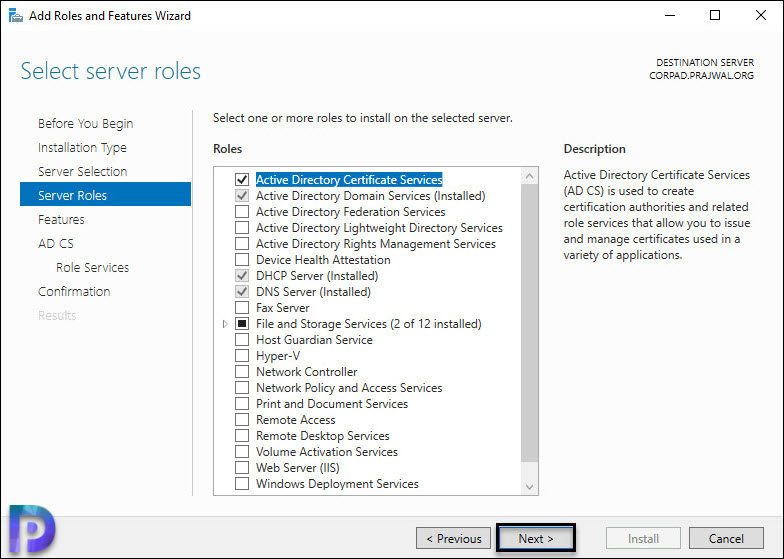
On the Server roles page, select Active Directory Certificate Services. Click Next.
Click Next on the Select Features page.

You are about to install Active Directory Certificate Services, click Next.
From the AD CS, select the Certification Authority as Role Service. Click Next.
Configure Active Directory Certificate Services
The below steps shows you how to configure Active Directory Certificate Services. Click Configure Active Directory Certificate Services on the destination server.
Specify the credentials to configure the AD CS. Click Next.
On the Role Services page, ensure Certification Authority is selected. Click Next.
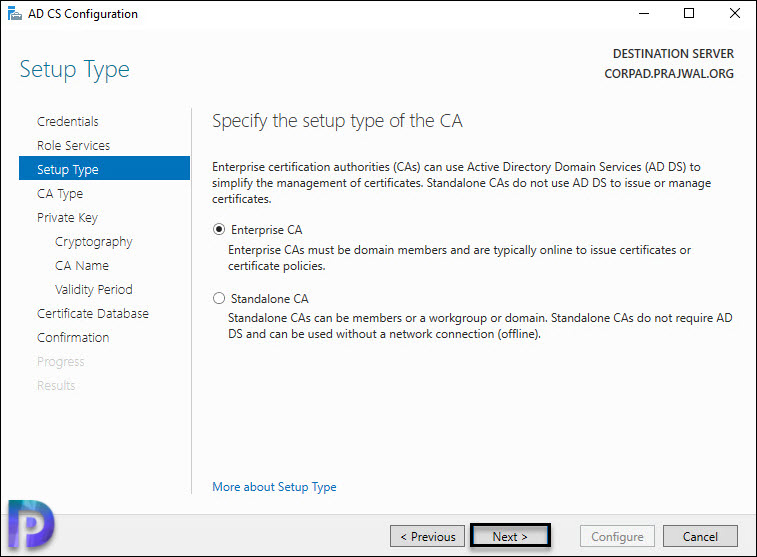
Select the Certification Authority type as Enterprise CA. Click Next.
For CA type, select Root CA and click Next.
On the Private key window, select Create a new private key. Click Next.
For Cryptography, leave the settings to default and click Next.
That’s your CA name and distinguished name suffix. Click Next.
You can change the validity period of the cert to more than 5 years. I will leave it to default and click Next.
On the Certificate database window, you can specify the certificate database location and certificate database log location. I will leave this to default. Click Next.
Verify the settings on Confirmation page and click Configure.
The certificate authority configuration succeeded. Click Close.
Finally close the Add Roles and Features wizard.


how do you renew the existing offline root CA certificate and give it a new end year of say 20 years for the lab?
excellent