Check Computer Uptime in Windows 10
There are several ways to check your Windows 10 computer uptime and I will be listing all of them in this post. A system uptime is a value that represents the percentage of time a device is successfully operational. In other words a computer uptime tells you how long your PC has been up and running.
While troubleshooting Windows 10 issues, you may want to know if a reboot was done recently or essentially how long your machine has been up and running. Therefore finding the system uptime can be useful in such scenarios.
In Windows 10 it is not difficult to find the system uptime. There are multiple ways to find the computer uptime and pick the one that is easy for you.
Table of Contents
Method 1 – Check Windows 10 Computer Uptime using Command Prompt
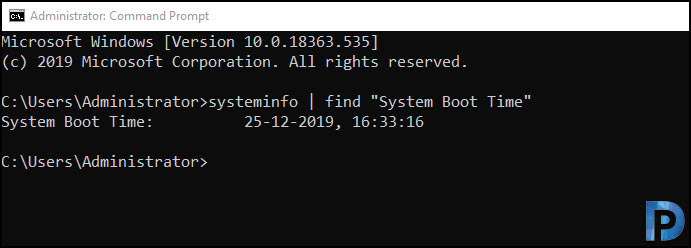
Checking the PC uptime using command prompt – systeminfo is easy.
- Log in to your Windows 10 computer.
- Run the command prompt as administrator.
- Type the below command and press Enter key.
- The output shows the system boot time.
systeminfo | find "System Boot Time"Method 2 – Check Windows 10 Computer Uptime using PowerShell
If you are a PowerShell lover, you can check your device uptime using PowerShell using below steps.
- On your Windows 10 computer, right click Start > click Windows PowerShell (Admin).
- Type the following command to query the device up-time and press Enter.
(get-date) – (gcim Win32_OperatingSystem).LastBootUpTimeMethod 3 – Check Windows 10 System Uptime using Task Manager
In addition to using a command prompt or PowerShell, you can quickly find a computer up time using Task Manager.
On your Windows 10 computer, press Ctrl + Shift + Esc keys to start Task Manager. Go to the Performance tab > CPU. You can see system up time at the bottom.
Method 4 – Check Windows 10 System Uptime using Network Settings
To check the system up time using Network Settings :-
- On Window 10 computer, right-click Start > Run.
- Type ncpa.cpl and press Enter. This opens the network connections window.
- Right-click the Ethernet network adapter and click Status.
- In the Ethernet Network Adapter Status window, check the duration to know the computer uptime.
Method 5 – Find Windows 10 Computer uptime using WMIC
To check your computer uptime using WMIC, follow the below steps.
- On your Windows 10 computer, right-click Start > Command Prompt (Admin).
- Type the below command to query the device’s last boot time. Press Enter.
wmic path Win32_OperatingSystem get LastBootUpTime


Hi sir,
Is there anyway to check network card uptime in windows server core
How can we see the uptime or lastboot in SCCM?
Your PowerShell method is, for all intents and purposes, the same as the WMIC method. You’re just using a cmdlet to access the same data source (WMI).
Also, your NIC connection uptime method is not without caveats. If you’ve been tinkering with your connections, taking them offline/online, the figure you’ll get back won’t be a representative measure of the *system* uptime.