Best Guide to Deploy Windows 10 21H1 using ConfigMgr
This detailed post covers the steps to deploy Windows 10 21H1 using ConfigMgr (SCCM). We will use the ConfigMgr task sequence to deploy Windows 10 21H1 version to Windows 10 devices.
There are different ways to update your Windows 10 to version 21H1 however when you want to deploy it to larger set of computers, ConfigMgr makes your task easier. For home users the Windows 10 21H1 update can be downloaded directly via Windows update.
I am going to deploy Windows 10 21H1 using ConfigMgr 2103. If you haven’t upgraded to version 2103 yet, refer my SCCM 2103 upgrade guide.
Table of Contents
About Windows 10 21H1 – Windows 10 May 2021 Update
Windows 10 21H1 is the latest Windows 10 release by Microsoft. It is also known as the Windows 10 May 2021 Update. This update also contains all features and fixes included in previous cumulative updates to Windows 10, version 20H2. Windows 10, version 21H1 is available for users with devices running Windows 10, versions 1903 and higher.
Windows 10 21H1 was released on 18 May 2021 and the support ends on 13 December 2022. Windows 10 21H1 is serviced for 18 months from the release date for devices running Windows 10 Enterprise or Windows 10 Education editions.
One of the best thing about Windows 10 21H1 is it now includes Latest Cumulative Updates (LCUs) and Servicing Stack Updates (SSUs) combined into a single cumulative monthly update available via Microsoft Catalog or Windows Server Update Services.
Before you deploy Windows 10 21H1
When you got new laptops arrived you don’t want to install an older version of Windows 10 and then look to upgrade to Windows 10 21H1. Rather you can deploy the new Windows 10 21H1 using ConfigMgr task sequence. But wait there is something that you need to understand here.
You should not deploy Windows 10 21H1 without proper testing. Before you deploy Windows 10 21H1 using ConfigMgr, you must test the deployment and have a proper plan for the roll out. Be it a bare metal deployment or an in-place upgrade to 21H1, a proper planning is required. Deploy it to a limited group and test all your business applications before broad deployment.
In this post I will deploy Windows 10 21H1 using ConfigMgr to my test VM’s. If you are looking to upgrade to Windows 10 21H1, check the guide on how to upgrade to Windows 10 21H1 using SCCM.
Windows ADK requirement for Windows 10 21H1
While most of you are looking to deploy Windows 10 21H1 using ConfigMgr, you might be concerned about the Windows 10 ADK version. The good news is there is no new ADK for Windows 10, version 21H1. The ADK for Windows 10, version 2004 will also work with Windows 10, version 21H1. Read the following blog post to know about Windows 10 ADK versions.
You must always use the latest version of ADK. If you have an older version of ADK installed, you can use the step-by-step guide to update Windows ADK on SCCM Server.
Prerequisites for Windows 10 21H1 Deployment using SCCM
Before you plan to deploy Windows 10 21H1 using SCCM, here are some of the prerequisites.
- You require Configuration Manager version 2103 and above.
- Latest version of ADK installed.
- Windows 10 21H1 ISO or media.
- You must have installed and configured the PXE on the distribution point.
- Add required drivers to the SCCM boot image and ensure they are distributed to all distribution points.
ConfigMgr Windows 10 21H1 Support
Before you deploy any new Windows 10 version you want to confirm if the new Windows 10 version is actually supported by ConfigMgr. When I say supported it means whether the ConfigMgr agent is compatible with Windows 10 version or not. So here is a helpful chart from Microsoft that shows ConfigMgr Windows 10 21H1 support.
If you want to deploy and manage Windows 10 21H1 using ConfigMgr, you must use ConfigMgr version 2103 and above. ConfigMgr 2103 agent is fully compatible with Windows 10 21H1.

Download Windows 10 21H1 ISO File
Before you deploy Windows 10 21H1 using ConfigMgr to new laptops or VM’s, let’s download the Windows 10 21H1 ISO file. To download Windows 10 21H1, you can either download it from Microsoft VLSC or Visual Studio.
Normally enterprise versions are deployed to new laptop in organizations. So I am going to download Windows 10 21H1 (business editions). Click the Download button and save the Windows 10 21H1 ISO file on SCCM server.
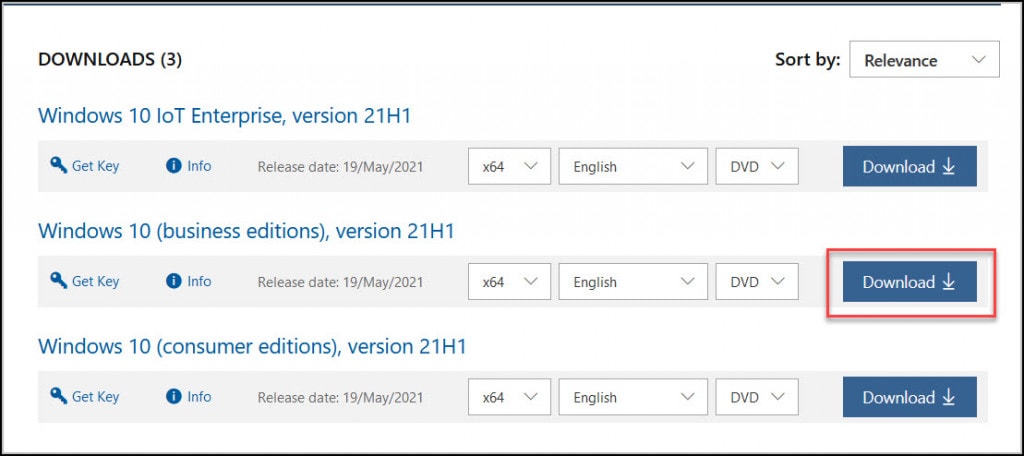
You have to extract the Windows 10 21H1 files to a folder before you could use it for deploying. You can either mount it and copy the files to a folder or use a software to extract it. I have placed the OS setup files inside a folder called W1021H1.

Import Windows 10 21H1 OS in SCCM
Use the following steps to import Windows 21H1 operating system image in SCCM.
- Launch the Configuration Manager console.
- Navigate to Software Library\Overview\Operating Systems\Operating System Images.
- Right click Operating System Images and click Add Operating System Image.

This launches Add operating system image wizard. On the Data Source window, click Browse and specify the path of Windows 10 21H1 install.wim file. Select the checkbox Extract a specific image index from the specified WIM file. Next to Image Index, select the Windows 10 edition that you want to extract. For example, I am going to extract Windows 10 21H1 enterprise edition from the WIM file.
Click Next.

On the General window, specify the name of the OS image for example Windows 10 21H1 Enterprise. Click Next.

Verify the settings on Summary page and on Completion window, click Close.

Deploy the Windows 10 21H1 Content to Distribution Points
When you import any content into SCCM, you must distribute the content to the distribution points. In the above step we imported Windows 10 21H1 image, let’s distribute the image.
In the SCCM console, go to Software Library > Overview > Operating Systems > Operating System Images. Right click Windows 10 21H1 enterprise image and click Distribute content.
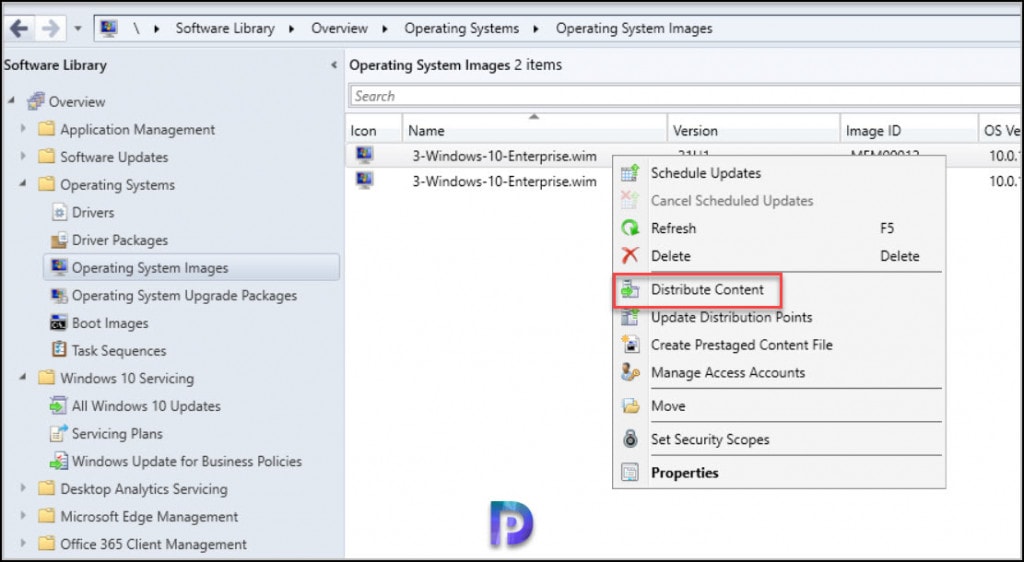
On the General window, click Next and on the Content Destination window, click Add button and select the distribution points. Click Next.

On the Completion window, click Close.

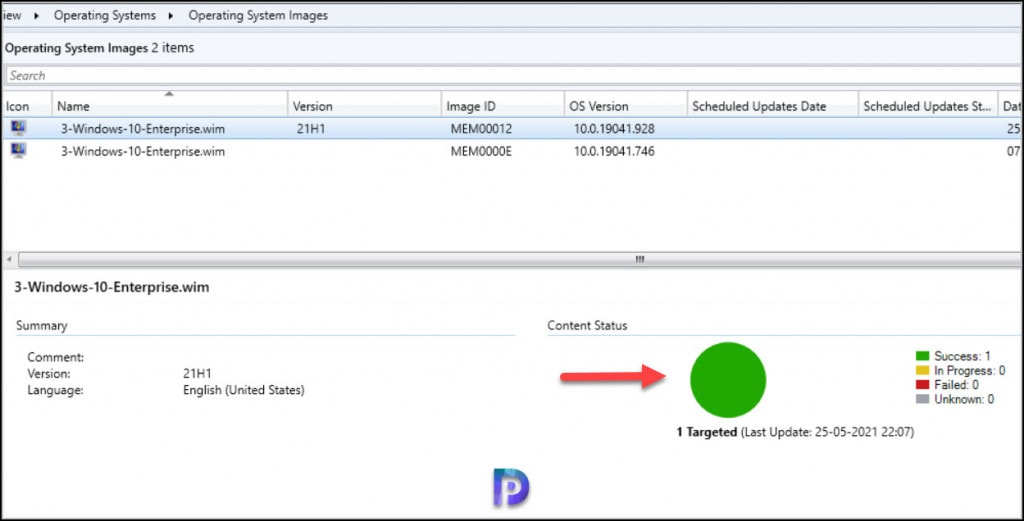
When you distribute the content to distribution points, you must ensure it is successful. Select the operating system image and look for Content Status. If it’s green, it means the content is distributed successfully.
Create ConfigMgr Task Sequence to Deploy Windows 10 21H1
In this step we will create a new ConfigMgr task sequence to deploy Windows 10 21H1.
- In the ConfigMgr console, go to Software Library\Overview\Operating Systems\Task Sequences.
- Right click Task Sequences and click Create Task Sequence.
- Select Install an existing image package. Click Next.

Specify the task sequence name like Deploy Windows 10 21H1 and you may also provide task sequence description. Click Browse and select a 64-bit boot image. Click Next.

In this step you specify the Windows 10 21H1 image package, product key. In addition, you may specify a local administrator password instead of randomly generated one. Click Next.

On the Configure Network window, select Join a domain. Click Browse and specify the destination OU. Next, select an account that permissions to join the machine to the domain. Click Next.

You may specify additional client installation properties. Click Next.

Uncheck all the options as we are not going to use state migration. Click Next.

I will not be including any software updates here as we can manage and deploy the updates using ADR’s. So select Do not install any software updates and click Next.

On the Install Applications window, if you wish to add applications to the deployment you can click the yellow star icon and select the Applications. Otherwise you can just skip it and later deploy the applications. Click Next.

Finally on the Completion window, click Close. Our task sequence in ready and in the next step we will deploy Windows 10 21H1 using ConfigMgr.

Add drivers for Windows 10 21H1 in Task Sequence
Along with Windows 10 21H1 deployment, deploying the drivers is also important. Otherwise you will have just the Windows 10 21H1 and no drivers installed. There are multiple ways to deploy drivers and manage driver updates. Each organization has their own way to deploy drivers and driver updates.
If I have to recommend a commonly used method to deploy drivers, that is via the task sequence again. You must first import the drivers into SCCM and then edit the task sequence and add Drivers > Apply Driver Package step. You can use the WMI to detect the laptop model and apply the right drivers.
After adding the drivers, you may add more steps to task sequence and customize it based on your requirements. Once the task sequence is ready, go to the next step.
Deploy Windows 10 21H1 using ConfigMgr
Follow the below steps to deploy Windows 10 21H1 using ConfigMgr task sequence.
- Launch the ConfigMgr console.
- Go to Software Library\Overview\Operating Systems\Task Sequences.
- Right click deploy Windows 10 21H1 task sequence and click Deploy.

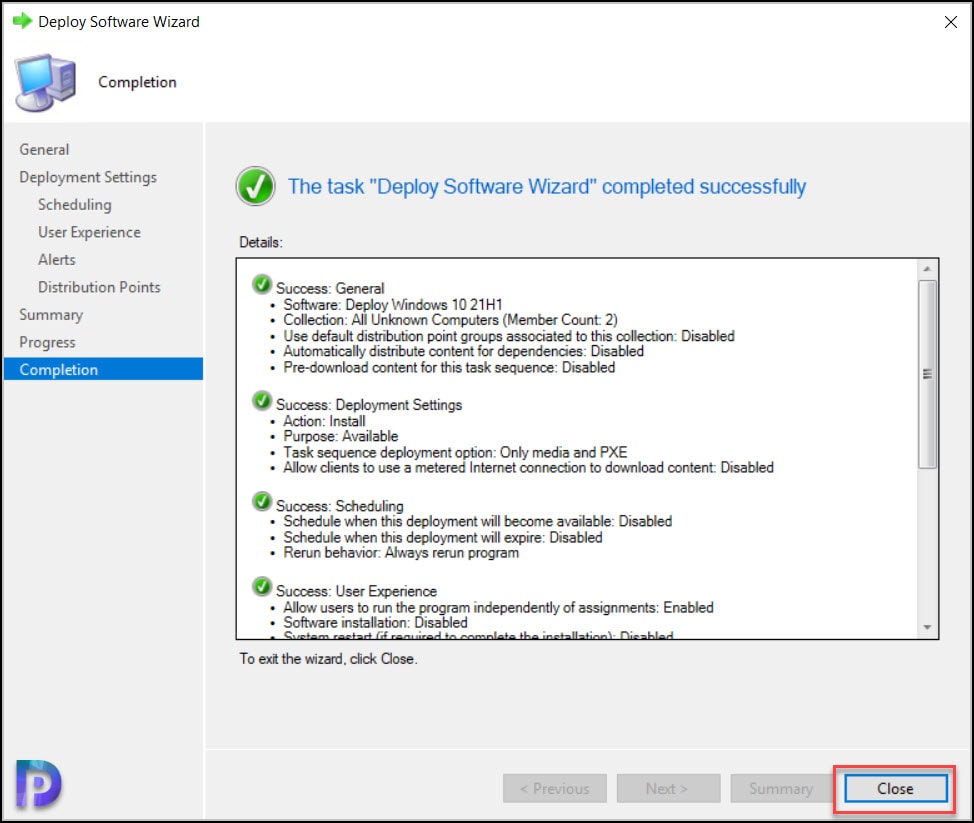
On the General page, specify the target collection to which you want to deploy Windows 10 21H1 task sequence. Click Next.

Select the purpose as Available and make the deployment available to only media and PXE. Click Next.

If you wish to schedule the deployment, you may do it here. Otherwise click Next.

Specify the user experience settings for the deployment. Click Next.

On the Alerts window, I won’t configure anything. Click Next.
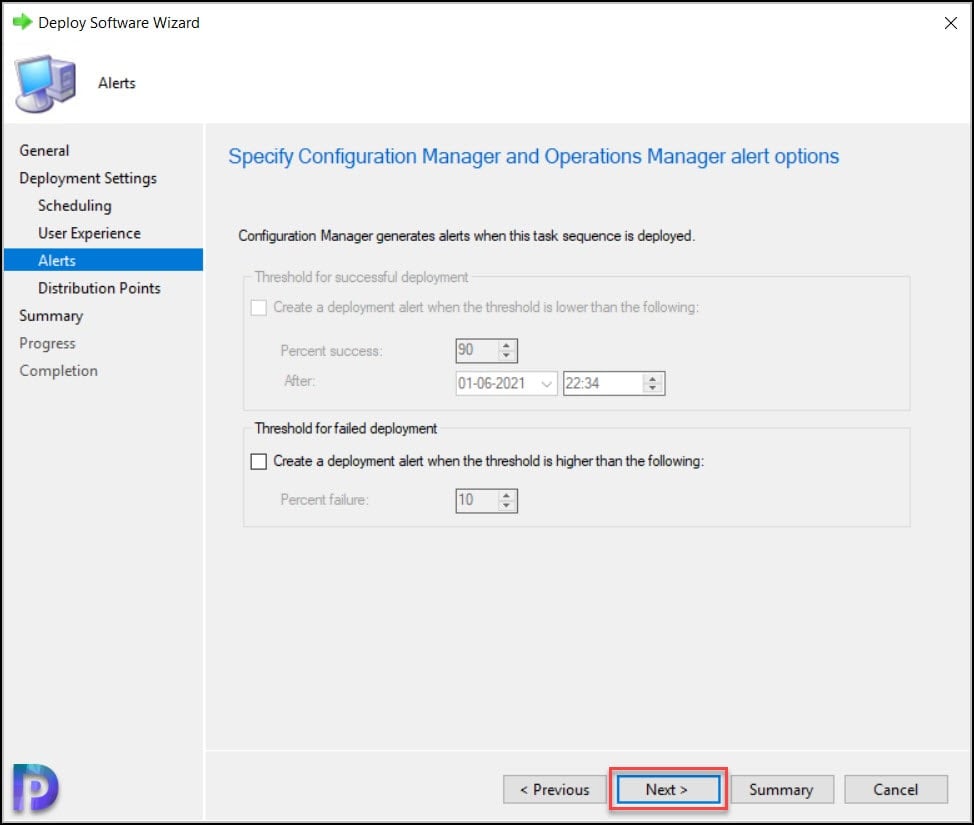
Click Next.

Close the deploy software wizard.
Test Windows 10 21H1 Deployment
In the above step we deployed the Windows 10 21H1 ConfigMgr task sequence to device collection. Now you can either connect a laptop to the network or create a new VM to test Windows 10 21H1 deployment.
In my lab I am going to create a new Virtual Machine with no OS installed. I will use the same VM to install Windows 10 21H1. I have enabled ConfigMgr PXE responder service and the boot images are distributed to DP’s. Power on the VM and press F12 for network boot.
The VM downloads the boot image from the distribution point.

I haven’t set a password for the task sequence. In case you have set the password, enter it and click Next.

Select the deploy Windows 10 21H1 task sequence and click Next.

The Windows 10 21H1 OS deployment is in progress. You don’t have to do anything here.

The task sequence completed successfully. Let’s check the Windows 10 version now. Login to the computer and click Start > type about your PC. Under Windows specifications, we see the edition as Windows 10 enterprise and version as 21H1. We have successfully deployed Windows 10 21H1 using ConfigMgr.

If you have any question, feel free to add them in the comments section below. I hope this post helps you with Windows 10 21H1 deployment.
ConfigMgr Windows 10 21H1 Deployment FAQ’s
Some of the common FAQ’s related to ConfigMgr Windows 10 21H1 deployment.
What ADK Version is required to deploy Windows 10 21H1 with ConfigMgr?
The ADK for Windows 10, version 2004 is required to deploy Windows 10, version 21H1.
What ConfigMgr version should I use to deploy Windows 10 21H1?
If you want to deploy and manage Windows 10 21H1 using ConfigMgr, you must use ConfigMgr version 2103 and above.
What is the Windows 10 21H1 Release Date?
Windows 10 21H1 was released on 18 May 2021.
When does Windows 10 21H1 Support Ends?
The Windows 10 21H1 support ends on 13 December 2022.
What is the Build Number of Windows 10 21H1?
The build number of Windows 10 21H1 is 19043.928.
