2 Ways to Deploy VMware Tools using SCCM | ConfigMgr
In this post, I will show you how to deploy VMware tools using SCCM or ConfigMgr. There are two ways to deploy VMware tools with ConfigMgr: by creating an application or a package. I will cover both these methods in this guide.
After you image a Virtual Machine, before you start using it, you install the VMware tools. Typically, when you install VMware tools on a VM, a reboot is required. Most organizations prefer VMware tools silent install without reboot. There are alternate methods to install the VMware tools on a guest machine.
Apart from ConfigMgr, there are alternate ways to install the VMware tools on your VMs. You could either install VMware Tools manually or automatically initiate the installation via the Server. For mass installation of VMware tools, you can prefer tools such as Configuration Manager, Intune etc.
VMware Tools is a suite of utilities that enhances the performance of the virtual machines guest operating system. It also improves management of the virtual machine. Without VMware Tools installed in your guest operating system, guest performance lacks important functionality. Hence, it always recommended that you install the latest version of VMware tools on newly created virtual machines.
Download VMware Tools Installation Package
To package the VMware tools as an application or package in SCCM, you will require the VMware Tools installation package. Download the latest version of VMware Tools directly from the VMware site. To download any product from the VMware site, you will need an account. If you already have one, sign-in or you create a new account.
VMware has got several products, so browse to the download site and ensure you select the VMware Tools version (32-bit/64-bit) that you require and then select Download. Since I have got all VM’s running 64-bit OS, I have downloaded the 64-bit Tools package.
Extract the contents of the CD image to a local folder
You must extract the contents of the CD image to a local folder. To accomplish that, extract the downloaded VMware Tools installation files to a location where SCCM can access. You can also download an icon for VMware tools and save it in the same folder.
Deploy VMware Tools using SCCM as Package
Create a VMware Tools package in SCCM using the following steps:
- Launch the Configuration Manager console.
- Go to Software Library\Overview\Application Management\Packages.
- Right click Packages and click Create Package for VMware Tools.
Specify the Package name as VMware Tools. Next, select This package contains source files and click Browse. Specify the path of VMware Tools application. Click Next.
Select the Program Type as Standard Program. Click Next.
Commands for Silent Installation of VMware Tools
Specify the command line, which is the VMware Tools install command.
VMware-tools-11.2.0-16938113-x86_64.exe /s /v/qn
Note that I have tried /norestart command, but that doesn’t work. The computer will still restart even with /norestart switch.
According to one of the comments received, the below command can be used for silent installation of VMware tools without needing the computer reboot.
VMware-tools-xx.x.x-xxxxxxxx-x86_64.exe /s /v /qn REBOOT=ReallySuppress
According to VMware, the uninstallation command listed below should work.
"MsiExec.exe /I{766355C9-1851-4890-9C1F-9F043A43AFCE}"
Click Next.
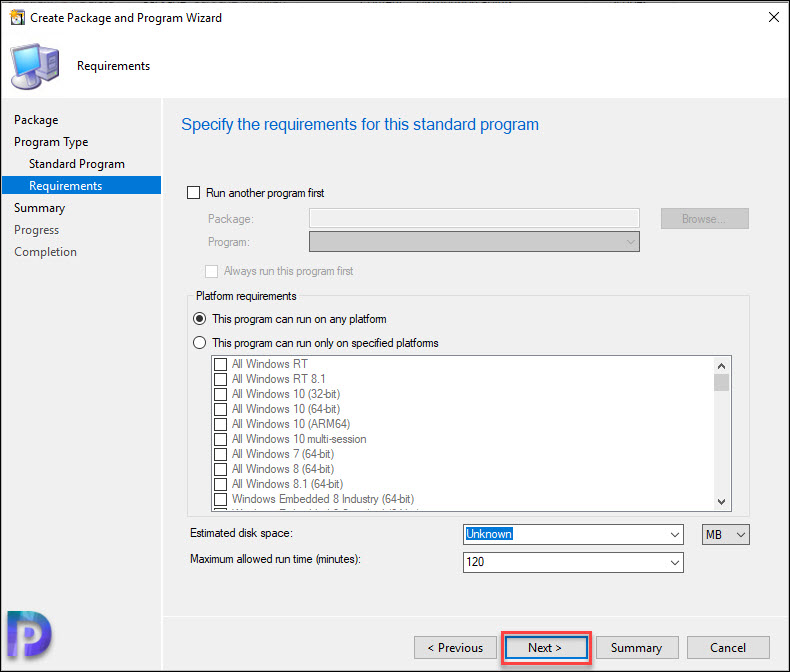
On the Requirements page, click Next.
On the Completion window, click Close.
We have successfully created VMware Tools package in SCCM. Next, distribute the package to the distribution points. Deploy the VMware Tools package to the device collection. You may first deploy it to a test collection.
Login to one of the client computers. Launch the Software Center and click Install VMware Tools. Although your computer restarts, the VMware Tools package installs without any issues.
Create VMWare Tools Application in SCCM Console
Use the following steps to create a VMware tools application in the SCCM console:
- Launch the Configuration Manager console.
- Go to Software Library\Overview\Application Management\Applications.
- Right-click Applications and select Create Application for VMware Tools.
- On the General window, click Manually specify the application Information.
Click Next.
Specify the Application Name as VMware Tools. You can specify additional details such as Publisher info, owners, administrative categories etc. Once you have specified the application details, click Next.
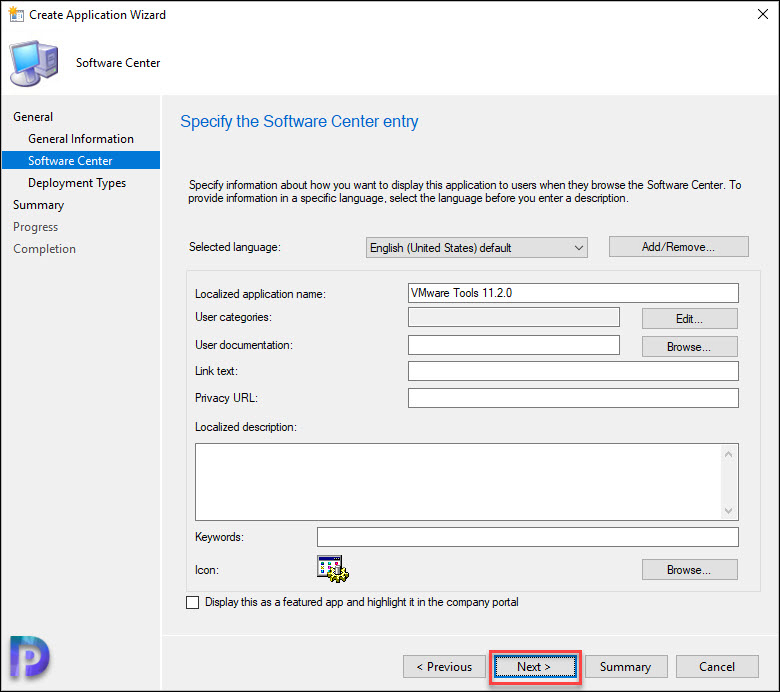
On the Software Center page, you specify the icon or logo for VMware Tools. The logo will appear along with the application in the Software Center for users. Click Browse and select an icon for VMware Tools and click Next.
On the Deployment Types page, click the Add button to add a new deployment type for VMware Tools application. At this point, you can read this useful guide on Supported Deployment Types for Applications in SCCM. Click Next to continue.
On the General window of Create deployment type wizard, select Manually specify the deployment type information. Specify deployment type as Script installer. Select Manually specify the deployment type information. Click Next.
On the content window, specify information about the content to be delivered to target devices.
- Content Location: Specify the content location, which is the actual folder path where you have saved the VMware tools installation package.
- Installation Program: To silently install VMWare Tools, click Browse and specify the command: VMware-tools-11.2.0-16938113-x86_64.exe /s /v/qn
- Uninstall Program: Leave it empty, this field is optional.
Click Next.
In this step, you must configure the detection methods to indicate whether the VMware tools deployment type is already installed. Use the below detection rule to detect the presence of VMware Tools.
- Setting Type: File System
- Type: File
- Path: %ProgramFiles%\VMware\VMware Tools
- File or Folder name: vmtoolsd.exe
- Property: Version
- Operator: Greater than or equal to
- Value: 11.0.6.19689 (right-click on the .exe file, click properties > details to get the file version).
After you specify the above details, click OK and continue with the create deployment wizard.
Specify the user experience settings for VMware Tools deployment. I have specified the following settings in the below example.
- Installation behavior: Install for system if resource is a device, otherwise install for user.
- Logon requirement: Whether or not a user is logged on.
- Installation program visibility: Hidden.
To continue to the next step, click Next.
Additionally, you can specify the requirements and dependencies for the application. Click Next and complete the add deployment wizard. On the Completion Window, click Close.
This completes the steps to create VMware Tools application in SCCM. In the next section, we will distribute the application to DP and deploy VMware Tools using SCCM (ConfigMgr).
Deploy VMware Tools Application using SCCM
- To deploy the VMware Tools Application in SCCM console, go to Software Library > Application Management > Application. Right-click VMware Tools app and select Deploy.
- On the General page of Deploy Software Wizard, click Browse and select a device collection to which you want to deploy the VMware Tools application. Click Next.
- On the Content page, click Add button and specify the distribution points to which you would like to distribute the application content. You may also select distribution point groups. Click Next to continue.
- On the Deployment Settings window, specify the settings to control the deployment. Select the Action as Install and Purpose as Available.
- Complete the remaining steps of the deployment software wizard and close it.
Test VMware Tools Application Installation on Client Computers
In this section, we will verify if the VMware tools deployment is successful on the client computers. Log in to a client computer, and launch the Software center. Click on the Applications tab and select VMware tools application. On the VMware Tools application details page, click Install. The application is now downloaded from the local distribution point server for installation.
After the VMware Tools installation finishes, the system will reboot. After the restart, log in to the computer and launch the Software Center. Go to Applications and select VMware Tools, and here we see the VMware tools have been successfully installed.
VMware Tools Deployment using PatchMyPC
Apart from using SCCM to deploy VMware Tools, you can use the PatchMyPC tool, which creates the VMware Tools application for you and lets you deploy VMware tools from the SCCM console. However, the Patch My PC is a licensed software, and you need to buy the license before you can create applications.
If you are new to the Patch My PC tool, you can use the following guides to get started with Patch My PC. The advantage of this tool is, along with application creation, it also updates the apps in the background.
Launch the Patch My PC tool and click ConfigMgr Apps. Under the VMware category, select VMware Tools. Run the publishing service sync and a new VMware Tools application should be created in the applications node of the SCCM console. In the next step, you can deploy VMware tools to your SCCM endpoints.


Hi Prajwal,
How can we select customize option and Install on local drive?
Thanks,
is it possible to deploy and install in the same time without connect to the client and click on install on software center…?
Use “VMware-tools-xx.x.x-xxxxxxxx-x86_64.exe /s /v /qn REBOOT=ReallySuppress” while specifying the command to quietly install without reboot. A patch reboot can follow after this installation to finish the update.
Thanks Prajwal, it is excellent.
I have one question, I deployed it to a physical server (not excluded) and the deployment remains “In Progress” for more 24 hours now… with a message “No Aadditional information” …
Anyway to exclude the physical server in case one is in the collection? anyway to stop the deployment on physical servers? anyway yo stop the “In progress” deployment?
Thanks,
DOm
Reboot suppression only works on clean install.
On upgrade it will reboot.
Thank you for this!! its the first silent install i’ve seen work. Do you know if this does a full install or a “typical” install?? or ways to modify the command to perform the preferred install
I guess it does a typical install.
Think it’s /qn REBOOT=R