How to Create a Windows 11 Bootable USB Drive
This article covers two ways to create a Windows 11 bootable USB drive from Windows 11 ISO file. We will look at multiple ways to create a bootable USB drive for Windows 11.
If you want to install Windows 11, a bootable USB drive is the best option. You can easily create one with a flash drive, a free download from Microsoft, and a Windows PC.
After creating a Windows 11 bootable USB drive, you can connect it to a laptop/desktop, boot your computer from the USB drive and install Windows 11.
And if you would like to upgrade Windows 10 to Windows 11, there are multiple ways to do that. Refer to this useful article on how to upgrade to Windows 11 using multiple methods.
If you own a laptop that came preinstalled with Windows 10, by now you should have got an option to upgrade to Windows 11. Note that if your Windows 10 PC is eligible for Windows 11 upgrade, you will automatically get it via Settings > Windows Updates > Check for Updates option.
You may choose to upgrade to Windows 11 via Windows Updates or prefer to stay on Windows 10, and it’s completely your choice. If you have already upgraded to Windows 11 and you aren’t liking it, you can uninstall Windows 11 and Roll Back to Windows 10.
Before you Create a Windows 11 Bootable USB Stick
Before you create a Windows 11 Bootable USB drive, you must be aware of the following prerequisites.
- Check whether your device hardware is compatible with Windows 11 or not. Windows 11 can only run on 64-bit CPUs. To install or upgrade to Windows 11, devices must meet the minimum hardware requirements.
- To make it easier, run the Windows 11 PC Health Check and this should tell you if the device is eligible for Windows 11.
- A valid Windows 11 license is required to complete the Windows 11 bootable install process. Read Windows 11 activation methods that covers different ways to activate your Windows 11 PC.
- You need a USB flash drive with at least 8 GB of storage space to create a bootable USB.
- You’ll need to choose the same language when you install Windows 11. To see what language you’re currently using, go to Time & language in PC settings or Region in Control Panel.
Create Windows 11 Installation Media using Media Creation Tool
Let’s see how to create Windows 11 Installation Media using media creation tool. If you want to perform a reinstall or clean install of Windows 11 on a new or used PC, use this option to download Windows 11 and make a bootable USB or DVD.
Visit the Windows 11 software download link and look for Create Windows 11 Installation Media section. Click Download Now.
This downloads the Microsoft Media Creation Tool for Windows 11 MediaCreationToolW11.exe. Save this file on your computer and run this file if it doesn’t launch automatically.

Accept the Media Creation Tool license agreement. Click Accept.

Select the Windows 11 language and Windows 11 edition to install. Click Next.

On the next screen, you must select the media type. There are two options available:
- USB Flash Drive – Choose this option to make a bootable USB drive for installing Windows 11.
- ISO File – If you want to Windows 11 using DVD, choose this option.
Let’s select USB Flash Drive option here. Click Next.

If you have multiple USB flash drives connected to your computer, they all should be listed here. Select the USB flash drive and click Next.
Note: If you select USB flash drive, all the data in the USB drive gets deleted or erased during the media creation process. Back up the files present on your USB drive and then select the USB drive.

The media creation tool downloads the latest Windows 11 files and prepares for bootable media. At this point ensure you have a consistent internet connection.

Finally, the USB flash drive is ready, and you can use this bootable USB media to install Windows 11 on your computer.

If you browse the bootable USB drive, you see the Windows 11 setup files that are required to install Windows 11. This is how you create a Windows 11 bootable USB drive using Media creation tool.

To install Windows 11, connect the USB drive to your PC and configure your computer to boot from the USB drive. You should see the Windows 11 setup.
Create Windows 11 USB Boot Media using Tools
There are numerous tools available online that can burn Windows 11 ISO file to a USB flash drive. In this example, I will be using an old tool – Windows 7 USB/DVD download tool.
Although this tool was released for Windows 7, it worked on Windows 8.1, Windows 10 too.
The Windows USB/DVD Download tool allows you to create a copy of your Windows 11 ISO file on a USB flash drive or a DVD. It also creates a boot media to install Windows 11.
Before you install this tool, install the .NET Framework 2.0 first. That’s because this tool requires .NET Framework 2.0 to work.
The steps to install Windows USB/DVD Download tool are simple. Assuming you have installed the tool, run the setup and on the welcome screen click Next.
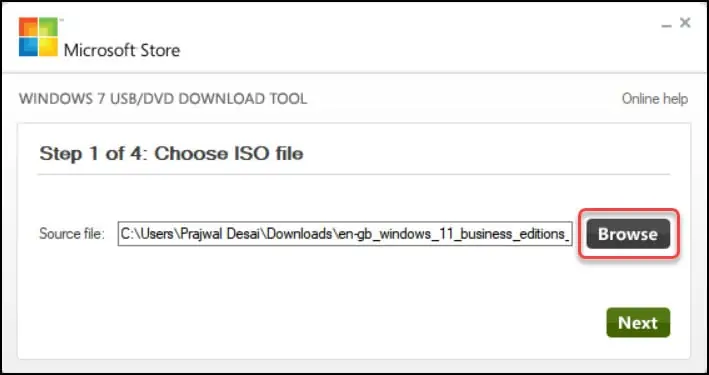
Connect the USB flash drive to drive your computer. In the first step, you must choose the ISO file. Click Browse button and select the Windows 11 ISO file. Click Next.

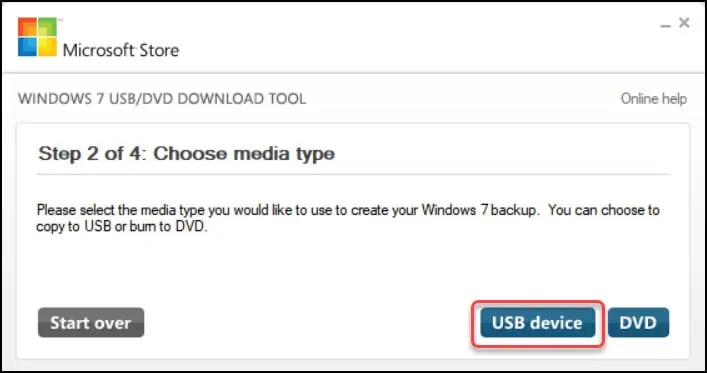
In this step, you must choose a media type which is a USB device or DVD. Click USB Device.

Select the USB device and click Begin Copying. The Windows 11 installation media is now being created.

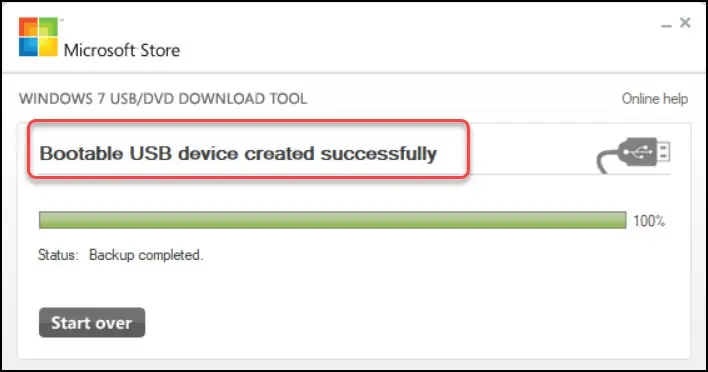
The Windows 11 boot USB device is created successfully. Close the Windows USB DVD download tool. Eject the USB drive and connect to your PC to install or upgrade to Windows 11.

